Introduction to Motion Graphics and Animation

Introduction to Motion Graphics and Animation

Name of Project:  Introduction to Animation

OVERVIEW OF PROJECT

The objective of the project is to make a 20-30 second animation using the student names or initials.  By using pre-production and animation techniques students can try to make a short story or a motion graphic to share or add to a demo reel. 

“BIG IDEAS”/ ESSENTIAL QUESTION(S)

What are the components to making an animation?

What different types of animation are there?

-How can the principles of animation be applied to each of them.

STUDENT OUTCOME OBJECTIVES 

Students will:

  1. Understand basic editing in Photoshop

    1. Key Frames

    2. Onion Skin

    3. Video Layer 

    4. Export video

2. Understand the 12 Principles of animation 

3. Understand Navigating Photoshop

PRIOR KNOWLEDGE

Students will need to have a basic understanding on how to operate Photoshop.

VISUAL ARTS CONTENT OR STANDARDS

2.9.5.9.1

2.9.3.6.1
2.9.2.3.1

CURRICULAR LINK / STANDARDS (if in a classroom only)

2.9.5.10.1

5.9.2.2.2

5.9.2.3.1

EXAMPLES OF ARTWORK

https://www.youtube.com/watch?v=EGOIB15vR8E&t=1s

https://www.youtube.com/watch?v=PVUCnmnHI8s

https://www.youtube.com/watch?v=5T_8y_uNTDg

ADDITIONAL RESOURCES

The 12 Principle of Animation

https://www.youtube.com/watch?v=f0cZfw3XrG8

How to Animate layer Mask in Photoshop

https://www.youtube.com/watch?v=OdMDySEPzUo

How to Make a Simple Video Animation

https://youtu.be/VXdHzVIvVWQ

Basic Frame By Frame animation

https://youtu.be/IO1yDUJl8qw

ASSESSMENT

During critique, students will be asked about their processes, feelings, and overall thoughts about the outcome of their projects.

MATERIALS

Computer

Photoshop

Digital Drawing Tablet (optional)

LEARNING ACTIVITIES AND TIMING

  1. Monday: Introduction

    1. Introduce project

      1. Project is about making a 10- 30 second animation using the students name or character, using keyframes, timeline, and onion skinning in Photoshop.

    2. Set expectations for the assignment

      1. Make a Short story, Into, Typography music video

    3. Give example of the project

  1. https://www.youtube.com/watch?v=EGOIB15vR8E&t=1s

  2. https://www.youtube.com/watch?v=PVUCnmnHI8s

  3. https://www.youtube.com/watch?v=5T_8y_uNTDg

Students can look at these as an example of what they can do for the project. 

  1. Give examples of different animations and methods

Power point presentations of:
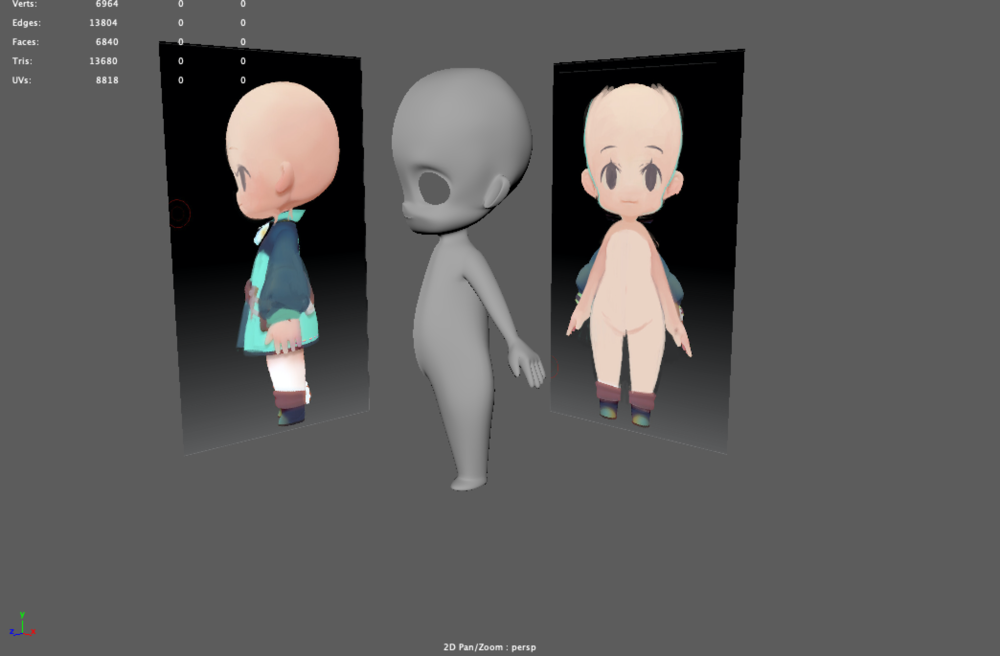
2D

3D

Stop Motion 

Motion Graphics

  1. Demo Name Project

    1. Create new document

    2. Select Film & Video Tab > Select 1920x1080 

      1. Standard TV Resolution

    3. Open Timeline: Window > Timeline

      1. Explain the Difference between 

    4. Select Video TimeLine

      1. Explain how to adjust Video line length

      2. Show how to adjust frame rates ( 24 frames per second) 

        1. Just in case anyone wants to hand draw on top of motion graphic.

      3. Set animation at 30 seconds 

    5. Add Animation Components

    6. Show Edit Tools

      1. Transform -Scale, Rotate, Move

      2. Opacity - Transparency

      3. Style 

      4. Text Wrap- Works along with text layer 

        1. ( T ) To Adjust

    7. Explain How Keyframes work 

      1. Close together = Fast

      2. Far apart = Slow

  1. Show class how I would personally make my animation. 

  2. Have Class brainstorm and create thumbnails

  1. Tuesday: Frame by Frame Animation

    1. Introduced the 12 Principles of Animation 

      1. Squash and Stretch

      2. Anticipation

      3. Staging 

      4. Straight Ahead and Pose to Pose

      5. Overlap and Follow through

      6. Slow in and Slow out

      7. Arcs

      8. Secondary action 

      9. Timing

      10. Exaggeration 

      11. Solid Drawing

      12. Appeal

https://www.creativebloq.com/advice/understand-the-12-principles-of-animation 

  1. How to Set Up Frame by Frame Animation

    1. Create new document

    2. Select Film & Video Tab > Select 1920x 1080

    3. Open Timeline: Window > Timeline

    4. Select Video Timeline

      1. Change frame rate to 24 Frames per second

    5. On first Layer:  Name it (Background)

    6. On background Layer Select the Film Icon > New Video group

      1. This is where to add frames for animation

      2. Make sure to name the layers

(since plugin is not available- Manual Frame set up is required.)

  1. Make new video group > And Layer > adjust layer length (2fps)> Move under BG Layer

    1. Copy: command +c

    2. Paste: command +v

    3. Paste in place: command +shift +v

  1. Things to think about when animating

    1. Onion Skin

      1. At the top right corner of the timeline select ladder icon > Enable onion skins. 

    2. Organization Folder

      1. If the timeline it cluttered- Put video Layer in folder

  1. Wednesday: Troubleshoot Day – No Class

  1. Thursday: Demo on Frequently asked Questions and How to Save animation project

When saving animation:

  1. On the timeline: at the top right corner of the timeline select the ladder icon> Render video

    1. Name project

    2. set destination ( Desktop)

    3. Do not change settings

    4. click render

  1. Friday: Turn In Rough Draft- No Class

TEACHING ARTIST REFLECTION

What problems are anticipated with this lesson?

Will the student be engaged?

Will they attend trouble shooting day for questions?

Will they be intimidated by the assignment?

How does this project fit into overall curriculum planning for the subject areas?

Students will gain familiarity with computer programs and editing tools.

Understand basic animation concepts.

Be able to expand in vocabulary in Media Arts

Create original animations

Be able to participate and grow through critique

How will your students’ work be shared with the community?

It will be shared to the student body and in student group critique

How will you receive feedback on your teaching methodology and quality of student work?

Student Critique Survey, and observation feedback from Aki and John

Photography Composition at Home

Photography Composition at Home

Photography Composition at Home!

Grade Level or Age of Participant: K-5

 School, Teacher and Classroom: Kenwood, Jacquelyn Williams, 2nd Grade

 MCAD Teaching Artist: Cassidy Walker

 Number of Students:  25

VISUAL ARTS CONTENT OR STANDARDS

5.3.2.3.1 : Create visual representations of places or systems that are part of everyday life using artistic foundations.

CURRICULAR LINK / STANDARDS

Language Arts, Writing 2

Communicate knowledge and ideas through a variety of presentation styles (such as verbal, visual, written, or digital) appropriate to task, purpose, audience, and discipline.


OVERVIEW OF PROJECT

Students are presented with foundations of photo composition including camera distance and framing tools. Using these foundations as guides, students are then asked to take photographs around their own homes with a phone or tablet. Students then select five of their images to title with an emotion or feeling.

“BIG IDEAS”/ ESSENTIAL QUESTION(S)

What does it mean to capture or “freeze” a part of your life in a photograph?

STUDENT OUTCOME OBJECTIVES

Students will:

1. Understand the foundations of photo composition including camera distance and framing tools.

2. Apply photographic foundations to their own photographs.

3. Create digital photographs of their surroundings and daily life at home.

PRIOR KNOWLEDGE

Experience taking photographs with a mobile phone or tablet. 

ADDITIONAL RESOURCES

Click! Photo Curriculum (pg. 18-35) from MN Perpich Professional Development Center


ASSESSMENT

Students upload their five images to a file-sharing platform (such as Seesaw or Google Folders) with titles

MATERIALS

Mobile phone or tablet with a camera

 LEARNING ACTIVITIES AND TIMING

1. Introduction by classroom teacher

2. Review teaching artist photos

·       Camera distance (close, mid, wide).

·       Composition (rule of thirds)

3. Demonstrate/My Own Examples around my home

4. Ask students to take ten photos using the following prompts

·       A special space in your home

·       Favorite objects

·       People you live with (if they are willing)

5. Review photos and choose 5 and title with an emotion or feeling.

6. Upload to the shared folders. 

TEACHING ARTIST REFLECTION

A possible issue is the student’s access to a camera, tablet, or cell phone with a camera.

If students are using different technology, viewfinders may look different.

Exploring Drawing: Looking at current practicing Native Artists from the Midwest

Exploring Drawing: Looking at current practicing Native Artists from the Midwest

Exploring Drawing: Looking at current practicing Native Artists from the Midwest

Grade Level or Age of Participant: Age 14 and up

School, Teacher and Classroom: Native Youth Arts Collective of Little Earth Community: Drawing 101

MCAD Teaching Artist:  Josephine Hoffman

Number of Students: 4-8


VISUAL ARTS CONTENT OR STANDARDS

Identifying formal drawing aspects in our own work and work of others


CURRICULAR LINK

Art, art history


OVERVIEW OF PROJECT

A slideshow of a variety Native artists from the upper Midwest region currently practicing drawing and painting techniques in their work. This will be a discussion based presentation with the students that accompanies the class’s ongoing conversation of ‘decolonizing the drawing class’.


“BIG IDEAS”/ ESSENTIAL QUESTION(S)

How does exploring current practicing Native artists from our region ( Upper Midwest) fit into the conversation of decolonization?

How does this conversation fit into the ongoing discussion around decolonization and the context in Fine Arts?


STUDENT OUTCOME OBJECTIVES

Students will:

1. Build identification skills of formal drawing elements

2. Explore content

3. Build conversational skills in a fine arts and/or decolonized fine arts context

4. Deepening group bonding and confidence


PRIOR KNOWLEDGE

By this time, the majority of the students have worked through negative space, sighting and organizational line, line variation, contour (blind and semi-blind), gesture, compositional considerations, perspective


EXAMPLES OF ARTWORK

Drawings and paintings from Andrea Carlson, Star Wallowingbull, Jim Denomie, Dyani Whitehalk, Frank Big Bear and Julie Buffalohead


ADDITIONAL RESOURCES

Forcast/Forward conversation series: Decolonizing Public Art, Part 1

https://www.youtube.com/watch?v=ZOOBiizmYk0&feature=emb_title


Decolonizing Art by Vy Vu

http://www.theinterfaithobserver.org/journal-articles/2019/3/12/decolonizing-art


Decolonial Strategies For The Art History Classroom: A zine for sharing exercises and resources assembled by Amber Hickey and Ana Tuazon

http://arthistoryteachingresources.org/wp-content/uploads/2019/05/Decolonial-Strategies-for-the-Art-History-Classroom-Zine.pdf


ASSESSMENT

Students’ success can be seen through engaged conversation and/or expression in their future drawings and conversations


MATERIALS

Projector/presentation screen


LEARNING ACTIVITIES AND TIMING

1. 6 images, about 3-7 minutes each, discussing about the artists, formal drawing qualities, content

2. 10-20 minutes furthering discussion where participants will describe what they notice, connect with how it makes them feel, consider what it reminds them of and and address the work through their own experience as drawers and painters.


Circle Fold Books

Circle Fold Books

Circle Fold Books

Grade Level or Age of Participant: age 5 - 95 (basically all ages)

Organization: Minnesota Center for Book Arts, “Fold-Along Friday” weekly virtual book arts lesson

MCAD Teaching Artist:  Jamie Kubat

Number of Students: open (video demo, free for everyone)


OVERVIEW OF PROJECT

This project is a pre-recorded video that demonstrates how to make a folded circle book. This is a simple but elegant structure that can be used as a book with content or as a sculptural object. The demo is for MCBA’s Fold-Along Friday lineup, a virtual lesson format provided to their Facebook and Instagram audiences in response to the COVID-19 epidemic.


“BIG IDEAS”/ ESSENTIAL QUESTION(S)

This lesson provides a way for people to engage with MCBA through this time of social isolation. It is designed to support viewers/participants by giving them a thought provoking and enjoyable process to inspire them to create something new. 

Additionally, the project supports an organization that gives so much to the larger arts community through their programming and access to studio space. This lesson fills a gap left by social distancing and our current inability to teach face-to-face. 


STUDENT OUTCOME OBJECTIVES

Students will:

1. Construct a blank book

2. Develop content for the book if they desire

3. Adapt the lesson to their own needs or creative pursuits through experimentation

(The lesson provides a concrete way to accomplish the first step but the other two will be up to the viewer to pursue. Examples and verbal encouragement are provided for taking the content further).


PRIOR KNOWLEDGE

Basic knowledge of how to use a scissors to cut with and pencil to draw with is helpful. The rest of the steps are explained, such as folding paper, gluing, etc.


LESSON PREPARATION TIMELINE

By 4/16: submit lesson plan draft

By 4/19: create exemplars and set up space in my apartment for video. Experiment with video shots and photograph exemplars. Share demo ideas/footage with TA Development group.

By 4/25: Write script. Video draft edit and rework lesson plan. 

By 5/1: Submit video lesson to Shelby and Madeline for upload on Friday 5/15.


EXAMPLES OF ARTWORK

I made several exemplars, which are included in a gallery below.


ADDITIONAL RESOURCES

Link to MCBA’s free Fold-Along workshops here.

The Art of The Fold, by Hedi Kyle and Ulla Warchol. 

Making Handmade Books: 100+ Bindings, Structures & Forms, by Alisa J. Golden. 


ASSESSMENT

I asked people to tag their work on social media so I could see what they make, and I received some feedback through both social media and email responses. 


MATERIALS

Paper, enough for 8 circles in any size (suggested diameter of each circle is 4.5”)

Pencil

Compass or a bowl/other circular object to trace around

Bone folder, popsicle stick, ruler (or thumbnail) for folding

Glue stick, PVA glue, or other type of glue 

Other paper and drawing materials for collage/content/etc. (magazines, handmade paper, old prints, dried flowers, watercolors, etc.).

Optional heavier paper for covers (will provide size recommended for cover based on size of pages, or a way to find that size)

VIDEO DEMO  

LEARNING ACTIVITIES AND TIMING

1. Intro and talk about MCBA a bit and my role at MCBA/in this series of lessons. (2 min)

2. Cutting paper into circles (3 min; cut and fold most circles ahead of time and just demonstrate with one or two during lesson).

3. Folding the paper (4 min)

4. Gluing the pages together and gluing on a cover (8 min)

5. Wrapping up, asking people to support MCBA (Shelby requested, it’ll probably be specific to the version of the video I send them along with any other MCBA related info) 2 min


TEACHING ARTIST REFLECTION

What problems are anticipated with this lesson?

Timing and dealing with the video creation. Performing for a recorded video while home alone proved challenging but ultimately very worth the time and effort. 

How does this project fit into overall curriculum planning for the subject areas?

It goes well with other books that MCBA shares in their youth curricula: simple, easy to adapt for a variety of content purposes, unique, and fun to make

How will your students’ work be shared with the community?

They can share it on social media or with friends/family if they want to! 


The video I recorded for this lesson can also be found here, on MCBA’s Facebook page!

Dual Abstract Self Portraits

Dual Abstract Self Portraits

Dual Abstract Self Reflections

Grade Level or Age of Participant: Adults

School, Teacher, and Classroom: Avivo Artworks with Jes Reyes

MCAD Teaching Artist:  Emily Bigus

Number of Students: N/A

Overview of Project

Take a drawing or painting surface of your choosing and divide it in half using tape. On one half of the surface, paint or draw your outer self or what others see. On the other half of the surface, portray your inner self or what you feel like inside. Focus on portraying yourself with the colors you choose rather than your portrait looking like you physically.

“Big Ideas”/ Essential Question(s)

How can color be used to represent yourself?

How do you represent your inner self differently from your outer self?

Student Outcome Objectives 

Students will:

  1. Visually portray their inner and outer selves using color to represent aspects of how they identify themselves

  2. Compare how they present themselves to others to how they see themselves

  3. Reflect on why they are choosing the colors they do 


Assessment

  • How do the two sections compare? How are they different?

  • What colors make you feel certain ways? 

  • What colors do you feel fit with certain personality traits?


Materials

Drawing/Painting Surface: i.e. Stretched Canvas, Canvas Board, Paper

Acrylic Paint

Water Cup

Palette

Brushes

Artist Tape

Paper Towel

TEACHING ARTIST DEMO

LEARNING ACTIVITES

  1. Introduction to Dual Abstract Self-Reflections

    1. Explain that this involves painting your outer and inner selves

    2. Go over materials

  2. Paint or draw on one half of the surface depicting how you allow others to see you. If using paint, allow to dry and remove the tape. 

  3. Tape the edge of the first half off and on the second half of your surface, paint or draw what you feel like on the inside. Allow to dry and remove the tape.

  4. Reflection

    1. Group Reflection

      1. Use Descriptive review protocol  ( support statements with content form the paintings)

      2. Describe what you see or notice?

      3. How does the work make you feel? Why? 

    2. Personal reflection in sketchbooks

      1. What do you notice about the work?

      2. What is similar

      3. What is different

      4. What is a surprise to you?


Teaching Artist Reflection

  • Problem wise, I am worried people will be thrown off by the word “portrait” and get too caught up in trying to make something that physically looks like them.

Quest of Quizzes: Elements of design Quiz

Quest of Quizzes: Elements of design Quiz

Name of Project: Elements of Design Quest of Quizzes

Grade Level or Age of Participant: 6th grade- 8th grade

School, Teacher and Classroom: Rachel Olmanson, St. Michaels, online class

MCAD Teaching Artist:  Molly Hoghaug


VISUAL ARTS CONTENT OR STANDARDS

5.6.4.8.1, Visual Arts, Respond, Evaluate artistic work by applying Criteria


OVERVIEW OF PROJECT

Students will download the quiz on all the elements of design in visual arts that they have learned in lessons throughout their years at school. The quizz is in the form of a game where students play through the levels and at the end screenshot their score and send it to the teacher.


“BIG IDEAS”/ ESSENTIAL QUESTION(S)

How does a game test ‘knowledge’?

How can testing be ‘fun’?


STUDENT OUTCOME OBJECTIVES

Students will:

1. Use their knowledge about the elements art and design to play a digital game

2. Have fun while taking a quiz and connect to visual art content

3. Use the quiz as a learning opportunity


PRIOR KNOWLEDGE

Knowledge of the elements of design that they have learned In their visual arts programming


ADDITIONAL RESOURCES

https://www.rpgmakerweb.com

The webpage of the program being used to make the quiz 


ASSESSMENT

The assessment will be the final screenshot of their score, this will be sent to the teacher and then the appropriate grade will be given according to the score.

What do I want to know?

MATERIALS

RPG maker program

Computer for students

Host site for game


LEARNING ACTIVITIES AND TIMING

1. Students have directions for the game provided by the instructor

2. Levels include mazes, door choices, and quests for content

3. The length of time needed for the game ranges between 10-30 minutes

4. Scores are revealed to each students as they go and collected by the instructor


TEACHING ARTIST REFLECTION

My concerns are that I will have more trouble explaining it to the teachers than to the students. Such as my mom gave it to her students at a 6th grade level and they got through it fine but I could not show the teachers the ease that the students would have getting through the game. 


The students that it was tested on had a good time, they said it was much more interactive than a pen and paper test. They said they wished it had more video game challenges and was less learning but that’s what would be expected, no kid really wants to do schoolwork. 

En Plein Painting Prep

En Plein Painting Prep

Name of Project: In place En Plein Air Prep

Grade Level or Age of Participant: College

School, Teacher and Classroom: MCTC, Laura Andrews

MCAD Teaching Artist:  Emma Konrad

OVERVIEW OF PROJECT

Students will create an en plein air painting following the instructional demo. Students will combine previous instruction of perspective, color, and observational painting to create the painting while also gaining instruction on surface and material preparation.


“BIG IDEAS”/ ESSENTIAL QUESTION(S)

How can artists interpret space? How can artists recreate a space based off of observation? How can color be used to convey space? 


STUDENT OUTCOME OBJECTIVES

Students will:

1.     Prepare materials and surface for En Plein air landscape painting

2. Make a painting outdoors.

3. Participate in critique of work and reflection on experience.


PRIOR KNOWLEDGE

Students should understand perspective, color, and the use of observation within painting. This will all inform the preparation for en plein air painting.


ASSESSMENT

Are the students able to complete the task from the instructions and the video demo?

What does the prep tell us about the outcomes?

What is the evidence of student learning?


MATERIALS

Acrylic paint

Tape

Pencil

Eraser

Variety of surfaces (cardboard, paper, denim)

Blanket

Backpack

Acrylic Brushes

Sealed Water Container

Paper Towels

Sketchbook/Book


STEP BY STEP PROCESS

  1.      Introduce the idea of an en plein air to students who have have talked about landscapes

  2.     Show the process of surface preparation including a variety of materials that might be used

  3.  Walkthrough material preparation

  4. Discuss appropriate protocols to working outside including materials needed, safety, social distancing, weather checks.

  5. Students prepare materials for painting outdoors

  6. Send students out to paint

  7. Regather online for reflection and critique during next class

PlayStation VR Pain Collaboration by Molly Hoghaug

PlayStation VR Pain Collaboration by Molly Hoghaug

Virtual Reality Line Learning

Grade Level or Age of Participant: 7th Grade

School, Teacher and Classroom: St Michaels, Art Classroom, Rachel Olmanson

MCAD Teaching Artist:  Molly Hoghaug

Number of Students: 10


VISUAL ARTS CONTENT OR STANDARDS

Students will investigate the elements of design in collaborative manor.

1.7.2.2.1 Generate and develop original artist ideas

CURRICULAR LINK / STANDARDS 

This project is about the design element of lines. 

1.7.2.2.1 Generate and develop original artist ideas

OVERVIEW OF PROJECT

Each student will have two+ minutes in a VR headset to draw a portion of a work that will be a large collaboration with the whole classroom.  The students will work in virtual reality using lines to collaborate with the other classmates to create one large piece of art work in the virtual reality program. 


“BIG IDEAS”/ ESSENTIAL QUESTION(S)

Collaboration leads to new ideas and experiences.

Collaboration is essential to creativity within the classroom and community


STUDENT OUTCOME OBJECTIVES

Students will:

1. Collaboration with each other a virtual reality piece 

2. Apply lines and colors to create an image with their classmates

3. Participate in a virtual reality experience that could contribute to their future


PRIOR KNOWLEDGE

Experience drawing and color

Experience any kind of digital game 

EXAMPLES OF ARTWORK

https://www.youtube.com/watch?v=pijO5vH9Ojc

This video gives an example of VR


ADDITIONAL RESOURCES

VR program used for the lesson: https://www.youtube.com/watch?v=BE9AHsFgLhI 

ASSESSMENT

  • Did students participate?

  • Did students understand instrutions?

  • Did students create a collaborative project?

  • How might they continue to consider and develop VR work?


MATERIALS

  • VR Headset

  • Controllers

  • CoolPaintVR

  • PS4

  • Adapter for Smartboard

  • Lens Wipes for headset and sanitizer wipe for nose piece


LEARNING ACTIVITIES AND TIMING (40 MINUTES)

1.     Introduce and overview the Virtual Reality and the lesson

a.     Idea- Line and color are the elements to use for VR collboration

b.     Rules- 2 minutes per student

2.     Instruction (about 5 minutes)

a.     Clear directions on how to put on the headset and safety measures for students and equipment

b.     Review controller buttons

3.     Worktime (32 Minutes)

a.     Students will have two minutes in the headset to draw their portion.

b.     Stay with the students and monitor them closely for questions and safety of students and equipment

4.     Closure

a.     Clean up and make certain all VR equipment is returned

b. Reflect on experience, learning, next steps and opportunities

5.     VR Video upload for teacher

a.     https://support.google.com/youtube/answer/6316263?hl=en (YouTube instructions)

b.     Export from PS4 https://www.youtube.com/watch?v=leqybBMmAWM

c.     Share link with the class so they can see their work! 

Dance Mimesis Project

Dance Mimesis Project

Video Demo Sent out to Students: https://www.tiktok.com/@teachinggrover

Video Demo Sent out to Students: https://www.tiktok.com/@teachinggrover

Dance Mimesis Project

Grade Level or Age of Participant: 12-14

School, Teacher and Classroom: Clara Barton Open School, Allison Rubin

MCAD Teaching Artist: Grover Hogan


VISUAL ARTS CONTENT OR STANDARDS

1.0.2.4.1

1. Dance

2. Create

4. Revise and complete original artistic work.

1. Respond to suggestions for changing movement in a guided improvisation.        

1.1.2.4.1

1. Dance 1

2. Create

4. Revise and complete original artistic work.

1. Apply suggestions to change movement in a guided improvisation.

1.7.3.5.2

1. Dance 7

3. Perform

5. Develop and refine artistic techniques and work for performance.

2. Refine partner and ensemble skills.
For example: Focus, awareness in executing complex patterns, sequences, and formations.


OVERVIEW OF PROJECT

Students replicate a choreographed dance done by the teaching artist. However, each student will do the dance to a different song and will adjust the emotion, tone, and pace of the dance moves to correlate with the song that they chose. Students and teaching artist ideally post a video of their interpretation to the app TikTok, however YouTube, Google Drive, or any other video uploading platform will suffice.


“BIG IDEAS”/ ESSENTIAL QUESTION(S)

1.     How can subtle movements and actions change tone?

2.     How does dance and music influence each other?

3.     What does collaboration look like, especially when that collaboration occurs in nonphysical spaces?

4.     What is artistic license and appropriation?


STUDENT OUTCOME OBJECTIVES

Students will:

1. Communicate tone and voice through dance and understanding of music

2. Consider tempo and affect in dance movements affected by music

3. Build collaboration skills through a virtual space


PRIOR KNOWLEDGE

Students will need prior experience recording video with either computer, phone, etc.  as well as a basic understanding of dance, music, and rhythm.


LESSON PREPARATION TIMELINE

Create Lesson Plan and Storyboard

Record Demo (1 video without music, 2 with different songs for each video, resulting in 3 videos total)

Upload all materials and send in to teacher so that class may view and recreate

Review Assessments


EXAMPLES OF ARTWORK

 1.     https://www.youtube.com/watch?v=yjZfuIME7vc

Keke Janajah, Video, 2020, Savage Dance Tutorial (Savage by Megan Thee Stallion, 2020)

2.     https://www.tiktok.com/@yodelinghaley/video/6774888255801396486

Hayley Sharpe, Video, 2019, Say So Dance Tutorial (Say So by Doja Cat, 2019).

3.     https://www.youtube.com/watch?v=rdff8hycRo8

Jalaiah Harmon. Video, 2020, Renegade Dance Tutorial (Lottery (Renegade) by K CAMP, 2019)


ASSESSMENT

Students will upload their own interpretation of the dance and will be allowed to leave comments on each other’s videos, including the teaching artist’s videos. Comments cannot be deleted by the user but are monitored by the application, and any comment that uses inappropriate language will not be visible. Comments may be reported and will then be removed by the application if shown to be harassment. Positive and constructive comments will be encouraged.  Students may choose to turn their comment section off if they wish.

Teaching Artist will also provide comments on student’s dances and interpretations, as both a way to set an example of how a critique should look like as well as a form of sincere critique within itself.


MATERIALS

Students will need access to an electronic device that will allow for recording and uploading. Ideally, the student would have the application TikTok. Materials will be what the student has at home.

 TEACHING ARTIST DEMO

ADDITIONAL RESOURCES AND INSTRUCTION

Instructions for instructor and students

LEARNING ACTIVITIES AND TIMING

Within a shared Google Document that will go out to the class, both links to exemplar videos as well as written instructions on how to share and critique other’s videos will be provided. The following will be mentioned/ linked to in the document:

1.     Teaching Artist will upload choreography to TikTok without any music, giving a slow and steady step by step instruction (approx. 30- 60 seconds)

2.     In addition, an example of the dance applied to two different songs will also be uploaded (2 30-60-second-long clips)

3.     Teaching Artist will ask students to leave comments and create their own video uploaded with the same hashtag (#CopyCatDanceChallenge)

4.     Students will be asked to leave positive and constructive feedback on each other’s videos


TEACHING ARTIST REFLECTION

1.     Students may not have access to the proper technology; need to find a way to make certain all have access to a cell phone and data

3.     Students may be embarrassed to dance in front of their peers; provide a way for students to submit work to teacher and teaching artist

4.     Students fun of others for what they upload off site; review protocols for feedback, social emotional learning connections

Making a Camera Obscura at Home!

Making a Camera Obscura at Home!

Materials * Duct Tape * Electrical Tape * Scissors * A window * A separate piece of paper or board to put holes in (obscura lens) * A drill (not needed but c...

Camera Obscura 

Teaching Team Members:  Jack Powers  and Avery Nordin

Age or Grade Level: 11th and 12th Grade

VISUAL ARTS CONTENT / STANDARDS

Media Arts 2.9.2.2.1

High School

  1. Create

2. Generate and develop original artistic ideas.    

1. Apply aesthetic criteria in developing, proposing, and refining artistic ideas, plans, prototypes, and production processes for media artworks, considering original inspirations, audience and constraints.

OVERVIEW OF PROJECT

Students will be learning how a camera obscura works and then be turning one of their rooms into a camera.

“BIG IDEAS”/ ESSENTIAL QUESTION(S)

How can we work around lack of resources as a photographer? 

How does a camera work?

Why does an image get cast on a wall in the camera obscura?

Why is the image inverted? 

STUDENT OUTCOME OBJECTIVES

Students will:

1. Make their own camera obscura

2. Learn how cameras work.

3. Judge the accessibility of the process


PRIOR KNOWLEDGE

None needed

EXAMPLES OF ARTWORK

https://www.flickr.com/photos/stealw0rker/6784969629

https://www.flickr.com/photos/number7cloud/26357316558


ADDITIONAL RESOURCES

https://petapixel.com/2014/05/12/diy-tutorial-convert-room-camera-obscura/

ASSESSMENT

Upload an image of your camera obscura.

Fill out some assessment questions.

  • How does time of day affect the image?

  • How did the room you projected into effect the image?

  • Is this something you could use in your art practice? If so how?

  • What were some challenges in trying to do this from home?

SUPPORT DEMO by JACK POWERS AND AVERY NORDIN


MATERIALS

·       Duct Tape

·       Electrical Tape

·       Scissors

·       A window

·       A separate piece of paper or board to put holes in (obscura lens)

·       A drill (not needed but can be used to create clean holes)

·       White sheet or something to project image onto

-A few of the following to be used to black out the window:

·       Black Construction paper

·       Cardboard or black Garbage Bags

·       Anything that will help block out light completely


LEARNING ACTIVITIES AND TIMING

1.     Collect all the materials that you need prior to starting

2.     Find a room with a window you would like to black out.  Think about the time of day when you do this. How might it affect the image?

3.     Start to black out the window, but leave a spot in the middle for the obscura lens. The lens will just be another piece of paper or foam board that you’ll cut holes into for the light to come into the room.

4.     Once window is blacked out makes sure there are no light leaks. The darker the room the easier it will be to see the image.

5.     Cut the obscura lens. Decide how large you want the obscura hole. The smaller the hole the sharper the image, but the harder it will be to see. The larger the hole the brighter the image will be, but will have less detail. A 10 – 15 mm ( .5-.75”) hole in diameter is recommended to start, but experiment to see what other results you can get. If you even want to you could try to cut a whole for a camera lens to fit into. You can also have multiple holes and just cover the ones you don't want to use.

6.     Once everything is blacked out and the holes have been cut, you can now tape the Obscura lens to the window (shown in video). 

7.     Turn off the lights and see the image being projected into your room. Wait 10-15 mins for your eyes to adjust to the darkness before trying to adjust the obscura hole.

8.     If you can’t see an image, try setting up a projection screen (white boards or curtains in my case.) in front of the obscura lens hole.

9.     If you still cannot see an image, try making a larger hole or seeing if your room still has some light leaking in.

10.  Once you have an image being projected in, take a photo of it! You might need to do a long exposure. 

TEACHER REFLECTION

What problems do you anticipated with this lesson?

Is it accessible to all at home?

Will the materials be available at home?

Will students be interested?

Tape may not stick to various surfaces.

Too much light leak

Too little light outside - need a bright day

How does this project fit into overall curriculum planning for the subject areas and the arts?

            Shows how a camera works in a Photography class

How will your students’ work be shared with the community?

            If the students can document the work they can share in online folders in classes or on social media

How will you receive feedback on your teaching methodology and quality of student work?

            Assessment and evaluation form

The Tin Foil Figure: Creating an Animation from Materials at home

The Tin Foil Figure: Creating an Animation from Materials at home

The Tin Foil Figure: Creating an Animation from Materials Found at Home -

Grade Level or Age of Participant: 4th Graders

School, Teacher and Classroom: DaVonte Robertson at Spero Academy

MCAD Teaching Artist:  Shaelynn Waseka

Number of Students: 10

VISUAL ARTS CONTENT OR STANDARDS

5.4.2.3.2

5. Visual Arts

Grade 4

2. Create

3. Create Original Artistic Work

2. Demonstrate awareness of environmental implications of art materials, tools, studio space, and equipment.

OVERVIEW OF PROJECT

This lesson focuses on using objects from home to create an animated form. The lesson helps students step back from reality and let them explore their creativity. They begin with tinfoil that is bunched up to create character or human form. The form can be can be easily manipulated to adjust to various scenerios or for stop motion animation. Documenting the character, either through photography or animation, they will share what they have created.

“BIG IDEAS”/ ESSENTIAL QUESTION(S)

What shapes create a human form?

How do our bodies move?

How do we balance?

STUDENT OUTCOME OBJECTIVES

Students will:

1.     Apply balance and proportions to the figure in a sculpture

2.     Create a human form from tinfoil

3.     Use the form to replicate movement

4.     Document the form in human poses

PRIOR KNOWLEDGE

Following directions on a screen

Safety with Tinfoil (serrated edge on box)

Optional (how to operate a phone, how to download and use an app)


EXAMPLES OF ARTWORK

I will be creating a step by step video of me doing the project. I will include an artist as a quick snippet of information.  


ADDITIONAL RESOURCES

Identify books or weblinks used to prepare the lesson plan and/or student learning materials.

Alan Becker (Animator vs. Animation (original)) Interesting video about stick figures

Gerard Regot Stop Motion Animation Techniques

L.S. Lowry, MatchStick Man Famous for painting stylized figures that were described as Match Stick men

Alberto Giacometti Sculpture famous for disproportioned bodies 


ASSESSMENT

Hopefully I will get feedback from this art lesson. But, theoretically students will be successful with this lesson if they can create a character where they can pose it in different forms. Another bonus would be getting the character to stand alone in a pose. This will show that they understand proportions and balance enough to keep the character standing.


MATERIALS

Part One

Phone, Pad or Computer access ( for video demo and directions)

Tinfoil

Pencil, Pen, Marker etc.

Piece of Paper

Scissors

Part Two

Cell phone

Scissors

TinFoil Man

Coffee Cup


LEARNING ACTIVITIES AND TIMING

Part 1 Making the TinFoil Figure

1. Open video

2. Watch video through and through to understand concept (Around 9-minute video). Feel free to stop the video as you work on the project.

3. Make a list of materials needed and bring them to a work area. (Tin foil, tablet, phone, smart device with camera, scissors, marker)

4. Take a sheet of tinfoil and add lines and labels like shown in the video

5. Label all parts of the tinfoil where head, legs, and arms are supposed to go.

6. Take scissors and cut where the lines are on the form in the video

7. Scrunch up the foil sections to create character; add additional tinfoil as needed for strength or detail

8. You may develop the form for additional foil characters. use it to create different sizes of foil characters

At this point, you may take pictures of your figure(s) in various settings with a camera or cell phone or you may create an animation with your figure. Do so so follow the directions in the video.

Part Two: Animating the Figure

1.     Collect Materials

2.     Create a coffee cup tripod (Cut two notches out of top of a coffee cup)

3.     Watch Tutorial

4.     Experiment with app

5.     Start taking pictures; slightly move the figure for each shot in the app

6. Play back the animation!

7. TA DA!


TEACHING ARTIST REFLECTION

What problems are anticipated with this lesson?

Lack of materials

Potentially could be too easy for some students and too hard for others.

Questions arise and students cannot ask anyone what to do. Parents or sibs may need to assist

Character falls apart


How does this project fit into overall curriculum planning for the subject areas?

This project helps the students understand balance and movement. Helps them understand another art form (Stop-Motion)

How will your students’ work be shared with the community?

Work can be shared with parents, classroom teachers or on social media with student releases

How will you receive feedback on your teaching methodology and quality of student work?

Photos back from the students of the completed projects it will help me understand if my method worked

It Just Takes Heart - Marc Chagall and the Bezhold Effect

It Just Takes Heart - Marc Chagall and the Bezhold Effect

Click here to access the Teaching Pptx created by Sydney Hollingshead

Click here to access the Teaching Pptx created by Sydney Hollingshead

Marc Chagall and the Bezhold Effect 

Teaching Artist: Sydney Hollingshead 

Grade Level: Elementary: 3rd Grade 

VISUAL ARTS CONTENT / STANDARDS 

  • Creating: Generate and conceptualize artistic ideas and work.

  • Organize and develop artistic ideas and work.

  • Synthesize and relate knowledge and personal experiences to make art.

  • Relate artistic ideas and works with societal, cultural, and historical context to deepen understanding.

OVERVIEW OF PROJECT 

Students will discover a new form of art making while also trying to mimic the works of the late artist, Marc Chagall (1887-1985). Students create their own artworks investigating the color used by Chagall in his work on heart shaped paper. In addition, students will attach the hearts to another sheet of paper to write about what they love to further mimic Chagall’s love for his work.

ESSENTIAL QUESTION(S) 

  • How does color choice effect the feeling of a piece of artwork? 

  • Why does a heart mean love?

  • Why do colors appear bright?

STUDENT OUTCOME OBJECTIVES

 Students will: 

   1. Apply color choice from a limited palette to create a design

   2. Adapt to a new technique of steps of artmaking. 

3. Use a variety of tools and materials to create a piece of art that is meaningful to them.


PRIOR KNOWLEDGE Before participating in this project, it is important for students to have a growth mindset. They need to understand that perfection isn’t everything. 

   EXAMPLES OF ARTWORK 

ADDITIONAL RESOURCES 

ASSESSMENT

The questions below are addressed in the Google Form for the lesson:

  • What can a heart mean besides love?

  • Can certain colors evoke a specific mood?

MATERIALS 

1. ) 3 pieces of  Printer Paper  (8 ½ x 11 inch) 

    2.) Scissors

    3.) Washable Markers 

    4.) Black Marker or Sharpie

    5.) Erasers 

    6.) Pencils

    7.) Glue stick

    8.) Ruler (optional)

LEARNING ACTIVITIES AND TIMING 

1.) Introduction to Marc Chagall: View Marc Chagall’s presentation that shows his past stained glass. 

  • Review vocabulary words discussed in the classroom and how it could tie into the activity (collage, composition/ space, contour, line, color, shape, geometric shape)

  • Introduce the project that the students will be working on and how it is similar into the presentation. 

  •  Present Own Example: An example drawn will show students the type of angle they should go when creating their hearts.

2.) Fold the Paper: After the presentation, students should take their computer sheet of paper and fold it the wider way or “hamburger style.” 

  • Make sure to line up the each side of the paper in a straight line to make sure that both sides are the same. 

3.) Draw a Half Heart: After folding their piece of paper, students should draw one half of their heart with a pencil on their folded paper. 

  • This may seem confusing to some students, so be sure to provide a reference image of a heart for students to look at when trying to draw.

4.) Cut Out the Heart: Cut out the half heart by guiding the scissors on the pencil line. 

  • Some students may be familiar with this part of the activity if they have made their own snowflakes in the past.

5.) Unfold the Heart : Once the students finished cutting out the hearts, have them unfold the paper and look at their hearts.

6.) Draw the Stained Glass: Have the students lightly draw the straight lines that are a part of Chagall’s stained glass work onto their paper hearts.

  • If available to them, students can also draw the straight lines on their papers with a ruler.

   7.) Inking: With a black marker, carefully go over the pencil lines. 

  • Before starting this step, be sure to lay another sheet of paper down on the table first just in case if the ink bleeds through the paper heart.

   8.) Erase the Pencil Lines: Erase the pencil lines that are still showing on the paper.

   9.) Coloring: Color the spaces that are left by the black marker with colored markers.

  • Have the students think about color choice while coloring.

  10.) Write a Message: On the back, write a message on the back about something or someone that you    love or appreciate.

11.) Glue the Paper: Glue the written message on the back of the heart with a glue stick.

12.) Take a picture of the heart and message with a cell phone. Put your heart in your window to share with your neighbors.

 TEACHING ARTIST REFLECTION 

 What problems do you anticipate with this lesson? 

  •  Students might feel frustrated when trying to cut out their hearts.

  •  Students may not grasp the importance of sticking to basic shapes with their designs 

and create complex ones instead. 

How does this project fit into overall curriculum planning for the subject areas and the arts? 

  •  Allows students to experiment and incorporate different types of art materials 

into one project. 

  • Shows students that there are multiple ways to make art and to express the meaning behind it.

How will your students’ work be shared with the community? 

  • Students will be able to give their hearts to others or their families to express what they love or as an act of it and be asked to upload them to their teachers art folder. In addition they may put them in the windows of their home.

 How will you receive feedback on your teaching methodology and quality of student work? 

  • Ask if they have learned anything. What did they like and dislike about working with different materials.

  • Through conversation with lead teacher after the project is complete

  • Through a self and video reflection

  • Through assessment by my instructor of the video of the lesson

Comic of our Fears  hosted by Mia

Comic of our Fears hosted by Mia

Comic of our Fears

Grade Level or Age of Participant: First grade and above

School, Teacher and Classroom: Minneapolis Institute of Art, Angela Olsen

MCAD Teaching Artist: Anavi Mullick

OVERVIEW OF PROJECT

This simple drawing project addresses fears and how to approach them with humor. Participants think about their own fears, choose one that is most alive for them, and then pick an animal which they feel best represents their fears. Then keeping in mind the fear and the animal they will draw the animal in a silly situation. For example; the fear of loved ones falling ill, embodied as a porcupine, and then imagining the porcupine juggling balls, and drawing this.

The lesson was designed focusing on the challenges that we are all facing as we live through a pandemic. Participants will be able to share their work through online social media platforms, as well as with members of their families.

A step-by-step document is featured on the Minneapolis Institute of Art (Mia) Website. Link Here.

“BIG IDEAS”/ ESSENTIAL QUESTION(S)

What are we afraid of? How can we learn to visualize something? How can art be reflective and expressive? How to draw from imagination? How can art be accessible to all?


STUDENT OUTCOME OBJECTIVES

Participants will:

1. Explore their own fears with guidance through a process to visualize a fear.

2. Draw from imagination.

3. Experience art as a form of expression.

4. Reflect on the power of the creative process.

PRIOR KNOWLEDGE

Ability to read/follow step-by-step instructions, or have a partner to help guide the participant.

LESSON PREPARATION TIMELINE

-       Brainstorming lesson

-       Step-by-Step planning

-       Reflect on outcomes and next steps

This lesson was conceived by Anavi Mullick from the MCAD Teaching Artist Practicum course and reviewed and workshopped by the Education Department of the Minneapolis Institute of Art prior to being included in their web lessons during the Covid 19 Pandemic


EXAMPLES OF ARTWORK

Samples chosen from the Collection at the Minneapolis Institute of Art.

-       Graham Sutherland, Bird and Mouse, 1968, 24.75 x 19.5 in.

https://collections.artsmia.org/art/54851/bird-and-mouse-graham-sutherland

-       Getsuju, Frog and Mouse, late 18th - early 19th century, 65 × 35 in.

https://collections.artsmia.org/art/117177/frog-and-mouse-getsuju

-       Gerhard Marcks, Cats, 1921, 15 x 20 in.

https://collections.artsmia.org/art/72892/cats-gerhard-marcks

-       Unknown artist, Seated Dog, 386-535.

https://collections.artsmia.org/art/872/seated-dog-china

-       John Randolph Carter, Grinning Dog with Raggedy Ann Doll, Clouds with Ears in Sky, 1979, 13.5 x 17 in.

https://collections.artsmia.org/art/8873/grinning-dog-with-raggedy-ann-doll-clouds-with-ears-in-sky-john-randolph-carter

-       Dudley Huppler, The Bug of Marianne Moore, 1945, 11 x 9 in.

https://collections.artsmia.org/art/128355/the-bug-of-marianne-moore-dudley-huppler

-       Unknown artist, Finial with Animal, late 12th-11th century BCE, 7 x 6 x 2 in.

https://collections.artsmia.org/art/1155/finial-with-animal-china

-       Clement Hurd, Animals, second half 20th century, 10.5 x 27 in.

https://collections.artsmia.org/art/117681/animals-clement-hurd


ADDITIONAL RESOURCES

-       Henri Rousseau’s (Artist) paintings of animals. (https://www.google.com/search?q=henri+rousseau+animal+paintings&hl=en&sxsrf=ALeKk00R9An6fyTyrO9S3pOqd82ipG4TPQ:1586804902830&source=lnms&tbm=isch&sa=X&ved=2ahUKEwjJ7r30jOboAhWRuJ4KHck5CUUQ_AUoAXoECBMQAw&biw=1172&bih=539)


SUPPORT MATERIALS

ASSESSMENT 

-How did you feel at the start of the lesson when you were thinking about what you were afraid of? How did you feel after the lesson?


MATERIALS

1.     A drawing tool

a.     Any one of the following; pencil. Pen, marker, crayon, color-pencil, paint and brush, chalk.

b.     Optional – if you think you would like to color your drawing after, you are welcome to. (crayons, paint, color pencil)

2.     A writing tool - a pencil or pen

3.     Paper/drawing surface - (2)

a.     Anything you have around you. (blank white paper, one sided paper, ruled sheets, an old paper bag, cut open a cereal box and use the inner surface, colored paper, newspaper, your driveway or sidewalk if you are using chalk)

4.     A comfy spot to sit, with a flat surface in reach. Not limited to, but a few options are; a dining table, or on the floor, or with a drawing board/a clipboard, or against a wall.


LEARNING ACTIVITIES AND PROJECT OVERVIEW

PROVIDE AN OVERVIEW OF THE PROJECT, PROCESS AND PURPOSE. See description above.

PREPARE. Gather drawing tool and decide on a drawing surface. Have everything at hand prior to starting. Then get comfortable.

Step 1. Brainstorming. Take a few seconds to observe your body, your breath, your heartbeat. You can close your eyes if you would like. 

Think about where you are, how you have been feeling, what you are afraid of.

 Step 2. Making a list and choosing. If your eyes were closed, you can open them. Pick up your writing tool, and your chosen drawing surface. Make a list of the fears that came to mind.

 When you are done with your list, take a moment to look at your list and identify which fear feels the most alive to you? Choose one that stands out to you.

Is it big and overwhelming? Is it small but sharp? Can you imagine this fear as an animal? What animal represents this fear?

Step 3. Imagining. Once you have chosen an animal that represents your fear, think of the animal doing something silly. Is it juggling balls? Eating fourteen bananas at the same time? Jumping on a trampoline? Be as silly as you can!

Step 4.  Draw it! Draw the animal doing this silly thing! Color it if you would like to. Do not worry about the animal or the activity looking ‘correct’. Just draw and enjoy! No judgement.

Step 5. Think about it….How do you feel now? Is your fear as great? Do you feel differently?

Step 5. Upload image, hashtag and respond. Tag @artsmia if you choose to post it, or #InspiredbyMia #MiaFromHome #MuseumFromHome. We’d love to hear what animal you chose, why you chose it and how you feel now.

Do as many as you like!

TEACHING ARTIST REFLECTION

-       Some participants will need assistance depending on their age in participating.

-       Participants might feel intimidated to think about the fears or drawing.

-       Challenging to consider consider sharing their artwork online

 Assessment from staff, general assessment through social media.

Making an Accordion Journal from Simple Materials with 2 Video Demos

Making an Accordion Journal from Simple Materials with 2 Video Demos

Hand torn Accordion Journal

Teaching Artist: Tanvi Kulkarni

 Age or Grade Level: 6-12 grade  

 Overview of Project

Students make an accordion book with cover and band. The lesson provides simple instruction for creating the book with minimal materials and without scissors.. Students will use the journals for daily reflections. Two short informational videos are available in the lesson as demonstration.


“Big Ideas”/ Essential Question(s)

  • How to be creative by using available material?

  • How to express ourselves through bookmaking?


Student Outcome Objectives

Students will:

  1. Create an accordion fold journal, cover and band to hold it together

  2. Use materials that are available and easy to access in a creative and intentional way

  3. Use the journal to connect their work to current events through writing and visual content


Prior Knowledge

None

Examples of Artwork

 Next to Nothing by Jody Williams https://mcad.edu/faculty/jody-williams

 Spatial Geometries by Karen Wirth http://karenwirth.com/books/books_spatial_geometries.htm


Additional resources

https://www.readbrightly.com/diy-accordion-book/

https://bookriot.com/2017/05/30/how-to-make-a-paper-bag-book-cover/


Assessment

How was the bookmaking process?

Did you learn something new?

What engaged you? What did you enjoy?

Materials

List of ALL material needed with specified amounts, sizes and/or quantities needed.

glue stick

paper , such as printer paper/newspaper/magazine/ discarded artwork

ruler

pencil

Learning Activities and Timing

30 mins: To make 3 types of accordion books.

20 mins: creative own content in the book.

10 mins: Create the cover for the journal.  

Step by Step Process

Video 1 - How to Make and Accordion Fold Book with few Supplies by Tanvi Kulkarni

Introduction and overview of the project

o   Gather materials: A4 size paper, glue, tape, and ruler

o   Cut a piece of paper in half lengthwise make two long rectangles.

o   Fold the rectangle in half widthwise.

o   Fold the top flap in half again by aligning the edge with the middle fold.

o   Flip the paper and do the same on the other side.

o   Do the same thing with another long rectangle

o   To attach the 2 Ws, flip one W to M shaped paper

o   Put glue on the page of W and glue the page of M on it, So it will look like WV.

o   Another way to attach the 2 Ws—>align the edges of W together, and put a tape on them

o   To make a pop out, cut two slits on the fold and push in the opposite direction of the paper

o   Angle the tear to create shapes.

Video 2 - How to Make a Cover and Band for an Accordion Fold Journal by Tanvi Kulkarni

Video 2

o   Material: A4 size paper, pencil, ruler, glue and accordion book

o   Take a piece of paper.

o   Cut the paper to the size of the book.

o   Fold top and bottom edges to the size.

o   Slide the page of the book on the cover.

o   Wrap it around the book.

o   To make a band, take a long strip of paper.

o   Wrap it over the book to size it.

o   Mark the length and glue both ends.

o   Slide the band on the cover.

 Teacher provides writing, drawing and artmaking prompts

Teaching Artist Reflection:

It might be hard to make a book without using Exacto knife and scissors because it is not easy to get sharp edges without cutting tools. I feel there is a thin line between DIY and art. Do not be concerned about the torn edge. It becomes part of the form.

STUDENT WORK GALLERY


Caffenol at Home Black and White Film Developer

Caffenol at Home Black and White Film Developer

Caffenol at Home Developer

Teaching Team Members:  Jack Powers

Age or Grade Level: 11th or 12th Grade

VISUAL ARTS CONTENT / STANDARDS

Media Arts 2.9.2.2.1

High School

1.Create

2.Generate and develop original artistic ideas.    

1. Apply aesthetic criteria in developing, proposing, and refining artistic

ideas, plans, prototypes, and production processes for media artworks,

considering original inspirations, audience and constraints.

OVERVIEW OF PROJECT

Students will be able to make this own developer at home. Most of the materials are available at your local grocery store (if you go out remember to practice social distancing!)  

“BIG IDEAS”/ ESSENTIALQUESTION(S)

How does accident play into art making?

How do materials, technique and accessibility effect the artists ability to work

STUDENT OUTCOME OBJECTIVES

Students will:

1. Make their own developer

2. Develop a roll of film

3. Judge the accessibility of the process 

PRIOR KNOWLEDGE

Basics of film development

EXAMPLES OF ARTWORK

https://www.flickr.com/groups/33051635@N00/pool/


ADDITIONAL RESOURCES

https://www.fieldmag.com/articles/how-to-develop-film-with-coffee-caffenol-guide

https://www.caffenol.org


ASSESSMENT

Upload an image of the developed roll.

Fill out some assessment questions.

 Did the demo represent the process?

Was this accessible to do at home?

How did the process change the outcome?

What were some challenges trying to do this from home?


MATERIALS

1 roll of undeveloped film

Vitamin C power or tablets (pulverized)

Instant coffee

Washing Soda  -  find it in laundry detergent aisle at the grocery store or in big-box stores, in hardware or home improvement stores or online

( addendum: WARNING: make sure to keep washing soda out of the reach of children and pets. You should wear gloves when cleaning with washing soda because it can cause skin irritation. It can be harmful to the eyes, cause irritation to the lungs if inhaled, and may cause abdominal pain or vomiting if large doses are swallowed.”

Washing soda can be made out of baking soda in the oven – have ventilation or open windows and take care in heating it up. https://sciencenotes.org/turn-baking-soda-washing-soda/

Fixer  https://www.ilfordphoto.com/rapid-fixer-product

Liquid dish soap

Glass or pyrex 16 ounce cup

Tsp (teaspoons – not Tbls tablespoon)

Vinyl, plastic or rubber gloves

Film processing tank or any light tight container or photo trays

Clothes pins and a hanger

Paper clips

Mixing containers


LEARNING ACTIVITIES AND TIMING

1.     Make the Washing Soda if needed and cool if it cannot be purchased.

2.     Collect all materials needed for the process from above list in one place where you will work by running water.

3.     Put on protective vinyl or rubber gloves.

4.     In one container mix 12 oz of tap water (room temp), ¾ tsps vitamin C powder (1000mg), 5 tsps instant coffee crystals (cannot be decaf), 3.5 tsps washing soda.

5.     Stir until all powder and crystals dissolve.

6.     Pour into sealed developing tank and agitate slowly for one minute, then agitate 2 time per minute for the following 11 minutes. Pour out Caffenol mix.

7.     Place tank under running water for 1 minute to stop developing process. Have the water as close to room temp as possible. It should not feel hot or cold to your touch.

8.     In another container, mix 2 oz of fixer with 6 oz of water. Pour this mix into tank and agitate slowly 2 times per minute for seven minutes. Save fix and bring to local darkroom (west photo) for disposal.

9.     In another container, mix water with a few drops of dish soap. Add to tank for a minute and agitate for the first 30 seconds. Let it rest for the last 30 seconds. Pour out and open tank.

10.  Pull out your film and hang to dry. You're all done.

11.  Scan film with scanner if possible if not, use your cell phone and take a picture of the negatives against a white screen on your laptop. Also you can scan the film with a DSLR if you have acess to one.  https://www.youtube.com/watch?v=xO-md8tiA6U

12.  Share images with Lauren. 

13.  Take the assessment to reflect on process and provide you and Laruen with Feedback.


TEACHER REFLECTION

What problems do you anticipated with this lesson?

Not everyone might be able to do the project.

Not everyone will have all the materials

Not everyone will want to do the project.

Not everyone will be able to see the results without a scanner or digital camera.

How does this project fit into overall curriculum planning for the subject areas and the arts?

            Is an alternative option to develop a roll yourself, rather than pay to have it done.

How will your students’ work be shared with the community?

            If they can scan the film they can share it however they’d like.

How will you receive feedback on your teaching methodology and quality of student work?

            Have the students will out an evaluation of the instructions and demo.


Everyday Notebooks: Figure-Eight Sewn Booklets

Everyday Notebooks: Figure-Eight Sewn Booklets

Planning Backwards Model 

Teaching Artist Practicum

Name of Project: Everyday Notebooks: Figure-Eight Sewn Booklet

Grade Level or Age of Participant: Highschool (Grades 11 & 12)

School, Teacher and Classroom: Perpich Center for Arts Education, Jeremy Lundquist (two sections of his printmaking class)

MCAD Teaching Artist:  Jamie Kubat

Number of Students: 33 total (17 in first group, 16 in second group)

VISUAL ARTS CONTENT OR STANDARDS

5.A.1.1 Visual Arts. All grades.1. Foundations 1. Use foundational knowledge and skills while responding to, creating, and presenting artistic work. 

OVERVIEW OF PROJECT

Students will be taught how to bind a single-signature book, using traditional binding tools as well as more accessible options (such as using a sponge to protect their work surface when punching holes, instead of a traditional book cradle, which is not readily available outside of book arts centers or some higher educational settings). 

“BIG IDEAS”/ ESSENTIAL QUESTION(S)

The lesson will introduce the idea of signature-sewn bindings and give the students a structure to potentially use in their final projects for the educational quarter, if they chose to. It will also hopefully communicate that bookmaking can be an accessible art form, a continuation of themes they have already been learning.

STUDENT OUTCOME OBJECTIVES Students will:

1. Sew a single-signature book binding

2. Use skills from two prior book projects together in one new one (sewing from stab binding and folding from meander book)

3. Construct a book from prepared materials

PRIOR KNOWLEDGE

Students do not need any prior knowledge to complete this lesson.

LESSON PREPARATION TIMELINE

Thursday, March 5: meet with Jeremy to finalize lesson details

Monday, March 9: buy paper for covers, thread, etc. and gather other TA materials from Lynda

Tuesday, March 10 (morning): cut down paper and gather all materials in one place

Tuesday, March 10 (afternoon): teach, document student work

EXAMPLES OF ARTWORK

Examples of various sample figure-eight bound books and zines (both blank exemplars and artist work).

ADDITIONAL RESOURCES

Making Handmade Books: 100+ Bindings, Structures & Forms, by Alisa J. Golden. $20. 

Non Adhesive Binding: Books without Paste or Glue, by Keith Smith. $30

ASSESSMENT

Goals for this project are for each student to complete their own book. Success will be students meeting this goal, engaging with the work/demonstration, and/or creating their own work beyond the lesson activity. Assessment can be obtained through observation and verbal feedback.


MATERIALS

In containers on the table or at each students’ place:

Bone folders (18)

Binding needles (18) 

Awls (Jeremy provides, 18)

Sponges (Jeremy provides, 18)

Paper for covers, such as mulberry, lokta or another strong, light paper (35, 18 for one class and 17 for the other. Set out for students to choose from)

Paper for pages (Jeremy provides. 8 per student plus some for me = 280. Set out for students to take). 

Scrap papers for guide (height of pages). (35 pieces)

Waxed thread (around 4 yds each of four colors, enough for each student to cut a piece for their book. Probably more than I need. Send around during demo/)

Scissors (1 for me and 4 to pass around with the thread)

Pencils so they can write their names in the back cover of the book (introduce colophons). 

LEARNING ACTIVITIES AND TIMING

1. Introduce book structure and sample books, purpose of lesson (new structure that is widely used, can be altered easily, this small one is a great pocket notebook size). Ask questions of students and show them examples of work made with the structure. (5 min.) 

2. Demo “hold and fold” method for folding pages and using bone folders if they haven’t done so before. Have students fold their pages and nest them inside one another correctly. Have students fold cover sheet as well. Talk about signatures, grain of paper, and paper for covers. (5-7 min.) 

3. Demo making a guide with scrap papers. Use guides to punch holes with awls & sponges. (5 min). 

4. Send thread around to be cut. Height = twice height of spine + a few inches. This can be done overlapping with previous step. (2 min).If available, a diagram on a whiteboard could be used. 

5. Demo threading needles, piercing string. Demo sewing the books and tying off thread with square knots, cutting ends while leaving tails, which can be run under the stitches inside the book. (5-7 min).

YAY! YOU HAVE A COOL LIL’ BOOK! 


TEACHING ARTIST REFLECTION

What problems are anticipated with this lesson?

Some of the problems are keeping the students focused, and making sure everyone can see the demonstrations. There are 17 students so taking it slow and make sure everyone knows what they are doing. Thankfully since they are teenagers they are old enough to help one another, plus Jeremy will be there to assist.

How does this project fit into overall curriculum planning for the subject areas?

Jeremy has been teaching them printmaking and basic book structures that can be easily used in combination with traditional and digital printmaking techniques. They have learned some folded structures as well as Japanese stab binding, and a figure-eight bound booklet is a natural third project. 

How will your students’ work be shared with the community?

They’ll hopefully be able to make & use these books on their own, going forward. I will also document the work and share it in my teaching artist journals.

How will you receive feedback on your teaching methodology and quality of student work?

I will ask for feedback from Jeremy and Lynda, and likely discuss the teaching with fellow book artists & educators who have taught similar lessons. 

Hidden Message Valentines Cards

Hidden Message Valentines Cards

Grade Level or Age of Participant: 2nd Grade

School, Teacher, and Classroom: Expo Elementary, Ulla Tervo-Desnick,

 MCAD Teaching Artist:  Shaelynn Waseka

 Number of Students: 24

 VISUAL ARTS CONTENT OR STANDARDS

Grade 2

1.     Artistic Foundations

2.     Demonstrate knowledge of the foundations of the arts area

3.     Visual Arts

4.     0.1.1.5.1

5.     Identify the elements of visual arts including color, line, shape, texture, and space.

OVERVIEW OF PROJECT

This project is based on the classroom theme of giving/caring. The project will be a Valentine’s Day card that will be sent to older adults in independent housing. The card will have a hidden message inside that will be revealed by a wheel that spins. This project is designed to be reciprocal. The adults receiving the cards will return a card.

“BIG IDEAS”/ ESSENTIAL QUESTION(S)

Why is giving to others important?

How does it make someone feel when they receive kindness?

How do we feel when we give?


STUDENT OUTCOME OBJECTIVES  

Students will:

1. Participate in the act of giving by creating a card for older adults.

2. Construct a handmade hidden message card with brass spinners and paper.

3. Produce handmade Valentine Day Cards with high-quality paper.

4. Understand the benefit of giving

5. Work together and collaborated on different creative decisions


PRIOR KNOWLEDGE

How to use scissors, glue sticks, markers, etc.

How to write words

Come up with a nice/caring message

 LESSON PREPARATION TIMELINE

Meeting with Lynda week of February 3rd. Collect supplies from Lynda

Create pre-cutouts of wheel and a couple of examples

February 10th teaching date

Deliver letters to the older artists

 EXAMPLES OF ARTWORK

Create a couple of different examples that will be shown in class and passed around

 ASSESSMENT

They allow their cards to be sent to the older artist. The goal of the project is to create something for someone else to receive. It is based on the theme of giving/caring.

MATERIALS

Cardstock/Construction Paper (All different colors)

Paint markers

Colored Pencils

Brass Spinners

Stickers

Glue Sticks

Scissors

Extra paper for prewriting

Pencils

Erasers

Envelopes

 LEARNING ACTIVITIES AND TIMING.

 1.     Introduction (Ask what Valentine’s day means to each student) 5 minutes 

2.     What does giving mean to them?

3.     Introduce who we will be creating the cards for (3 minutes)

4.     Have them sit in seats. Pass out scratch paper to come up with a message (10 minutes)

5.     Bring them back to the carpet

6.     Demonstration of how to assemble card (10 minutes)

7.     Have them go back to seats

8.     Pass out materials  

9.     Assemble cards

10.  Collect all the cards (5 minutes)

11.  Deliver cards to adults.


TEACHING ARTIST REFLECTION

Students unwilling to participate

Students who find it too challenging

Students will use their skills of handwriting and spelling for the hidden message inside. They will also reflect on the class theme of giving/caring when creating the card. 

 The completed letters will then be passed onto the older artists within the community. The cards will have a message specialized for the older artists.

I will receive feedback from both the students in the classroom and Lynda from her review. I also will receive feedback from Ulla in the end.


Questions for Ulla

 How she would you like the students to write and think about their messages?

How do you celebrate Valentine’s day in your classroom?

Avivo Artworks' Community Mural Workshop

Avivo Artworks' Community Mural Workshop

PLANNING BACKWARDS MODEL

Name of Project: Avivo Artworks’ Community Mural Workshop

Grade Level or Age of Participant: Varied, all adults.

School, Teacher and Classroom: Avivo, Jes Reyes, Basement Art Studio

MCAD Teaching Artist: Sarah Maude-Griffin

Number of Students: 3 for planning mural, 7+ for painting

VISUAL ARTS CONTENT OR STANDARDS

Participants will learn about the collaborative art-making process, scaling up images, and painting large surfaces and the importance of community art.

OVERVIEW OF PROJECT

Collective members will work with the Teaching Artist to create a collaborative design that represents the Artworks program. The entire Avivo art community will be invited to attend a workshop in which the teaching artist will discuss public art and members will collectively work to paint the mural design in. The Mural will be 6 feet by 5 feet and will be completed in two 4 hour collaborative painting sessions.

“BIG IDEAS”/ ESSENTIAL QUESTION(S)

How does art change a space?

How can art communicate a sense of place and inclusiveness?

STUDENT OUTCOME OBJECTIVES

Artists will:

1. Apply their personal experiences and the core values from their work at Avivo to a visual artwork.

2. Evaluate ideas and decide on a collaborative design for the mural.

3. Create a painted mural that communicates the importance of Avivo’s programming.

PRIOR KNOWLEDGE

Basic understanding of composition and symbolism, familiarity with Avivo

LESSON PREPARATION TIMELINE

2/25 12:30-2 pm Meet with Avivo Collective members and begin Mural design.

3/1 1-2 pm Create cohesive sketch from conversation with Avivo Collective Members.

3/3 11-12 pm meet with Lynda about PBM, 12:30-2pm refine sketch and transfer to wall

3/4 Get supplies in preparation for Fridays workshop

3/6 12 pm arrive at Avivo to set up, 1-3 pm teach workshop, 3-4 pm clean up.

EXAMPLES OF ARTWORK

http://goodspacemurals.com/ourwork

Greta McLain and Goodspace Murals’ work

Speaking Truth to Power, Sarah Maude-Griffin 2017

Tarana J. Burke, Sarah Maude-Griffin 2018

ASSESSMENT

During the lesson, the teaching artist will engage in conversations with the artists while they work in how the experience is going, how they feel the mural and space is evolving as they paint, and the whether or not they feel represented through the mural.

MATERIALS

Avivo has several gallons of acrylic paint, aprons, palettes, large paint brushes, paint markers, painters tape, butcher paper and canvas tarp. Teaching artist will get sample sized quarts of latex wall paint from Sherwin Williams in colors discussed with collective members and colors that are low or missing from Avivo’s acrylic collection. White, light green, yellow, light purple, and red orange. 5 quartz at $8 a quart totals out to be $41.21 with taxes. Paints will be set up on the communal tables in the art studio, along with larger paint brushes and palates. In hallway where the mural will be, we will have a canvas tarp down.

LEARNING ACTIVITIES AND TIMING

FOR FIRST DESIGN SESSION WITH COLLECTIVE MEMBERS

Introduce the project: We’re making a mural! This mural will represent what Avivo means to you and the values that are present in this community. Briefly walk over to the wall we will be painting, and then return to the tables. What does it feel like to be a part of this organization? Brainstorm word list on newsprint. (30 minutes) 2. Narrow down words and phrases everyone agrees with (5 min) 3. Discuss what could visually represent these words and the message for the mural and create list. (10 min) 4. Each artist is given markers and newsprint to create their own ideal design incorporated the words and visual elements listed. (15 min) 5. Group comes back together to discuss what they like best about each design. (25 min) 6. Teaching artist takes photos of the work and creates a digital mockup of this design to presented at next design session.

FOR SECOND DESIGN SESSION WITH COLLECTIVE MEMBERS

Open up digital mockup on laptop, along with the documented designs from last session. Feedback and critique! (15 min)

Make adjustments to digital file as a group on photoshop. Export image and send to Jes to print, so that we can use an Artograph projector to trace the image onto the wall. (15 min)

Move everything away from the wall we will be painting on, and wipe down the wall with damp paper towels to get rid of any dust or scuff marks. (15 min)

Set up the Artograph projector, and trace the design onto the wall with pencil (30 min)

FOR MURAL PAINTING WORKSHOP WITH ALL PARTICIPANTS

Welcome folks and discuss the process of painting murals (20 minutes)

  • Go around the table and say names (some of us may already know each other!)

  • Teaching artist talk about previous experience with creating murals Slide show of in process photos for both murals, explaining the significance of each stuff, scaling things up larger, what it is like to work large and publicly, what constraints may be placed on public art, and how to collaborate with people of varying art skill levels.

  • Show some of Greta McClain’s work and how she does this with her company Goodspace Murals

  • Answer any questions .

Quick introduction to where we will be painting and what, along with best practices for acrylic painting (10 min)

  • Teaching artist stops at paint table and demonstrate pouring house paint onto pallets (using a wooden stir stick on house paint to ensure it’s mixed still), and grabs a few paint brushes of different sizes

  • Group heads into the hallway where the wall is, Teaching Artist shows how to apply paint to the wall without drips, how to make clean lines, the ways you can use each kind of brush.

  • Speak to the importance of giving each person working on the mural the space they need, and taking shifts working on the wall.

  • Express the importance of covering as much of the wall as possible in order to make progress today—and also that things to not have to be perfect and precious if you don’t want them to be!

Artists take shifts painting in outlined shapes on the mural! Teaching artist will facilitate discussions with artists as they go in and out of their shifts about the progress of the mural and process of painting (120 minutes)

Wash brushes and palettes! (10 minutes).

TEACHING ARTIST REFLECTION

What problems are anticipated with this lesson?

  • Some folks may be eager to take over and struggle with collaboration

  • Things may take longer than three sessions (which is okay because Avivo has given the Teaching Artist permission to come back for a less formal painting day)

  • There may be disagreements about the direction of the mural

How will you receive feedback on your teaching methodology and quality of student work?

One of the benefits of the mural being in such a communal area is that people passing by will engage with the artists and Teaching Artist/will be easy to invite to engage with the artists and Teaching Artist and give feedback. The small groups of artists working on the mural and shifts allows for down time to discuss how things are going and what is working and what is not working.

Therapeutic Painting Project

Therapeutic Painting Project

Name of Project: Therapeutic Painting Project

Grade Level or Age of Participants: Middle School to High School Age, Applicable for All Ages

School and Teacher: Children’s Residential Treatment Center with Carmen Elate

MCAD Teaching Artist: Emily Bigus

Number of Students: 10

Visual Arts Content and Standards:

5.A.1.1  Use foundational knowledge and skills while responding to, creating, and presenting artistic work

5.8.2.3.1   Create original artistic work. Apply visual literacy strategies to create artwork that communicates ideas

Overview of Project:

Students will learn how to identify what makes them feel happy and supported and then use color to express those things in relation to themselves. This encourages self-reflection by encouraging students to think about how and why the things they chose make them feel the way they do and ways to express that through painting.

“Big Ideas” and Essential Question(s):

How can you use paint to show the importance of something?

How can feelings and emotions be expressed through artmaking?

Student Outcome Objectives:

Students will:

  1. Identify the things in their life that make them feel happy and supported.

  2. Use color, shape, and texture in painting to express personal feelings of happiness.

Lesson Preparation Timeline:

  1. Pick a Day to teach

  2. Meet with Lynda (2/20)

  3. Friday before teaching (3/6): Cut paper for assignment

  4. Thursday (3/12): Have students identify the things in their life that make them feel happy and supported. Have them assign a color to themselves and each of the items on their list. Also, trace the outlines for the next class.

  5. Friday (3/13): Painting Day! Start by having the students take the color they chose for themselves and paint a circle in the center of the outline. Then, have the students take the color for each item on their list and paint on the outline where they feel that item resonates with them. If there is more time at the end of class, have students share their paintings and ask how the experience made them feel.

Additional Resources:

https://www.youtube.com/watch?v=BN2rTaFUlxs

Assessment:

This project is about self-reflection and encouraging the students to think about what is important to them. During the reflection at the end of the project, students should be able to verbalize why they picked the things they did and why these things feel like they resonate where they do. Students are asked to reflect on why they chose the colors they did and what inspired them to paint these importances the way they did.

Materials:

Sketchbook or paper for brainstorming 

Pencil or pen

Drawing Paper, cut to fit students full body outline

Acrylic Paint in a variety of colors

Brushes of a variety of sizes

Markers to trace the outline

Water cups

Paper towel

Colored Pencils

Learning Activities and Timing:

Day 1: 15-30 minutes in total (Class Period)

  1. Have students make a list of 5 to 7 things in their life that make them feel happy and supported. Have them leave a space at the top for themselves; this is in addition to the 5 to 7 items the students have selected.

  2. Have students assign themselves a color, as well as each item on their list. Have students use colored pencils to map out what shades they want to paint with the next day.

  3. Have another teacher or aid take students one at a time to trace their outlines on the large sheet of paper.

Day 2:

  1. Begin painting by having the students paint a circle in the center of the figure in the color they chose for themselves. 

  2. Next, have students paint the items on their list in the colors they’ve chosen. Have them paint them on the figure where they feel these things resonate the most for them.

  3. When students finish, hang the projects and have a final reflection. Ask students how this project made them feel and what things they were thinking about while doing it. Ask students to share why they chose the colors they did and why they chose to depict their lists in the way they chose to.

Teaching Artist Reflection:

  • Students may be confused about how to represent their list on the figure in an abstract way. 

  • Projects will be hung in the hallways of the residency center or possibly up in the units.

  • Feedback on teaching will come from the group reflection at the end.

IMG-1714.jpg

Virtual Reality Drawing

Virtual Reality Drawing

Planning Backwards Model* 

Teaching Artist Practicum

Name of Project: Virtual Reality Line Learning

Grade Level or Age of Participant: 7th Grade

School, Teacher and Classroom: St Michaels, Art Classroom, Rachel Olmanson

MCAD Teaching Artist:  Molly Hoghaug

Number of Students: 10

VISUAL ARTS CONTENT OR STANDARDS

Students will investigate the elements of design in collaborative manor.

1.7.2.2.1 Generate and develop original artist ideas

CURRICULAR LINK / STANDARDS (if in a classroom only)

*links have changed to all Covid-19 links*

This project is about the design element of lines. 

1.7.2.2.1 Generate and develop original artist ideas

OVERVIEW OF PROJECT

Each student will have around two minutes in the headset to draw a portion of a work that will be a large collaboration with the whole classroom.  The students will work in Virtual Reality using lines to collaborate with the other classmates to create one large piece of art work in the virtual reality program. 

“BIG IDEAS”/ ESSENTIAL QUESTION(S)

The big idea will be learning to collaborate with others ideas and creating a bigger picture with every one else but by only using lines. Collaboration is essential to creativity within the classroom.

STUDENT OUTCOME OBJECTIVES

Students will:

1. Collaboration with each other a virtual reality piece 

2. Apply lines and colors to create an image with their classmates

3.Participate in a virtual reality experience that could contribute to their future


PRIOR KNOWLEDGE

Experience drawing and learning the element of line.

Experience any kind of digital game 

LESSON PREPARATION TIMELINE

*write the lesson plan

*prepare the materials

*retrieved materials

EXAMPLES OF ARTWORK

https://www.youtube.com/watch?v=pijO5vH9Ojc

This video gives an example of what they are doing to the best explanation without actually doing it.

ADDITIONAL RESOURCES

https://www.youtube.com/watch?v=BE9AHsFgLhI

ASSESSMENT

Success would be all student participation and contributing to the art work

MATERIALS

*Vr Headset

*Controllers

*CoolPaintVR

*PS4

*Adapter for smart board

*!!! Lens Wipes for headset and sanitizer wipe for nose piece!!!* (for the virus precautions)

LEARNING ACTIVITIES AND TIMING (40 MINUTES)

1.     Introduce the lesson (about 3 minutes)

a.     Idea - with only lines you will collaborate with classmates to make a VR painting.

b.     Rules - 2 minutes per student or less depending on what they want to do with their lines.

2.     Instruction ( 5 minutes)

a.     How to put on the headset (stay next to student when they do so anyway to make sure its right and nothing breaks)

b.     Controller buttons. What buttons to hit and only what buttons to hit.

c.     NO QUICK MOVEMENTS WHILE IN THE HEADSET!

3.     Worktime (32 Minutes)

a.     Students will get roughly two minutes in the headset to draw their portion.

b.     Monitor students for acceptable use of equipment and directions

4.     After class

a.     Make sure they put away all things that they were doing while waiting for the headset and that they are respectful with the equipment after use

5.     VR Video upload for teacher

a.     https://support.google.com/youtube/answer/6316263?hl=en (YouTube instructions)

b.     Export from PS4 https://www.youtube.com/watch?v=leqybBMmAWM 

c.     Share link with the class so they can see their work! 

headgear.jpg