Click here to access the Teaching Pptx created by Sydney Hollingshead
Marc Chagall and the Bezhold Effect
Teaching Artist: Sydney Hollingshead
Grade Level: Elementary: 3rd Grade
VISUAL ARTS CONTENT / STANDARDS
Creating: Generate and conceptualize artistic ideas and work.
Organize and develop artistic ideas and work.
Synthesize and relate knowledge and personal experiences to make art.
Relate artistic ideas and works with societal, cultural, and historical context to deepen understanding.
OVERVIEW OF PROJECT
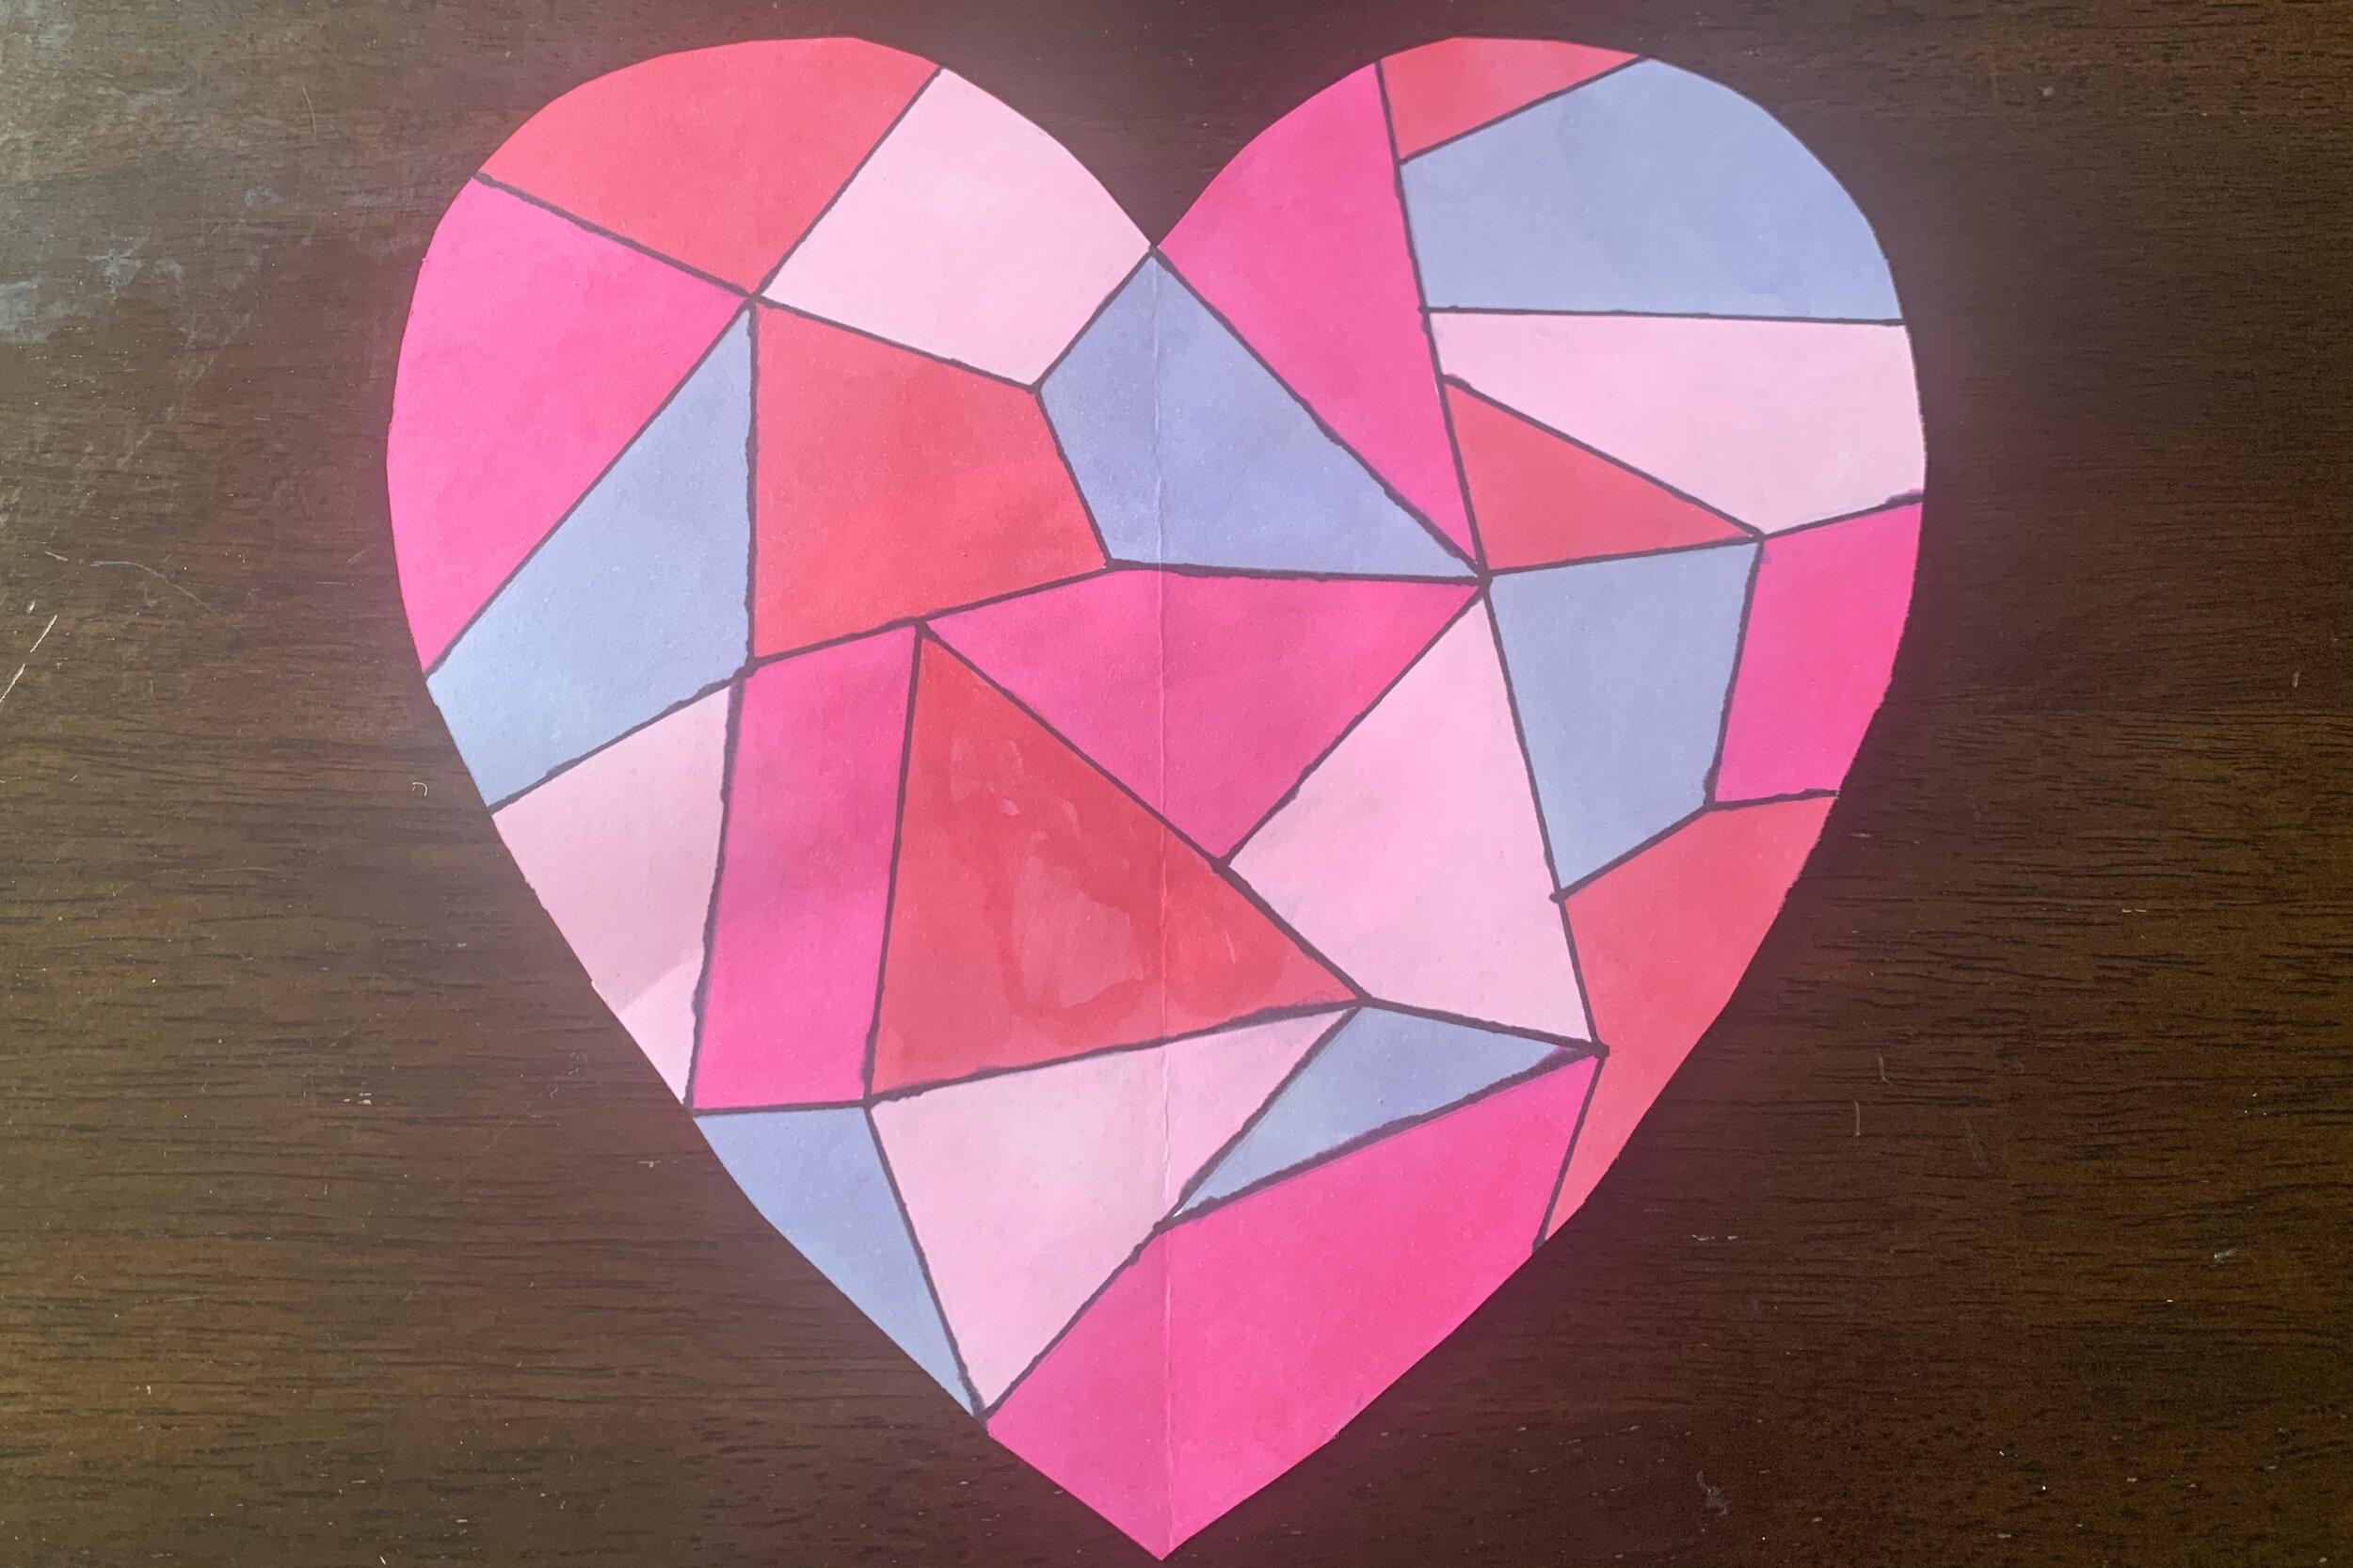
Students will discover a new form of art making while also trying to mimic the works of the late artist, Marc Chagall (1887-1985). Students create their own artworks investigating the color used by Chagall in his work on heart shaped paper. In addition, students will attach the hearts to another sheet of paper to write about what they love to further mimic Chagall’s love for his work.
ESSENTIAL QUESTION(S)
How does color choice effect the feeling of a piece of artwork?
Why does a heart mean love?
Why do colors appear bright?
STUDENT OUTCOME OBJECTIVES
Students will:
1. Apply color choice from a limited palette to create a design
2. Adapt to a new technique of steps of artmaking.
3. Use a variety of tools and materials to create a piece of art that is meaningful to them.
PRIOR KNOWLEDGE Before participating in this project, it is important for students to have a growth mindset. They need to understand that perfection isn’t everything.
EXAMPLES OF ARTWORK
Marc Chagall, Still-Life (Nature Morte), 1912, Oil on Canvas
Marc Chagall, Stained Glass Windows At Tudeley, 1967-85, Stained-GlassStained-Glass
ADDITIONAL RESOURCES
Marc Chagall Presentation created by Sydney Hollinshead: See below
Art Projects for Kids: Kathy Barbro’s Stained Glass Candle Drawing https://artprojectsforkids.org/oil-pastel-candle/
ASSESSMENT
The questions below are addressed in the Google Form for the lesson:
What can a heart mean besides love?
Can certain colors evoke a specific mood?
MATERIALS
1. ) 3 pieces of Printer Paper (8 ½ x 11 inch)
2.) Scissors
3.) Washable Markers
4.) Black Marker or Sharpie
5.) Erasers
6.) Pencils
7.) Glue stick
8.) Ruler (optional)
LEARNING ACTIVITIES AND TIMING
1.) Introduction to Marc Chagall: View Marc Chagall’s presentation that shows his past stained glass.
Review vocabulary words discussed in the classroom and how it could tie into the activity (collage, composition/ space, contour, line, color, shape, geometric shape)
Introduce the project that the students will be working on and how it is similar into the presentation.
Present Own Example: An example drawn will show students the type of angle they should go when creating their hearts.
2.) Fold the Paper: After the presentation, students should take their computer sheet of paper and fold it the wider way or “hamburger style.”
Make sure to line up the each side of the paper in a straight line to make sure that both sides are the same.
3.) Draw a Half Heart: After folding their piece of paper, students should draw one half of their heart with a pencil on their folded paper.
This may seem confusing to some students, so be sure to provide a reference image of a heart for students to look at when trying to draw.
4.) Cut Out the Heart: Cut out the half heart by guiding the scissors on the pencil line.
Some students may be familiar with this part of the activity if they have made their own snowflakes in the past.
5.) Unfold the Heart : Once the students finished cutting out the hearts, have them unfold the paper and look at their hearts.
6.) Draw the Stained Glass: Have the students lightly draw the straight lines that are a part of Chagall’s stained glass work onto their paper hearts.
If available to them, students can also draw the straight lines on their papers with a ruler.
7.) Inking: With a black marker, carefully go over the pencil lines.
Before starting this step, be sure to lay another sheet of paper down on the table first just in case if the ink bleeds through the paper heart.
8.) Erase the Pencil Lines: Erase the pencil lines that are still showing on the paper.
9.) Coloring: Color the spaces that are left by the black marker with colored markers.
Have the students think about color choice while coloring.
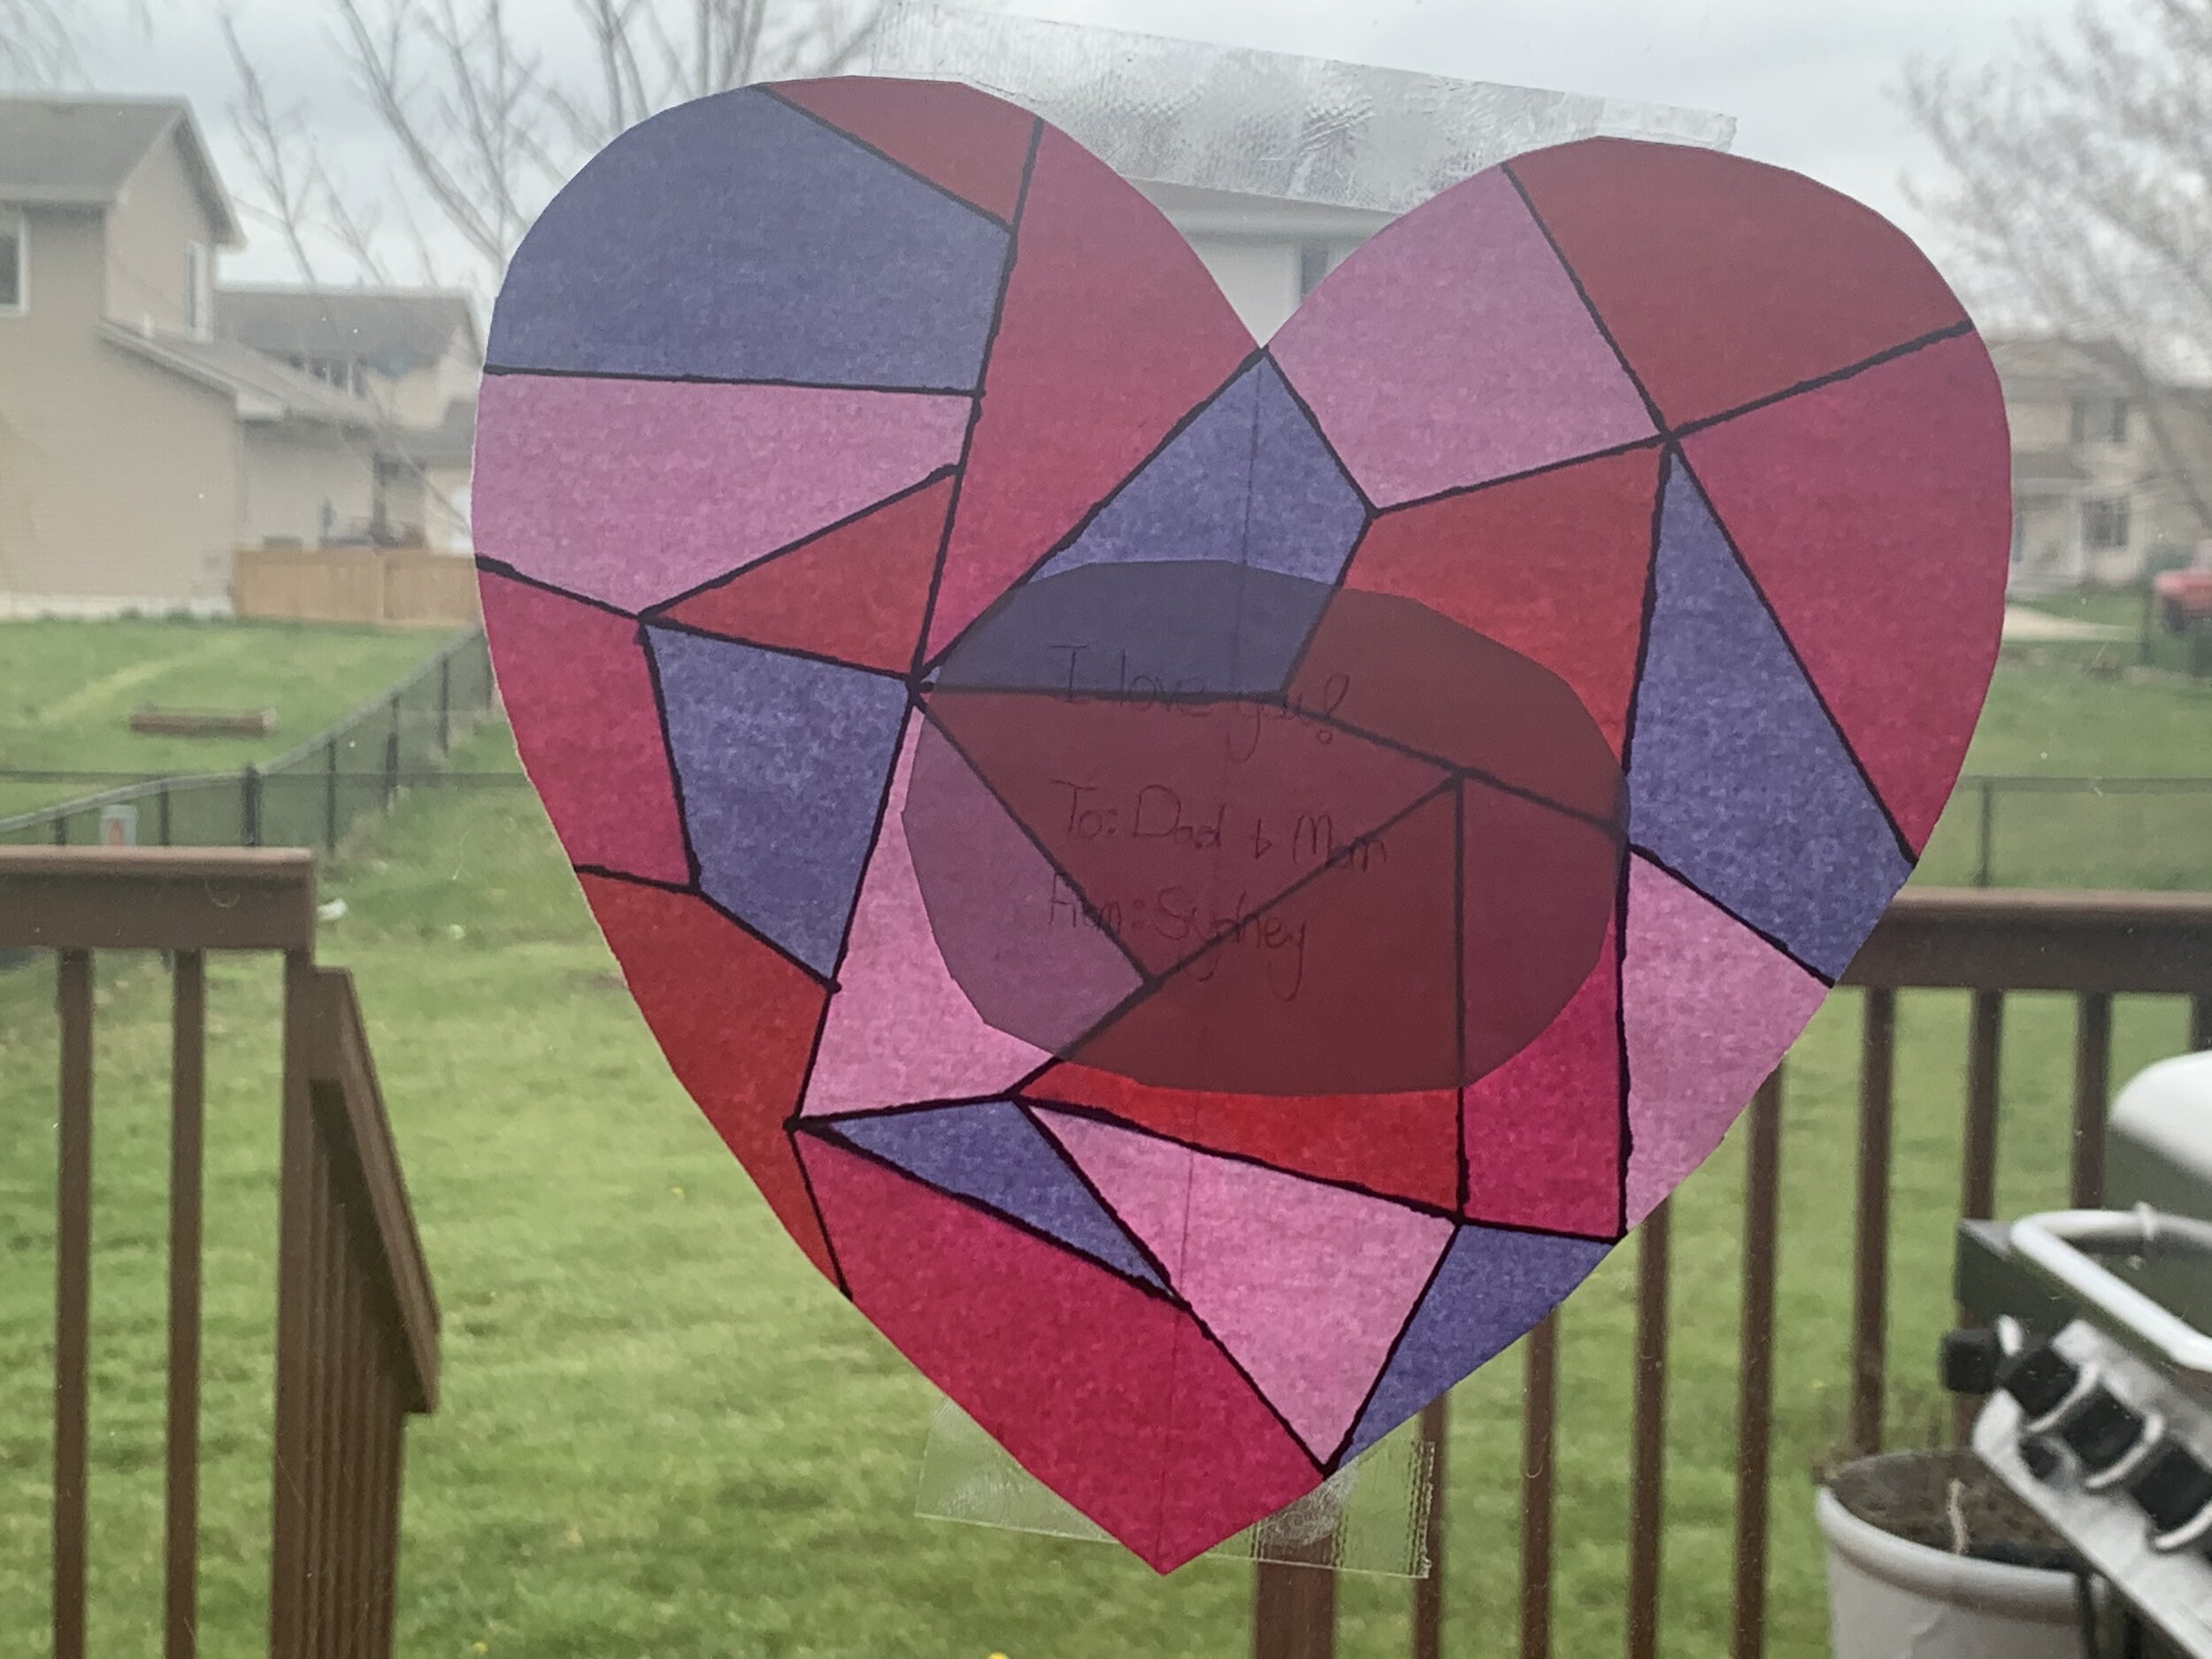
10.) Write a Message: On the back, write a message on the back about something or someone that you love or appreciate.
11.) Glue the Paper: Glue the written message on the back of the heart with a glue stick.
12.) Take a picture of the heart and message with a cell phone. Put your heart in your window to share with your neighbors.
TEACHING ARTIST REFLECTION
What problems do you anticipate with this lesson?
Students might feel frustrated when trying to cut out their hearts.
Students may not grasp the importance of sticking to basic shapes with their designs
and create complex ones instead.
How does this project fit into overall curriculum planning for the subject areas and the arts?
Allows students to experiment and incorporate different types of art materials
into one project.
Shows students that there are multiple ways to make art and to express the meaning behind it.
How will your students’ work be shared with the community?
Students will be able to give their hearts to others or their families to express what they love or as an act of it and be asked to upload them to their teachers art folder. In addition they may put them in the windows of their home.
How will you receive feedback on your teaching methodology and quality of student work?
Ask if they have learned anything. What did they like and dislike about working with different materials.
Through conversation with lead teacher after the project is complete
Through a self and video reflection
Through assessment by my instructor of the video of the lesson