Viewing entries in
Lesson Plan / Online

Doodle Buddies

Grade Level or Age of Participant: Teenagers (10th-12th grade)

Number of Students: 10-12


OVERVIEW OF PROJECT

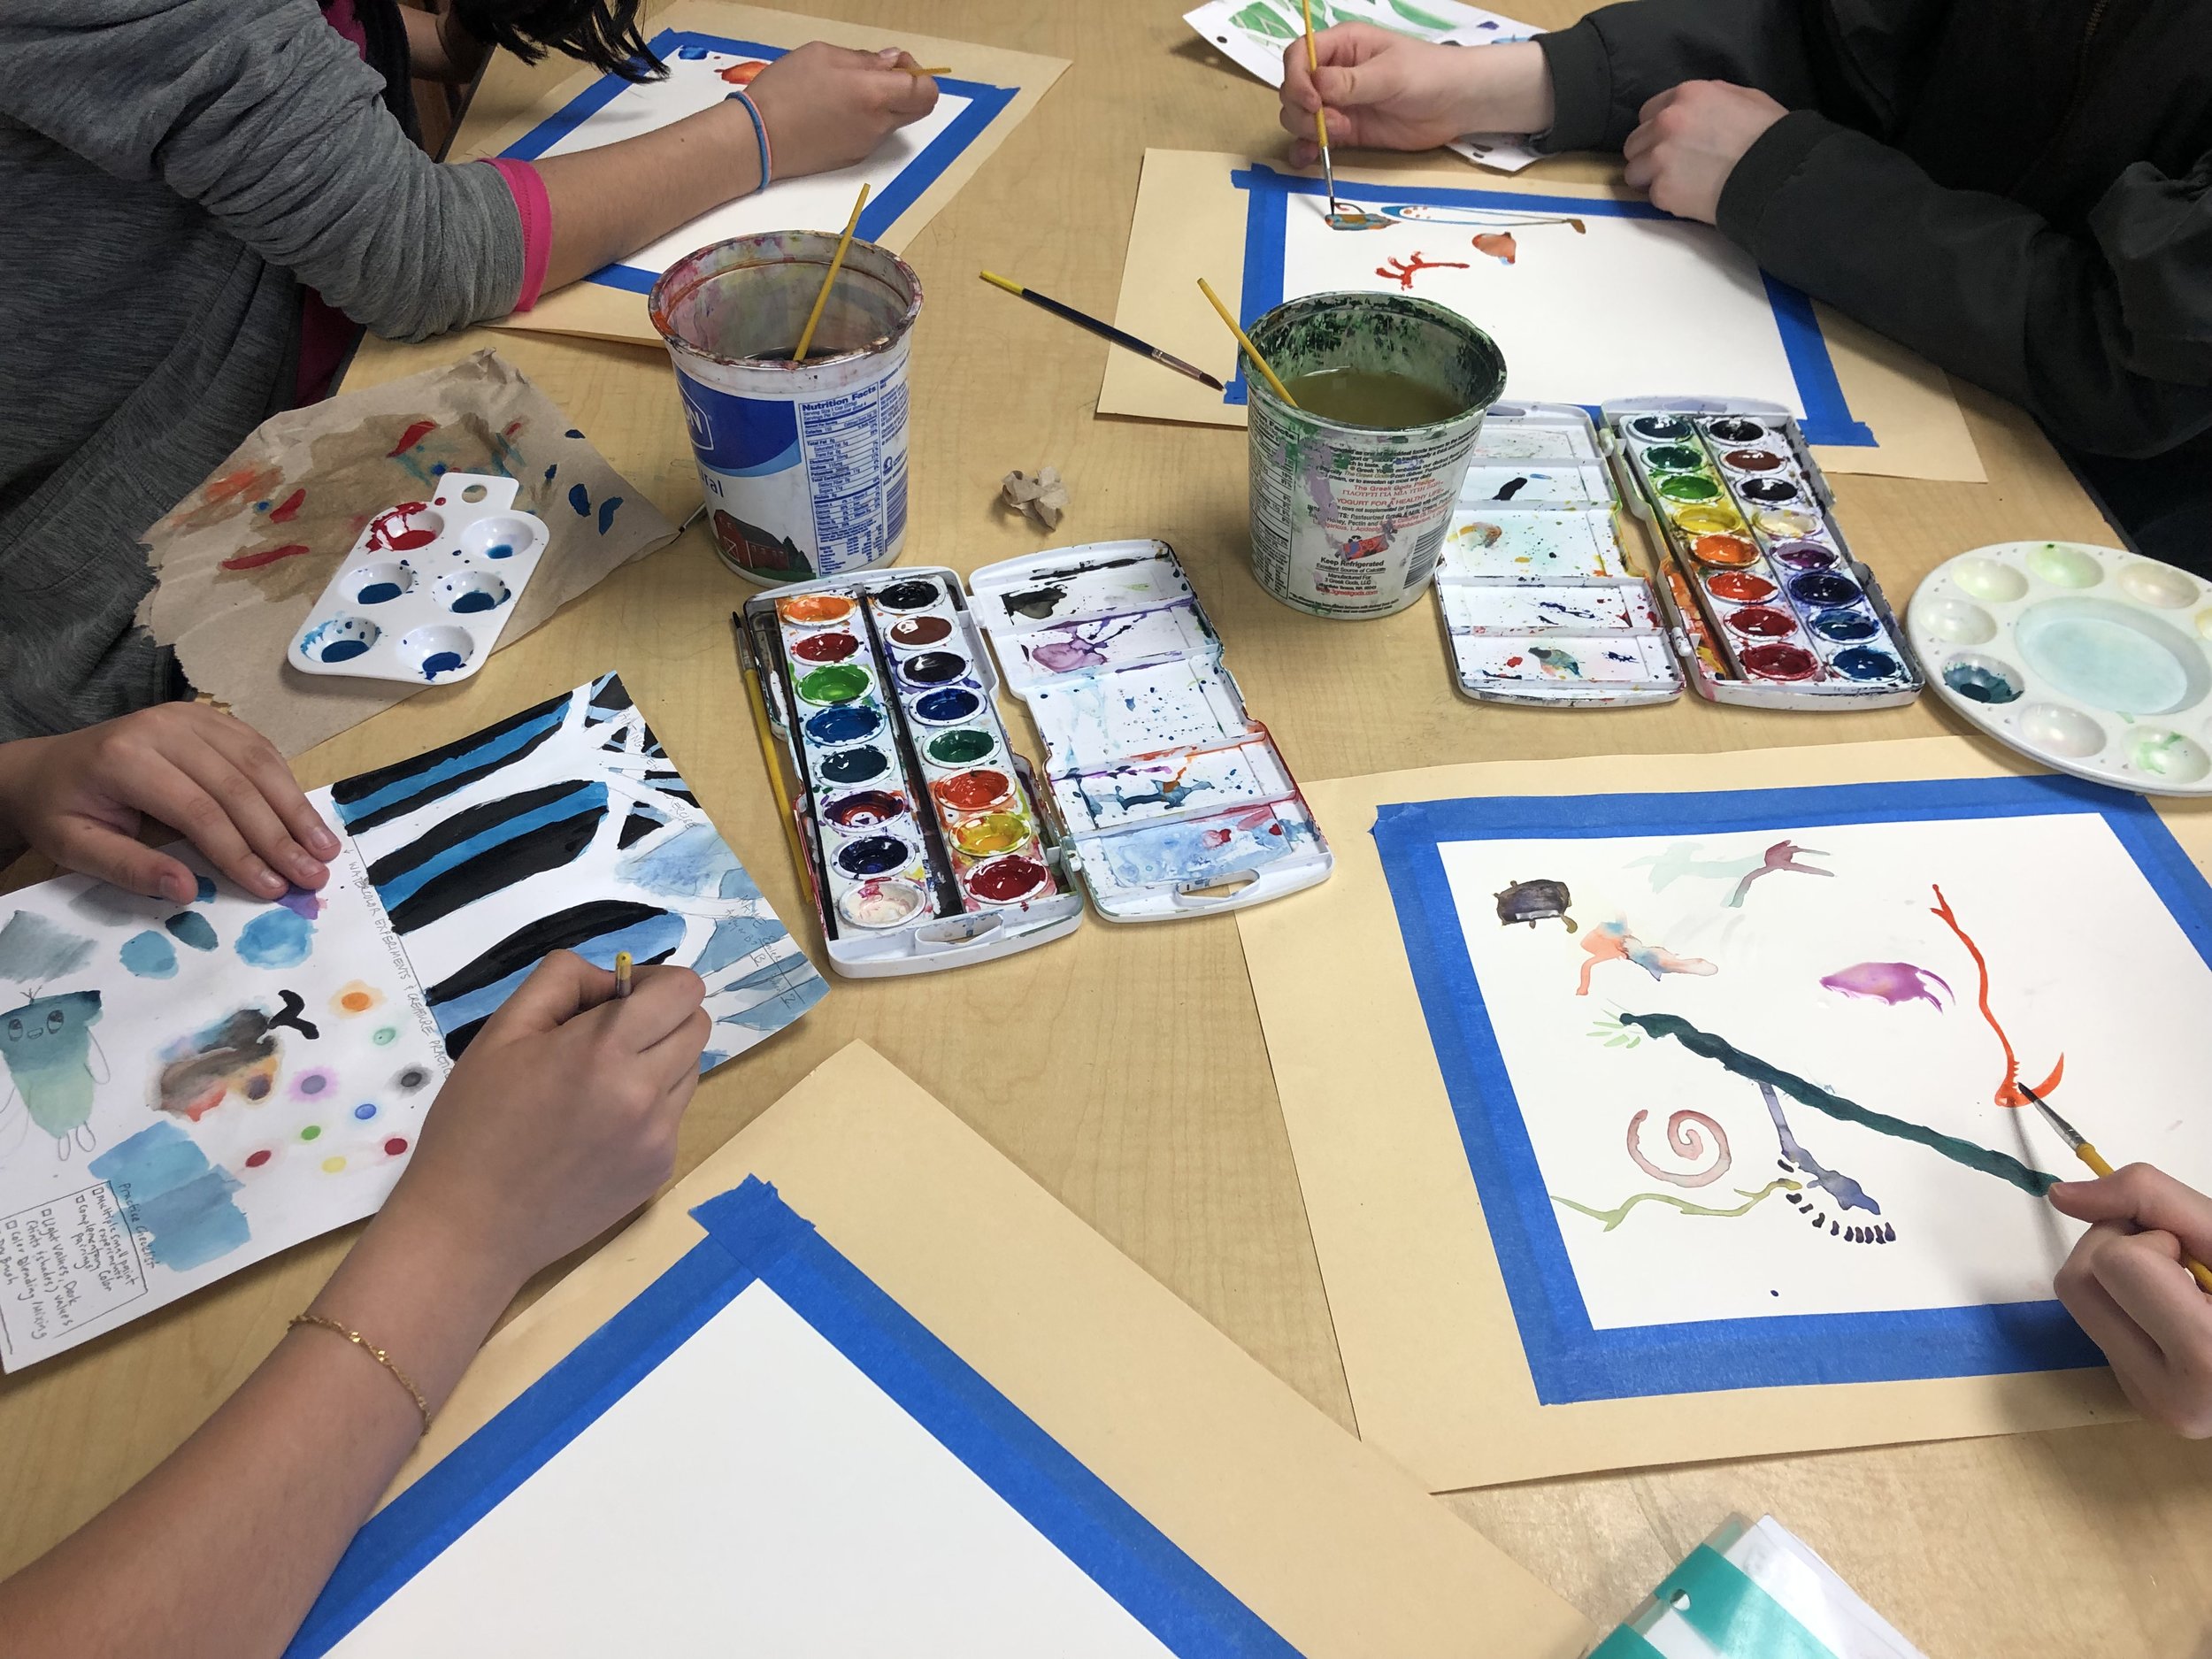
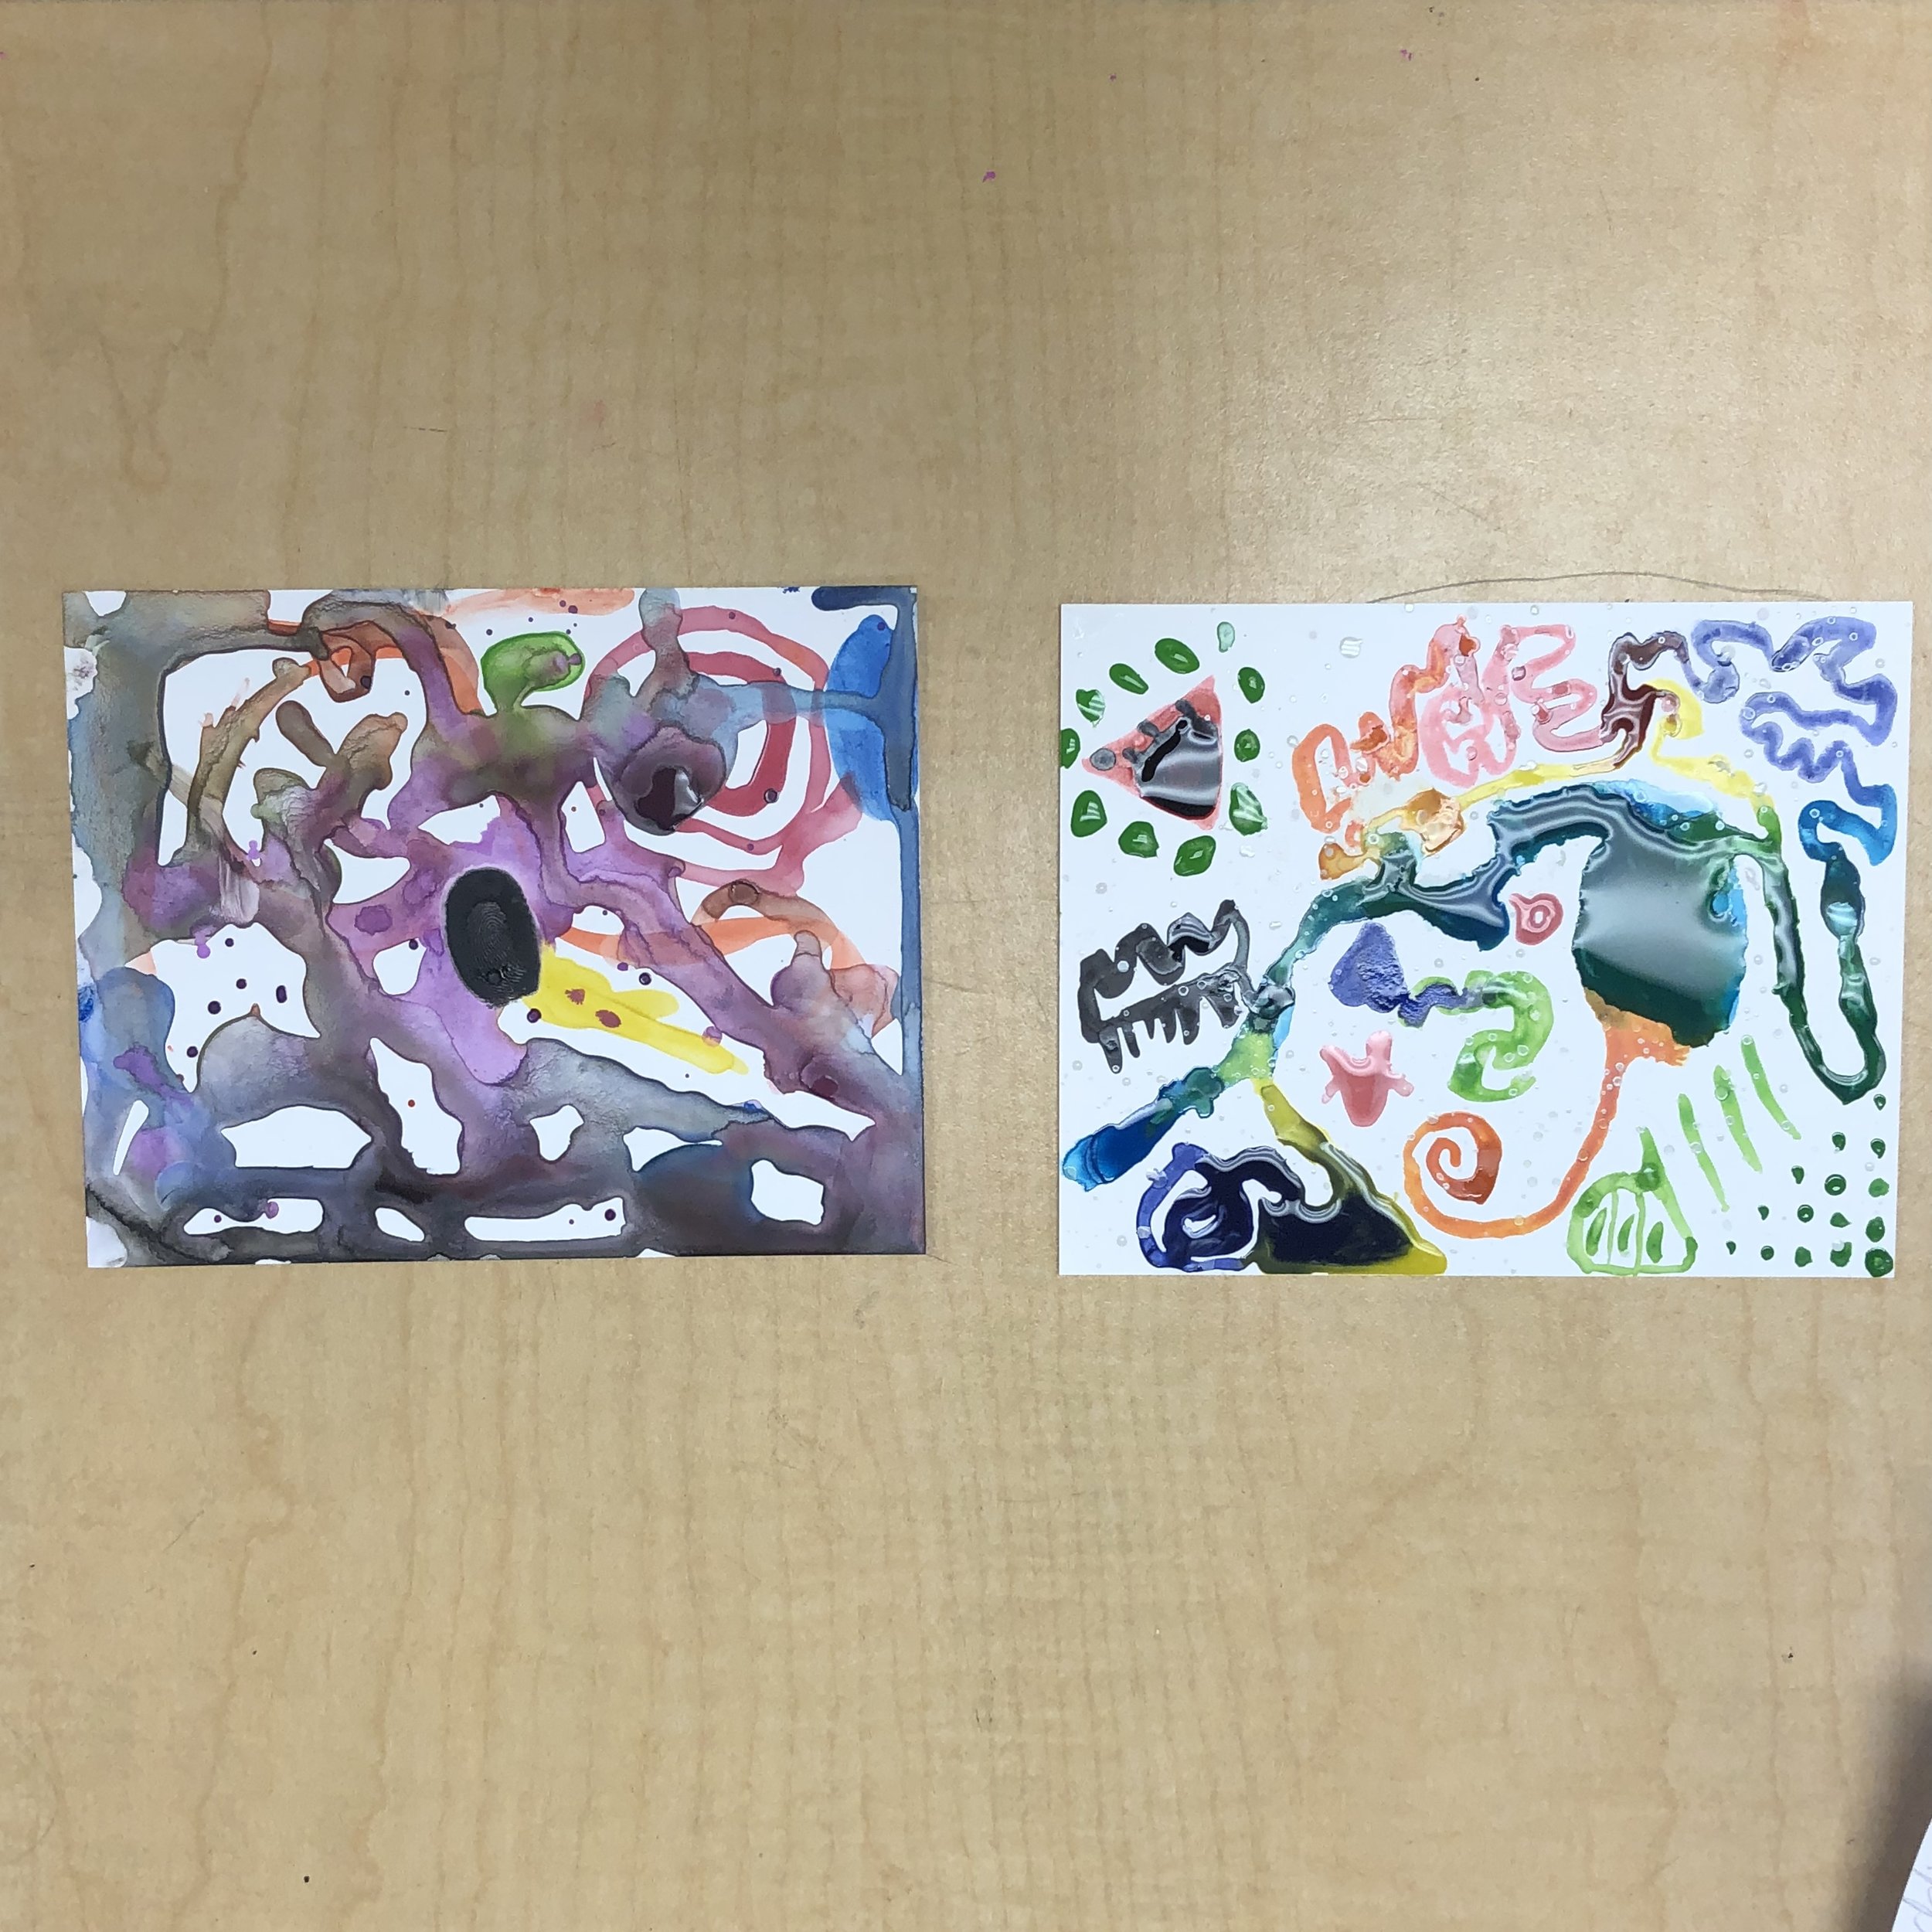
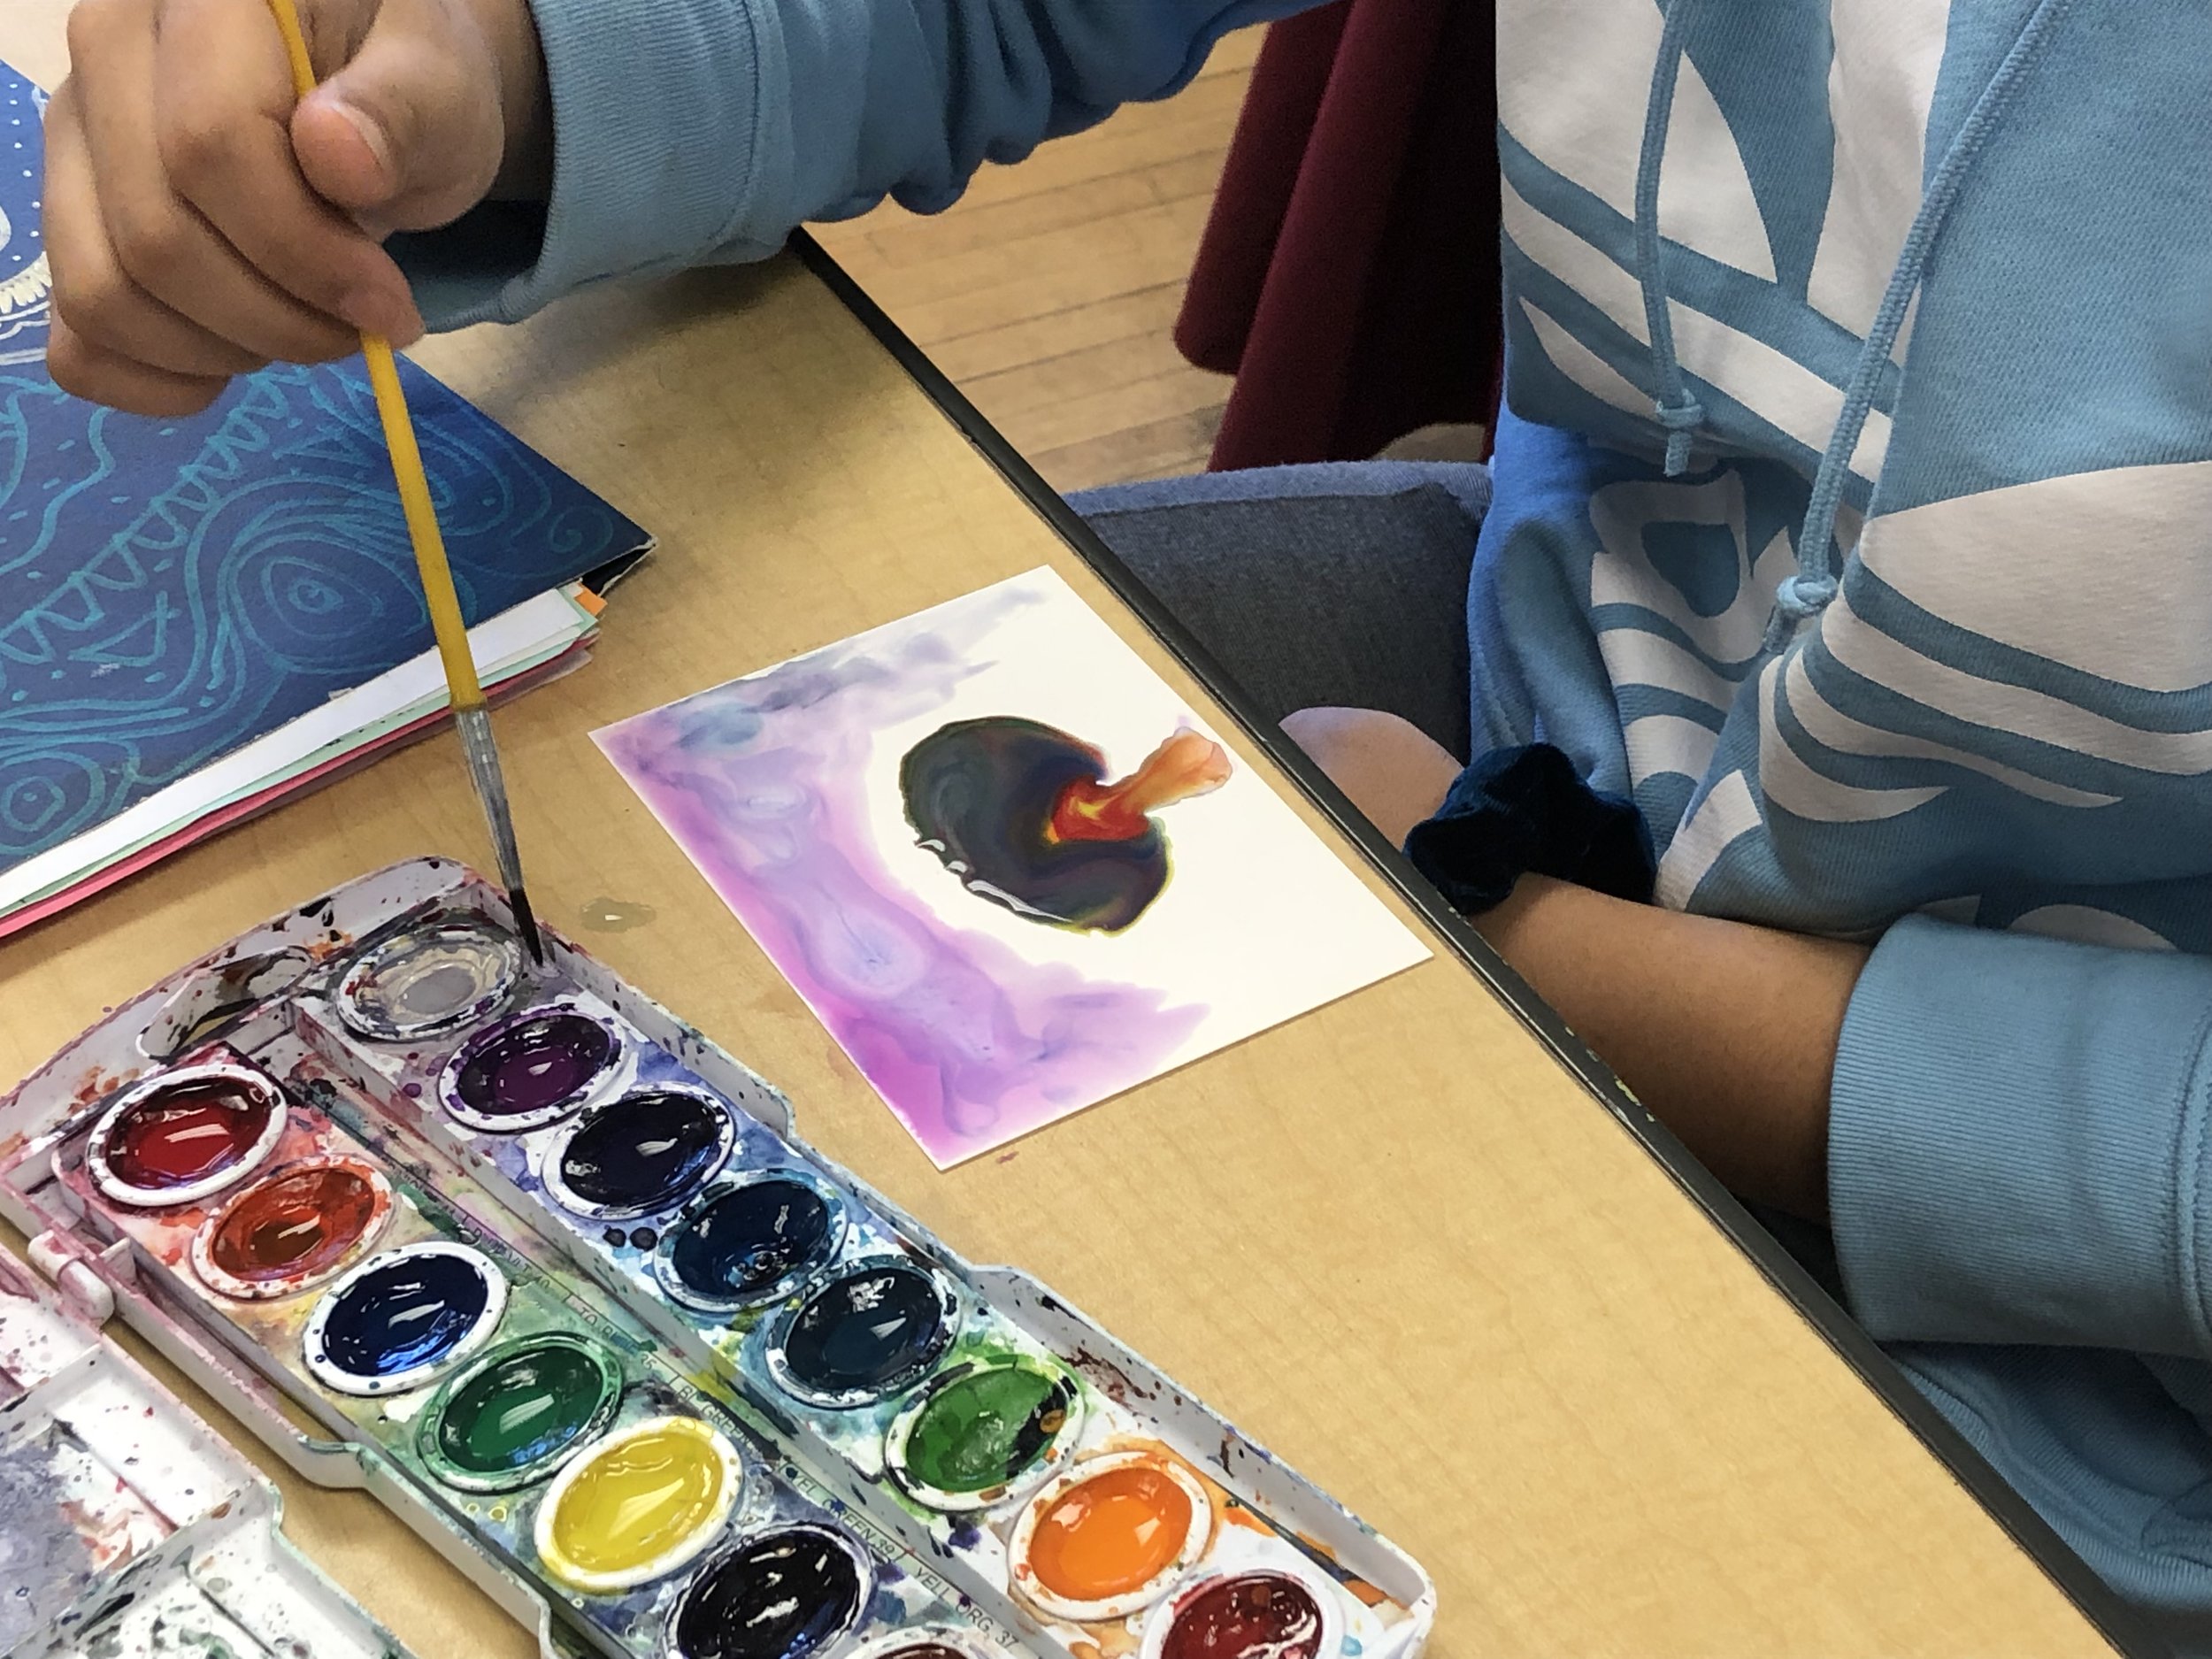
Activity should take 15-20 minutes to complete. This is an icebreaker/grounding activity to warm up before shifting attention to major projects. Participants and facilitator will be providing prompts in order to guide this drawing activity. The prompts will be based on the different bodily parts of a character as well as using other words (adjectives, nouns, verbs) to describe the character and scene. 

Everyone will be creating their own separate drawing using the same prompts given during the duration of the activity. Drawings from the group are not revealed until the end of the activity.


“BIG IDEAS”/ ESSENTIAL QUESTION(S)

Through drawing the characters, learners are building visual interpretation skills.

Through drawing, group will be able to get to know each others. 

Adjective to use to inspire drawing (each students will choose adjective):

They will be choosing the adjective of “How would you describe your week?” OR “How are you feeling about the project they are working on?”  

Spiky / Squiggly / Soft / tangle

“How did AAAA thought about spiky? What do you think AAAA was thinking? ”


STUDENT OUTCOME OBJECTIVES 

Students will:

1. Be able to create their own characters by collaborating with words that has provided from the others.  

2. Listen to the others words and providing visual description 

3. Practice interpatient of adjectives with visual components 

4. Present and verbally explain their visual interpretation 


PRIOR KNOWLEDGE

  • Students must know What adjectives are 

  • Students should be able to interoperate Special balance on the limited size paper

  • Students can call out different Body parts


ASSESSMENT

Everyone would have created drawing work to show at the end of the lesson

At the presentation we can discuss the difference and similarity of each other’s work.

“What is your favorite part of your characters?” 

“What is your favorite part of others characters?”

“Is there anything hard to interpreted?” 

“What is the difference between your work and AAAA’s work? OR similarity?”  

MATERIALS

Blank sheet of paper

Drawing utensil (Choose 1 medium)


LEARNING ACTIVITIES AND TIMING

1.Relating to Audience

Take time to explain that the activity will be short in time and that there are no right or wrong answers/outcomes. The effectiveness of the activity is dependent on interpreting the given prompts and the short duration for each prompt. -


2. Collect Materials

-Give students a couple of minutes to collect materials or ask questions about materials needed for activity. 

-Check-in with students before moving on to the next step.

3. Introduction of Activity

The facilitator explains rules and prompts for the grounding activity

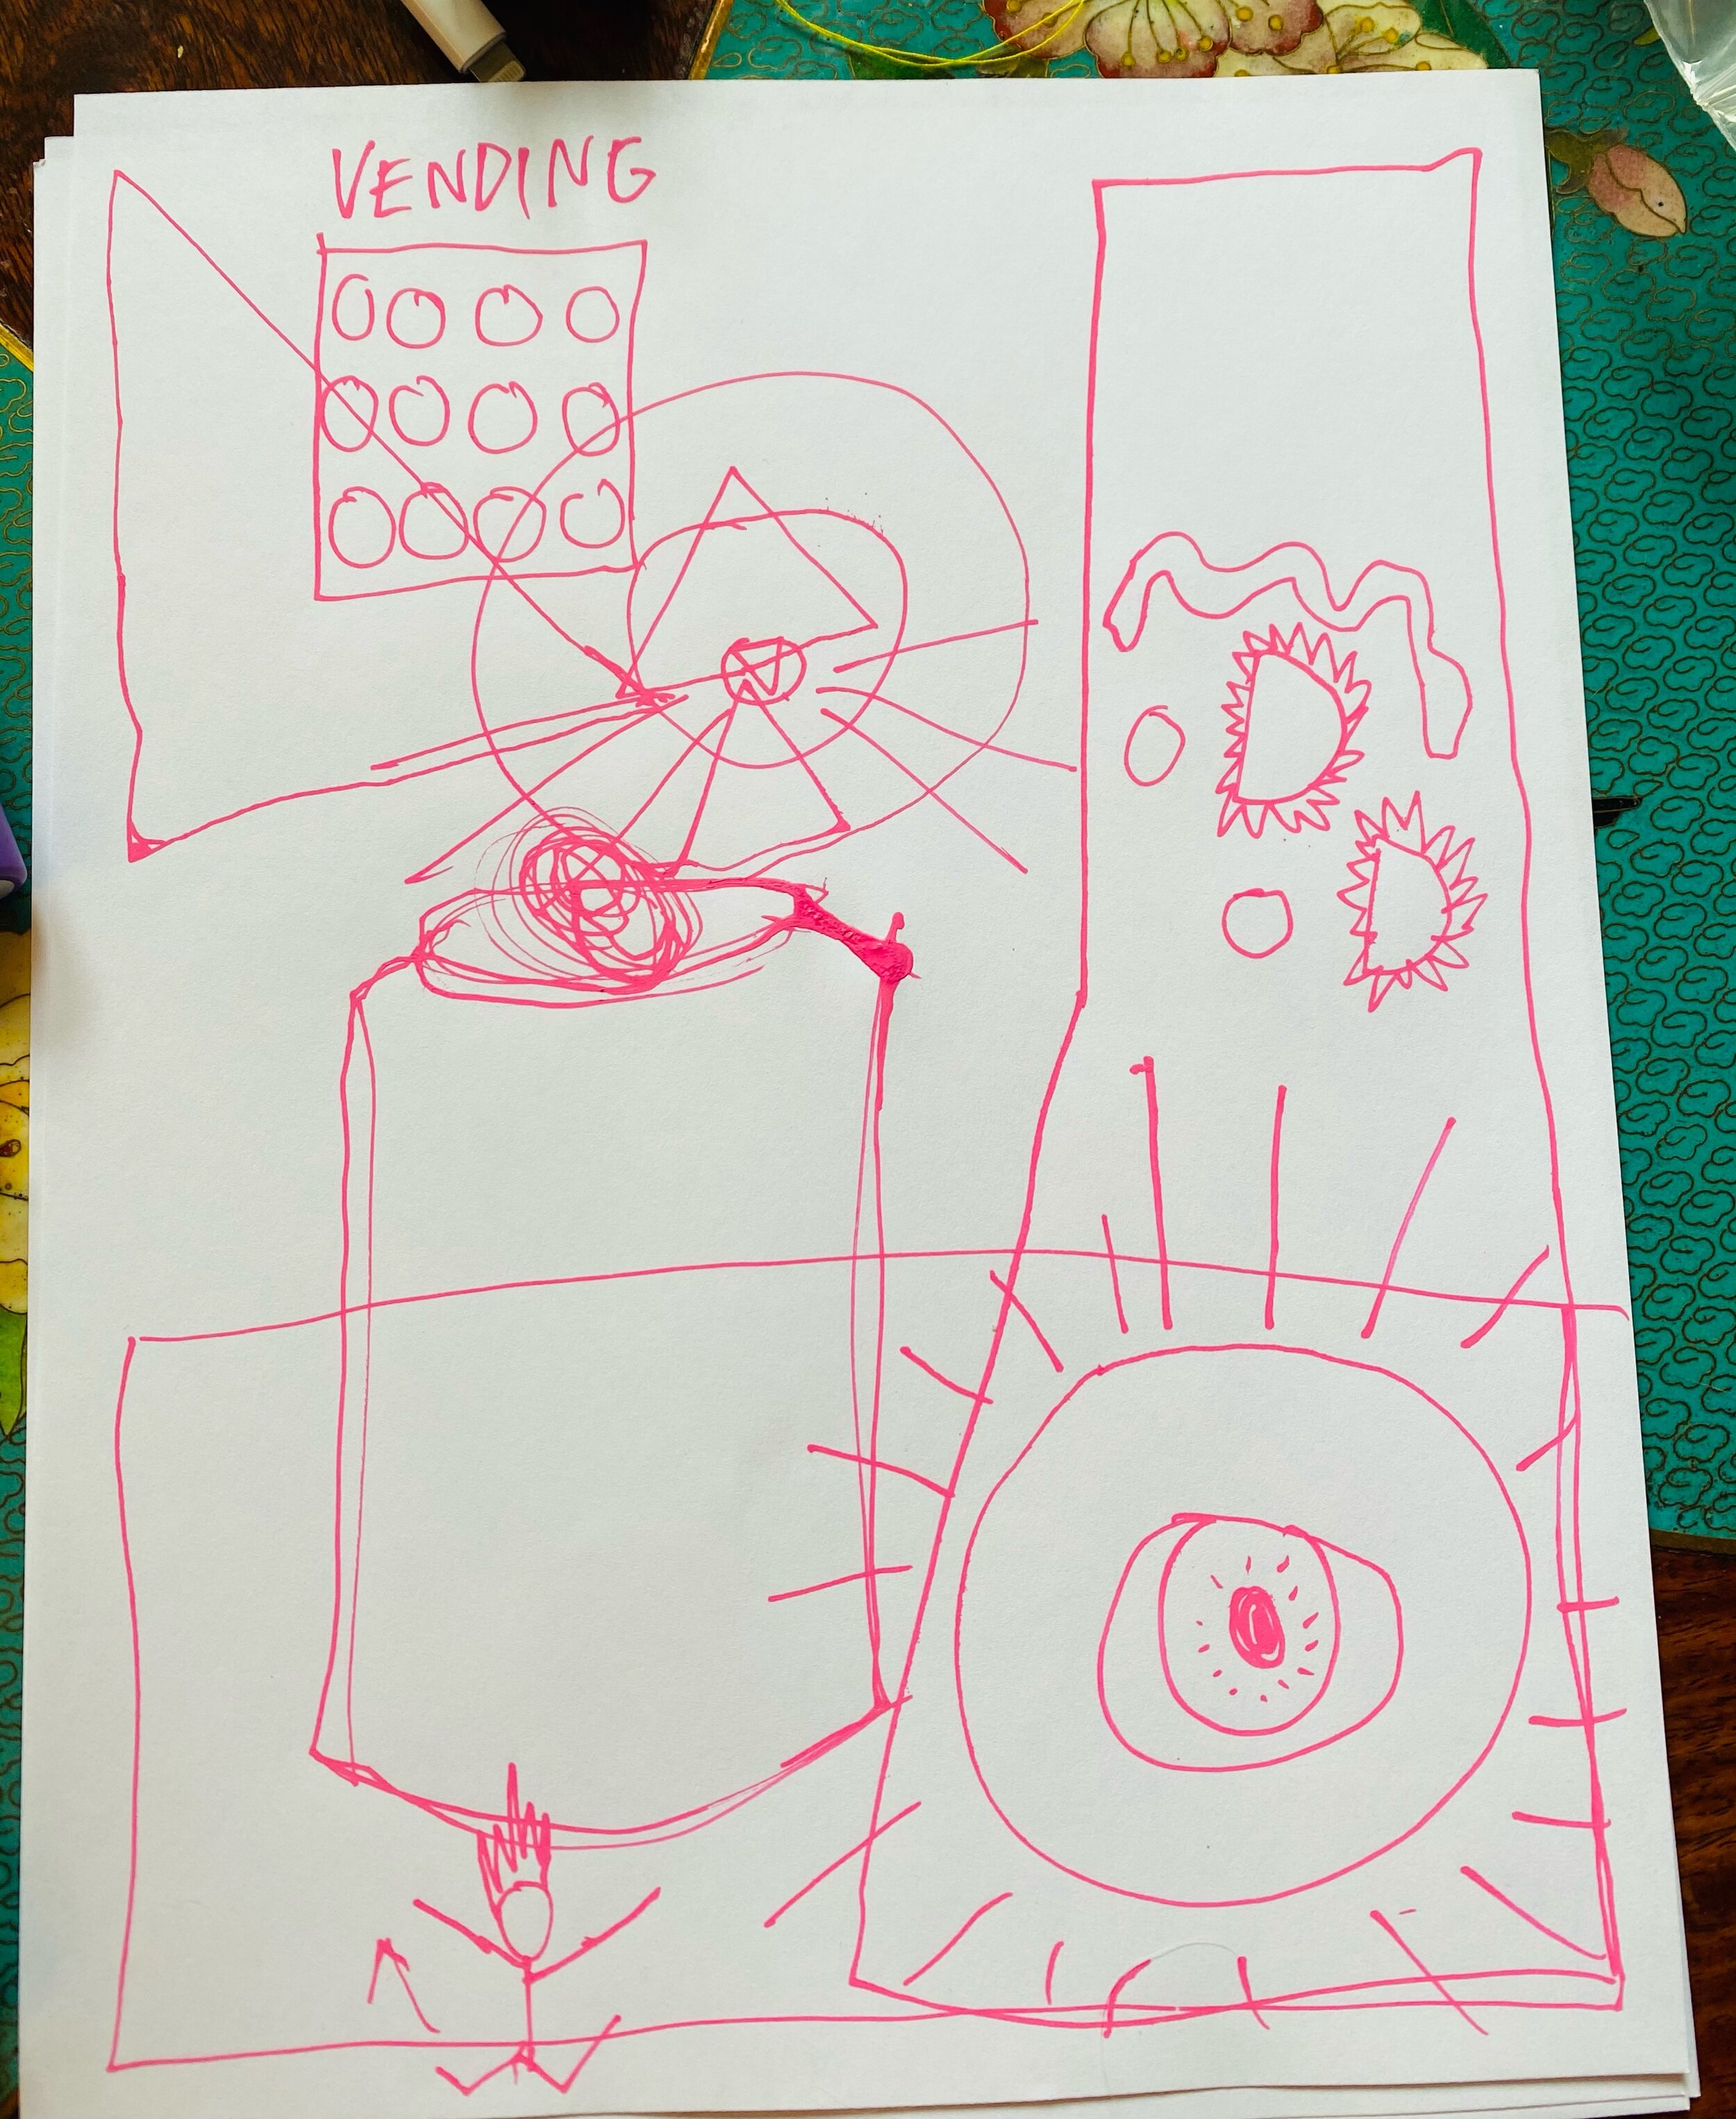
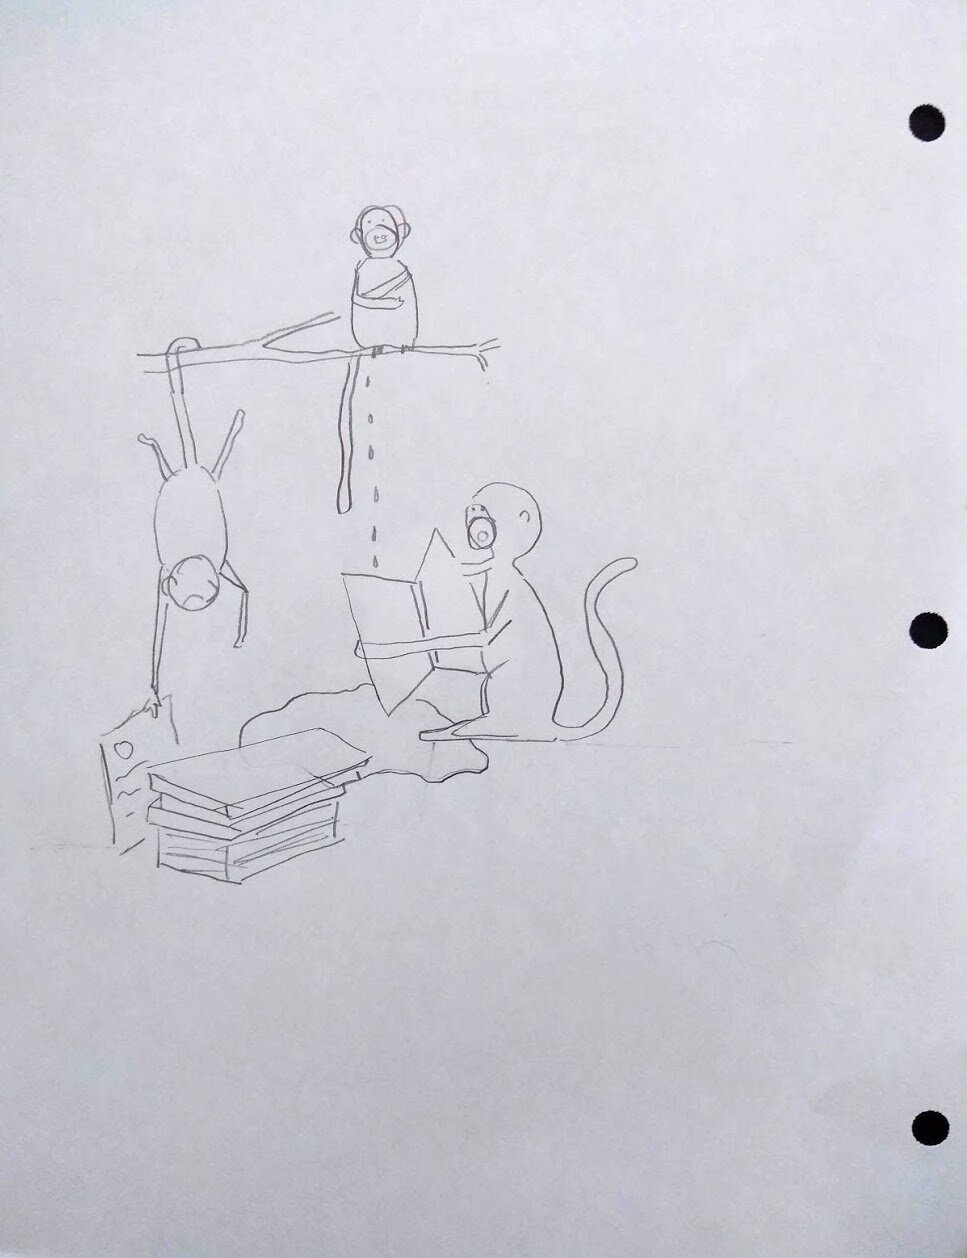
-I decided to give this activity the name “Doodle Buddies”

-The main idea of the activity is that we will all be drawing our own ‘doodle buddies’ using the same information/prompts (to make the prompt process easier- body parts, other descriptive words)

-The prompts are mostly based on the different body parts a character could have (head, arms, legs, etc. ) but will also be influenced by the overall chosen theme and descriptions from group members

-I will be assigning the first part of the prompt (body parts) to the group members as they are chosen to contribute, then they will provide more specific details about said body part.

-I will start off to demonstrate the flow of the activity and also keep a timer to move the activity along


4. Questions

- Take time to answer any final pending questions about the “Doodle Buddies” grounding exercise.

-Suggest overall character theme


5. Begin Activity

Before beginning to draw the character’s head, ask group members if they would like to volunteer prompts or ‘popcorn’ to their peers.

-Choose character theme and write in top left corner

-Re-state that after each prompt is given, we will only have 30 seconds to complete that part of the character

-Re-state that the first part of the prompt is given by me (body parts) and the description comes second. - example: body part - arms, spooky themed - skeleton arms/bones, adjective - decayed bones, noun - chainsaws for arms, verb - flexing

-Check-in with students before moving on to the next step.


6. Prompts

- Head and neck

-Eyes/eyebrows

-Nose

-Mouth

-Ears

-Hair/hair accessories 

-Body - include clothing

-Arms

-Legs - include clothing

-Feet/shoes

-Additional accessories - maybe bag or jewelry

-Pet/companion

-Background

-Name of character - Could also collectively create a name with the group instead of assigning one person


7. Final Product Reveal

After everyone in the group has contributed to the prompts, the facilitator will show their final drawing and name their favorite characteristic that their character was given. Discuss with the group about how their doodle buddy turned out.

(7 min) Share out time

- Show facilitator’s drawing as a sample and talk about “My character name is BBB and I name them that because ________ “ This is the way we can introduce the characters to each others.

- invite next speaker by asking “Did anyone found something similar to my character, come forward and introduce your character ☺” 

- Keep going around till everyone introduce and talk about their character! 


(1 min) Reflection and summary for the project “This is what I noticed doing the project with you”

  • Learned about each other a little bit from this project

  • Made visual interpretation from the language 

  • We made collaboration through sharing words

  • All of our interpretations are different

  • Respecting each other’s differences and artistic choices.


Collaborative Line Drawing... With a Twist!

Collaborative Line Drawing... With a Twist!

Whatever it is, the way you tell your story online can make all the difference.

Age of participants: 6+

Mcad teaching artist: Greer Coffman

Number of Students: 7

Overview of Project:

In this project we will come together to create a collaborative blind drawings and explore how to communicate our

goals and intentions with each other, both abstractly and concretely.

Big Ideas:

● clear communication vs abstract communication

● different interpretations of ideas

● individuality

Student Outcome Objectives

Students will:

1. create a collaborative line drawing

2. find ways to communicate with each other to make their points clear

3. have a good time!

Prior Knowledge:

● usage of a mark making tool

● communication skills

lesson preparation timeline:

● planned the lesson

Materials:

● piece of paper

● mark making tool

● google meet software

learning activities and timeline:

1. i will start the lesson by explaining the concept

1. “today we will be creating a collaborative line drawing, one person will start by putting a line on the

paper, and it can be any shape or duration, but as soon as you lift your pencil off the paper, you are

done. you then must describe to the group the line you made and everyone must try and replicate

that line without seeing it. then the next person will go and add on with a line of their own, and

everyone must replicate that line without seeing it, and so on and so forth”

2. I will be the person to start the line drawing, then I will choose someone to do the next line, and then we will

continue in that manner.

3. After we are done with the first round, we will do a second round in which we will try and create something

more grounded, but using more abstract terms. For example, someone will draw a mouse, but instead of

using very specific terms for it, they will be looser with how they describe it, and people can interpret that

how they want.

4. After all of the drawings are complete, we will come together to share and compare our individual interpretations of the prompt!

Suminagashi Lesson Plan

Suminagashi Lesson Plan

DIY Suminagashi

Age of participants: 12+

Organization: greer c workshop for the arts

MCAD teaching artist: greer coffman

Number of students: 2

Overview of Project

● In this project we will come together to explore the printmaking technique Suminagashi! We will be focusing

on a DIY approach, mixing traditional techniques with a slightly more home-friendly, experimental focus.

Ideas Explored

● Exploring the more accessible sides of printmaking

● Control vs chaos, and controlling the chaos

● Nature vs nurture, in terms of the development of an art piece

Student Outcome Objectives

Students will:

1. learn about the art of suminagashi

2. experiment with different ways to effect the ink on the surface of the water

3. Create their own suminagashi prints as a result of their knowledge and experimentation

Prior Knowledge

● usage of a paint brush

Lesson Preparation Timeline

● Took a class on suminagashi

● Experimented and practiced it

● Cut down 60+ sheets of paper

Examples of Artwork

● A variety of my own personal prints

● Natalie Stopka

● Wandering and Orinoco Flow by CHEUK Ka-wai, Cherie

● Tadao Fukuda

Additional Resources:

● suminagashi.com

● https://www.pinterest.com/gomeditate/suminagashi/

● https://www.youtube.com/watch?v=GdgRQf6UiDM&ab_channel=RokoleeDIY

● http://marblinginspain.blogspot.com/2009/11/suminagashi-and-harunobu.html

Assessment:

● Do the students leave the class with a basic understanding of suminagashi?

● Did everyone have a good time?

● Will the students be able to replicate this on their own time if they please?

Materials

● empty hummus containers x3

● 30 precut 3x3 sheets of mullberry paper

● 30 precut 3x3 sheets of handmade paper

● a variety of paint brushes including sumi brushes

● one container of sumi ink

● small containers to hold ink

● spray bottle x3

● 5 hand towels

● 1 gallon of water

● dishwashing liquid

Learning Activities and Timeline

● Single day workshop, 1 hour

● 25 minutes of more traditionally structured suminagashi demonstrations + troubleshooting

○ 5 minutes: Start with stretches and setting the space for suminagashi, physically and mentally

○ 2 minutes: Go over a brief description and history of suminagashi

○ 5 minutes: Start demoing

○ 10 minutes: After one demo is complete, we will work in tandem to create together

○ Once that demo is done, the participants will work independently with suminagashi as I provide

assistance and troubleshooting

● 35 minutes of open work/experiment time

○ We will conclude with creating 3 collaborative suminagashi pieces together that we can each take

home (all of the students individual work they will be able to take home too).

Introduction to Motion Graphics and Animation

Introduction to Motion Graphics and Animation

Name of Project:  Introduction to Animation

OVERVIEW OF PROJECT

The objective of the project is to make a 20-30 second animation using the student names or initials.  By using pre-production and animation techniques students can try to make a short story or a motion graphic to share or add to a demo reel. 

“BIG IDEAS”/ ESSENTIAL QUESTION(S)

What are the components to making an animation?

What different types of animation are there?

-How can the principles of animation be applied to each of them.

STUDENT OUTCOME OBJECTIVES 

Students will:

  1. Understand basic editing in Photoshop

    1. Key Frames

    2. Onion Skin

    3. Video Layer 

    4. Export video

2. Understand the 12 Principles of animation 

3. Understand Navigating Photoshop

PRIOR KNOWLEDGE

Students will need to have a basic understanding on how to operate Photoshop.

VISUAL ARTS CONTENT OR STANDARDS

2.9.5.9.1

2.9.3.6.1
2.9.2.3.1

CURRICULAR LINK / STANDARDS (if in a classroom only)

2.9.5.10.1

5.9.2.2.2

5.9.2.3.1

EXAMPLES OF ARTWORK

https://www.youtube.com/watch?v=EGOIB15vR8E&t=1s

https://www.youtube.com/watch?v=PVUCnmnHI8s

https://www.youtube.com/watch?v=5T_8y_uNTDg

ADDITIONAL RESOURCES

The 12 Principle of Animation

https://www.youtube.com/watch?v=f0cZfw3XrG8

How to Animate layer Mask in Photoshop

https://www.youtube.com/watch?v=OdMDySEPzUo

How to Make a Simple Video Animation

https://youtu.be/VXdHzVIvVWQ

Basic Frame By Frame animation

https://youtu.be/IO1yDUJl8qw

ASSESSMENT

During critique, students will be asked about their processes, feelings, and overall thoughts about the outcome of their projects.

MATERIALS

Computer

Photoshop

Digital Drawing Tablet (optional)

LEARNING ACTIVITIES AND TIMING

  1. Monday: Introduction

    1. Introduce project

      1. Project is about making a 10- 30 second animation using the students name or character, using keyframes, timeline, and onion skinning in Photoshop.

    2. Set expectations for the assignment

      1. Make a Short story, Into, Typography music video

    3. Give example of the project

  1. https://www.youtube.com/watch?v=EGOIB15vR8E&t=1s

  2. https://www.youtube.com/watch?v=PVUCnmnHI8s

  3. https://www.youtube.com/watch?v=5T_8y_uNTDg

Students can look at these as an example of what they can do for the project. 

  1. Give examples of different animations and methods

Power point presentations of:

2D

3D

Stop Motion 

Motion Graphics

  1. Demo Name Project

    1. Create new document

    2. Select Film & Video Tab > Select 1920x1080 

      1. Standard TV Resolution

    3. Open Timeline: Window > Timeline

      1. Explain the Difference between 

    4. Select Video TimeLine

      1. Explain how to adjust Video line length

      2. Show how to adjust frame rates ( 24 frames per second) 

        1. Just in case anyone wants to hand draw on top of motion graphic.

      3. Set animation at 30 seconds 

    5. Add Animation Components

    6. Show Edit Tools

      1. Transform -Scale, Rotate, Move

      2. Opacity - Transparency

      3. Style 

      4. Text Wrap- Works along with text layer 

        1. ( T ) To Adjust

    7. Explain How Keyframes work 

      1. Close together = Fast

      2. Far apart = Slow

  1. Show class how I would personally make my animation. 

  2. Have Class brainstorm and create thumbnails

  1. Tuesday: Frame by Frame Animation

    1. Introduced the 12 Principles of Animation 

      1. Squash and Stretch

      2. Anticipation

      3. Staging 

      4. Straight Ahead and Pose to Pose

      5. Overlap and Follow through

      6. Slow in and Slow out

      7. Arcs

      8. Secondary action 

      9. Timing

      10. Exaggeration 

      11. Solid Drawing

      12. Appeal

https://www.creativebloq.com/advice/understand-the-12-principles-of-animation 

  1. How to Set Up Frame by Frame Animation

    1. Create new document

    2. Select Film & Video Tab > Select 1920x 1080

    3. Open Timeline: Window > Timeline

    4. Select Video Timeline

      1. Change frame rate to 24 Frames per second

    5. On first Layer:  Name it (Background)

    6. On background Layer Select the Film Icon > New Video group

      1. This is where to add frames for animation

      2. Make sure to name the layers

(since plugin is not available- Manual Frame set up is required.)

  1. Make new video group > And Layer > adjust layer length (2fps)> Move under BG Layer

    1. Copy: command +c

    2. Paste: command +v

    3. Paste in place: command +shift +v

  1. Things to think about when animating

    1. Onion Skin

      1. At the top right corner of the timeline select ladder icon > Enable onion skins. 

    2. Organization Folder

      1. If the timeline it cluttered- Put video Layer in folder

  1. Wednesday: Troubleshoot Day – No Class

  1. Thursday: Demo on Frequently asked Questions and How to Save animation project

When saving animation:

  1. On the timeline: at the top right corner of the timeline select the ladder icon> Render video

    1. Name project

    2. set destination ( Desktop)

    3. Do not change settings

    4. click render

  1. Friday: Turn In Rough Draft- No Class

TEACHING ARTIST REFLECTION

What problems are anticipated with this lesson?

Will the student be engaged?

Will they attend trouble shooting day for questions?

Will they be intimidated by the assignment?

How does this project fit into overall curriculum planning for the subject areas?

Students will gain familiarity with computer programs and editing tools.

Understand basic animation concepts.

Be able to expand in vocabulary in Media Arts

Create original animations

Be able to participate and grow through critique

How will your students’ work be shared with the community?

It will be shared to the student body and in student group critique

How will you receive feedback on your teaching methodology and quality of student work?

Student Critique Survey, and observation feedback from Aki and John

Photography Composition at Home

Photography Composition at Home

Photography Composition at Home!

Grade Level or Age of Participant: K-5

 School, Teacher and Classroom: Kenwood, Jacquelyn Williams, 2nd Grade

 MCAD Teaching Artist: Cassidy Walker

 Number of Students:  25

VISUAL ARTS CONTENT OR STANDARDS

5.3.2.3.1 : Create visual representations of places or systems that are part of everyday life using artistic foundations.

CURRICULAR LINK / STANDARDS

Language Arts, Writing 2

Communicate knowledge and ideas through a variety of presentation styles (such as verbal, visual, written, or digital) appropriate to task, purpose, audience, and discipline.


OVERVIEW OF PROJECT

Students are presented with foundations of photo composition including camera distance and framing tools. Using these foundations as guides, students are then asked to take photographs around their own homes with a phone or tablet. Students then select five of their images to title with an emotion or feeling.

“BIG IDEAS”/ ESSENTIAL QUESTION(S)

What does it mean to capture or “freeze” a part of your life in a photograph?

STUDENT OUTCOME OBJECTIVES

Students will:

1. Understand the foundations of photo composition including camera distance and framing tools.

2. Apply photographic foundations to their own photographs.

3. Create digital photographs of their surroundings and daily life at home.

PRIOR KNOWLEDGE

Experience taking photographs with a mobile phone or tablet. 

ADDITIONAL RESOURCES

Click! Photo Curriculum (pg. 18-35) from MN Perpich Professional Development Center


ASSESSMENT

Students upload their five images to a file-sharing platform (such as Seesaw or Google Folders) with titles

MATERIALS

Mobile phone or tablet with a camera

 LEARNING ACTIVITIES AND TIMING

1. Introduction by classroom teacher

2. Review teaching artist photos

·       Camera distance (close, mid, wide).

·       Composition (rule of thirds)

3. Demonstrate/My Own Examples around my home

4. Ask students to take ten photos using the following prompts

·       A special space in your home

·       Favorite objects

·       People you live with (if they are willing)

5. Review photos and choose 5 and title with an emotion or feeling.

6. Upload to the shared folders. 

TEACHING ARTIST REFLECTION

A possible issue is the student’s access to a camera, tablet, or cell phone with a camera.

If students are using different technology, viewfinders may look different.

Exploring Drawing: Looking at current practicing Native Artists from the Midwest

Exploring Drawing: Looking at current practicing Native Artists from the Midwest

Exploring Drawing: Looking at current practicing Native Artists from the Midwest

Grade Level or Age of Participant: Age 14 and up

School, Teacher and Classroom: Native Youth Arts Collective of Little Earth Community: Drawing 101

MCAD Teaching Artist:  Josephine Hoffman

Number of Students: 4-8


VISUAL ARTS CONTENT OR STANDARDS

Identifying formal drawing aspects in our own work and work of others


CURRICULAR LINK

Art, art history


OVERVIEW OF PROJECT

A slideshow of a variety Native artists from the upper Midwest region currently practicing drawing and painting techniques in their work. This will be a discussion based presentation with the students that accompanies the class’s ongoing conversation of ‘decolonizing the drawing class’.


“BIG IDEAS”/ ESSENTIAL QUESTION(S)

How does exploring current practicing Native artists from our region ( Upper Midwest) fit into the conversation of decolonization?

How does this conversation fit into the ongoing discussion around decolonization and the context in Fine Arts?


STUDENT OUTCOME OBJECTIVES

Students will:

1. Build identification skills of formal drawing elements

2. Explore content

3. Build conversational skills in a fine arts and/or decolonized fine arts context

4. Deepening group bonding and confidence


PRIOR KNOWLEDGE

By this time, the majority of the students have worked through negative space, sighting and organizational line, line variation, contour (blind and semi-blind), gesture, compositional considerations, perspective


EXAMPLES OF ARTWORK

Drawings and paintings from Andrea Carlson, Star Wallowingbull, Jim Denomie, Dyani Whitehalk, Frank Big Bear and Julie Buffalohead


ADDITIONAL RESOURCES

Forcast/Forward conversation series: Decolonizing Public Art, Part 1

https://www.youtube.com/watch?v=ZOOBiizmYk0&feature=emb_title


Decolonizing Art by Vy Vu

http://www.theinterfaithobserver.org/journal-articles/2019/3/12/decolonizing-art


Decolonial Strategies For The Art History Classroom: A zine for sharing exercises and resources assembled by Amber Hickey and Ana Tuazon

http://arthistoryteachingresources.org/wp-content/uploads/2019/05/Decolonial-Strategies-for-the-Art-History-Classroom-Zine.pdf


ASSESSMENT

Students’ success can be seen through engaged conversation and/or expression in their future drawings and conversations


MATERIALS

Projector/presentation screen


LEARNING ACTIVITIES AND TIMING

1. 6 images, about 3-7 minutes each, discussing about the artists, formal drawing qualities, content

2. 10-20 minutes furthering discussion where participants will describe what they notice, connect with how it makes them feel, consider what it reminds them of and and address the work through their own experience as drawers and painters.


Circle Fold Books

Circle Fold Books

Circle Fold Books

Grade Level or Age of Participant: age 5 - 95 (basically all ages)

Organization: Minnesota Center for Book Arts, “Fold-Along Friday” weekly virtual book arts lesson

MCAD Teaching Artist:  Jamie Kubat

Number of Students: open (video demo, free for everyone)


OVERVIEW OF PROJECT

This project is a pre-recorded video that demonstrates how to make a folded circle book. This is a simple but elegant structure that can be used as a book with content or as a sculptural object. The demo is for MCBA’s Fold-Along Friday lineup, a virtual lesson format provided to their Facebook and Instagram audiences in response to the COVID-19 epidemic.


“BIG IDEAS”/ ESSENTIAL QUESTION(S)

This lesson provides a way for people to engage with MCBA through this time of social isolation. It is designed to support viewers/participants by giving them a thought provoking and enjoyable process to inspire them to create something new. 

Additionally, the project supports an organization that gives so much to the larger arts community through their programming and access to studio space. This lesson fills a gap left by social distancing and our current inability to teach face-to-face. 


STUDENT OUTCOME OBJECTIVES

Students will:

1. Construct a blank book

2. Develop content for the book if they desire

3. Adapt the lesson to their own needs or creative pursuits through experimentation

(The lesson provides a concrete way to accomplish the first step but the other two will be up to the viewer to pursue. Examples and verbal encouragement are provided for taking the content further).


PRIOR KNOWLEDGE

Basic knowledge of how to use a scissors to cut with and pencil to draw with is helpful. The rest of the steps are explained, such as folding paper, gluing, etc.


LESSON PREPARATION TIMELINE

By 4/16: submit lesson plan draft

By 4/19: create exemplars and set up space in my apartment for video. Experiment with video shots and photograph exemplars. Share demo ideas/footage with TA Development group.

By 4/25: Write script. Video draft edit and rework lesson plan. 

By 5/1: Submit video lesson to Shelby and Madeline for upload on Friday 5/15.


EXAMPLES OF ARTWORK

I made several exemplars, which are included in a gallery below.


ADDITIONAL RESOURCES

Link to MCBA’s free Fold-Along workshops here.

The Art of The Fold, by Hedi Kyle and Ulla Warchol. 

Making Handmade Books: 100+ Bindings, Structures & Forms, by Alisa J. Golden. 


ASSESSMENT

I asked people to tag their work on social media so I could see what they make, and I received some feedback through both social media and email responses. 


MATERIALS

Paper, enough for 8 circles in any size (suggested diameter of each circle is 4.5”)

Pencil

Compass or a bowl/other circular object to trace around

Bone folder, popsicle stick, ruler (or thumbnail) for folding

Glue stick, PVA glue, or other type of glue 

Other paper and drawing materials for collage/content/etc. (magazines, handmade paper, old prints, dried flowers, watercolors, etc.).

Optional heavier paper for covers (will provide size recommended for cover based on size of pages, or a way to find that size)

VIDEO DEMO  

LEARNING ACTIVITIES AND TIMING

1. Intro and talk about MCBA a bit and my role at MCBA/in this series of lessons. (2 min)

2. Cutting paper into circles (3 min; cut and fold most circles ahead of time and just demonstrate with one or two during lesson).

3. Folding the paper (4 min)

4. Gluing the pages together and gluing on a cover (8 min)

5. Wrapping up, asking people to support MCBA (Shelby requested, it’ll probably be specific to the version of the video I send them along with any other MCBA related info) 2 min


TEACHING ARTIST REFLECTION

What problems are anticipated with this lesson?

Timing and dealing with the video creation. Performing for a recorded video while home alone proved challenging but ultimately very worth the time and effort. 

How does this project fit into overall curriculum planning for the subject areas?

It goes well with other books that MCBA shares in their youth curricula: simple, easy to adapt for a variety of content purposes, unique, and fun to make

How will your students’ work be shared with the community?

They can share it on social media or with friends/family if they want to! 


The video I recorded for this lesson can also be found here, on MCBA’s Facebook page!

Dual Abstract Self Portraits

Dual Abstract Self Portraits

Dual Abstract Self Reflections

Grade Level or Age of Participant: Adults

School, Teacher, and Classroom: Avivo Artworks with Jes Reyes

MCAD Teaching Artist:  Emily Bigus

Number of Students: N/A

Overview of Project

Take a drawing or painting surface of your choosing and divide it in half using tape. On one half of the surface, paint or draw your outer self or what others see. On the other half of the surface, portray your inner self or what you feel like inside. Focus on portraying yourself with the colors you choose rather than your portrait looking like you physically.

“Big Ideas”/ Essential Question(s)

How can color be used to represent yourself?

How do you represent your inner self differently from your outer self?

Student Outcome Objectives 

Students will:

  1. Visually portray their inner and outer selves using color to represent aspects of how they identify themselves

  2. Compare how they present themselves to others to how they see themselves

  3. Reflect on why they are choosing the colors they do 


Assessment

  • How do the two sections compare? How are they different?

  • What colors make you feel certain ways? 

  • What colors do you feel fit with certain personality traits?


Materials

Drawing/Painting Surface: i.e. Stretched Canvas, Canvas Board, Paper

Acrylic Paint

Water Cup

Palette

Brushes

Artist Tape

Paper Towel

TEACHING ARTIST DEMO

LEARNING ACTIVITES

  1. Introduction to Dual Abstract Self-Reflections

    1. Explain that this involves painting your outer and inner selves

    2. Go over materials

  2. Paint or draw on one half of the surface depicting how you allow others to see you. If using paint, allow to dry and remove the tape. 

  3. Tape the edge of the first half off and on the second half of your surface, paint or draw what you feel like on the inside. Allow to dry and remove the tape.

  4. Reflection

    1. Group Reflection

      1. Use Descriptive review protocol  ( support statements with content form the paintings)

      2. Describe what you see or notice?

      3. How does the work make you feel? Why? 

    2. Personal reflection in sketchbooks

      1. What do you notice about the work?

      2. What is similar

      3. What is different

      4. What is a surprise to you?


Teaching Artist Reflection

  • Problem wise, I am worried people will be thrown off by the word “portrait” and get too caught up in trying to make something that physically looks like them.

Quest of Quizzes: Elements of design Quiz

Quest of Quizzes: Elements of design Quiz

Name of Project: Elements of Design Quest of Quizzes

Grade Level or Age of Participant: 6th grade- 8th grade

School, Teacher and Classroom: Rachel Olmanson, St. Michaels, online class

MCAD Teaching Artist:  Molly Hoghaug


VISUAL ARTS CONTENT OR STANDARDS

5.6.4.8.1, Visual Arts, Respond, Evaluate artistic work by applying Criteria


OVERVIEW OF PROJECT

Students will download the quiz on all the elements of design in visual arts that they have learned in lessons throughout their years at school. The quizz is in the form of a game where students play through the levels and at the end screenshot their score and send it to the teacher.


“BIG IDEAS”/ ESSENTIAL QUESTION(S)

How does a game test ‘knowledge’?

How can testing be ‘fun’?


STUDENT OUTCOME OBJECTIVES

Students will:

1. Use their knowledge about the elements art and design to play a digital game

2. Have fun while taking a quiz and connect to visual art content

3. Use the quiz as a learning opportunity


PRIOR KNOWLEDGE

Knowledge of the elements of design that they have learned In their visual arts programming


ADDITIONAL RESOURCES

https://www.rpgmakerweb.com

The webpage of the program being used to make the quiz 


ASSESSMENT

The assessment will be the final screenshot of their score, this will be sent to the teacher and then the appropriate grade will be given according to the score.

What do I want to know?

MATERIALS

RPG maker program

Computer for students

Host site for game


LEARNING ACTIVITIES AND TIMING

1. Students have directions for the game provided by the instructor

2. Levels include mazes, door choices, and quests for content

3. The length of time needed for the game ranges between 10-30 minutes

4. Scores are revealed to each students as they go and collected by the instructor


TEACHING ARTIST REFLECTION

My concerns are that I will have more trouble explaining it to the teachers than to the students. Such as my mom gave it to her students at a 6th grade level and they got through it fine but I could not show the teachers the ease that the students would have getting through the game. 


The students that it was tested on had a good time, they said it was much more interactive than a pen and paper test. They said they wished it had more video game challenges and was less learning but that’s what would be expected, no kid really wants to do schoolwork. 

En Plein Painting Prep

En Plein Painting Prep

Name of Project: In place En Plein Air Prep

Grade Level or Age of Participant: College

School, Teacher and Classroom: MCTC, Laura Andrews

MCAD Teaching Artist:  Emma Konrad

OVERVIEW OF PROJECT

Students will create an en plein air painting following the instructional demo. Students will combine previous instruction of perspective, color, and observational painting to create the painting while also gaining instruction on surface and material preparation.


“BIG IDEAS”/ ESSENTIAL QUESTION(S)

How can artists interpret space? How can artists recreate a space based off of observation? How can color be used to convey space? 


STUDENT OUTCOME OBJECTIVES

Students will:

1.     Prepare materials and surface for En Plein air landscape painting

2. Make a painting outdoors.

3. Participate in critique of work and reflection on experience.


PRIOR KNOWLEDGE

Students should understand perspective, color, and the use of observation within painting. This will all inform the preparation for en plein air painting.


ASSESSMENT

Are the students able to complete the task from the instructions and the video demo?

What does the prep tell us about the outcomes?

What is the evidence of student learning?


MATERIALS

Acrylic paint

Tape

Pencil

Eraser

Variety of surfaces (cardboard, paper, denim)

Blanket

Backpack

Acrylic Brushes

Sealed Water Container

Paper Towels

Sketchbook/Book


STEP BY STEP PROCESS

  1.      Introduce the idea of an en plein air to students who have have talked about landscapes

  2.     Show the process of surface preparation including a variety of materials that might be used

  3.  Walkthrough material preparation

  4. Discuss appropriate protocols to working outside including materials needed, safety, social distancing, weather checks.

  5. Students prepare materials for painting outdoors

  6. Send students out to paint

  7. Regather online for reflection and critique during next class

Dance Mimesis Project

Dance Mimesis Project

Video Demo Sent out to Students: https://www.tiktok.com/@teachinggrover

Video Demo Sent out to Students: https://www.tiktok.com/@teachinggrover

Dance Mimesis Project

Grade Level or Age of Participant: 12-14

School, Teacher and Classroom: Clara Barton Open School, Allison Rubin

MCAD Teaching Artist: Grover Hogan


VISUAL ARTS CONTENT OR STANDARDS

1.0.2.4.1

1. Dance

2. Create

4. Revise and complete original artistic work.

1. Respond to suggestions for changing movement in a guided improvisation.        

1.1.2.4.1

1. Dance 1

2. Create

4. Revise and complete original artistic work.

1. Apply suggestions to change movement in a guided improvisation.

1.7.3.5.2

1. Dance 7

3. Perform

5. Develop and refine artistic techniques and work for performance.

2. Refine partner and ensemble skills.
For example: Focus, awareness in executing complex patterns, sequences, and formations.


OVERVIEW OF PROJECT

Students replicate a choreographed dance done by the teaching artist. However, each student will do the dance to a different song and will adjust the emotion, tone, and pace of the dance moves to correlate with the song that they chose. Students and teaching artist ideally post a video of their interpretation to the app TikTok, however YouTube, Google Drive, or any other video uploading platform will suffice.


“BIG IDEAS”/ ESSENTIAL QUESTION(S)

1.     How can subtle movements and actions change tone?

2.     How does dance and music influence each other?

3.     What does collaboration look like, especially when that collaboration occurs in nonphysical spaces?

4.     What is artistic license and appropriation?


STUDENT OUTCOME OBJECTIVES

Students will:

1. Communicate tone and voice through dance and understanding of music

2. Consider tempo and affect in dance movements affected by music

3. Build collaboration skills through a virtual space


PRIOR KNOWLEDGE

Students will need prior experience recording video with either computer, phone, etc.  as well as a basic understanding of dance, music, and rhythm.


LESSON PREPARATION TIMELINE

Create Lesson Plan and Storyboard

Record Demo (1 video without music, 2 with different songs for each video, resulting in 3 videos total)

Upload all materials and send in to teacher so that class may view and recreate

Review Assessments


EXAMPLES OF ARTWORK

 1.     https://www.youtube.com/watch?v=yjZfuIME7vc

Keke Janajah, Video, 2020, Savage Dance Tutorial (Savage by Megan Thee Stallion, 2020)

2.     https://www.tiktok.com/@yodelinghaley/video/6774888255801396486

Hayley Sharpe, Video, 2019, Say So Dance Tutorial (Say So by Doja Cat, 2019).

3.     https://www.youtube.com/watch?v=rdff8hycRo8

Jalaiah Harmon. Video, 2020, Renegade Dance Tutorial (Lottery (Renegade) by K CAMP, 2019)


ASSESSMENT

Students will upload their own interpretation of the dance and will be allowed to leave comments on each other’s videos, including the teaching artist’s videos. Comments cannot be deleted by the user but are monitored by the application, and any comment that uses inappropriate language will not be visible. Comments may be reported and will then be removed by the application if shown to be harassment. Positive and constructive comments will be encouraged.  Students may choose to turn their comment section off if they wish.

Teaching Artist will also provide comments on student’s dances and interpretations, as both a way to set an example of how a critique should look like as well as a form of sincere critique within itself.


MATERIALS

Students will need access to an electronic device that will allow for recording and uploading. Ideally, the student would have the application TikTok. Materials will be what the student has at home.

 TEACHING ARTIST DEMO

ADDITIONAL RESOURCES AND INSTRUCTION

Instructions for instructor and students

LEARNING ACTIVITIES AND TIMING

Within a shared Google Document that will go out to the class, both links to exemplar videos as well as written instructions on how to share and critique other’s videos will be provided. The following will be mentioned/ linked to in the document:

1.     Teaching Artist will upload choreography to TikTok without any music, giving a slow and steady step by step instruction (approx. 30- 60 seconds)

2.     In addition, an example of the dance applied to two different songs will also be uploaded (2 30-60-second-long clips)

3.     Teaching Artist will ask students to leave comments and create their own video uploaded with the same hashtag (#CopyCatDanceChallenge)

4.     Students will be asked to leave positive and constructive feedback on each other’s videos


TEACHING ARTIST REFLECTION

1.     Students may not have access to the proper technology; need to find a way to make certain all have access to a cell phone and data

3.     Students may be embarrassed to dance in front of their peers; provide a way for students to submit work to teacher and teaching artist

4.     Students fun of others for what they upload off site; review protocols for feedback, social emotional learning connections

Making a Camera Obscura at Home!

Making a Camera Obscura at Home!

Materials * Duct Tape * Electrical Tape * Scissors * A window * A separate piece of paper or board to put holes in (obscura lens) * A drill (not needed but c...

Camera Obscura 

Teaching Team Members:  Jack Powers  and Avery Nordin

Age or Grade Level: 11th and 12th Grade

VISUAL ARTS CONTENT / STANDARDS

Media Arts 2.9.2.2.1

High School

  1. Create

2. Generate and develop original artistic ideas.    

1. Apply aesthetic criteria in developing, proposing, and refining artistic ideas, plans, prototypes, and production processes for media artworks, considering original inspirations, audience and constraints.

OVERVIEW OF PROJECT

Students will be learning how a camera obscura works and then be turning one of their rooms into a camera.

“BIG IDEAS”/ ESSENTIAL QUESTION(S)

How can we work around lack of resources as a photographer? 

How does a camera work?

Why does an image get cast on a wall in the camera obscura?

Why is the image inverted? 

STUDENT OUTCOME OBJECTIVES

Students will:

1. Make their own camera obscura

2. Learn how cameras work.

3. Judge the accessibility of the process


PRIOR KNOWLEDGE

None needed

EXAMPLES OF ARTWORK

https://www.flickr.com/photos/stealw0rker/6784969629

https://www.flickr.com/photos/number7cloud/26357316558


ADDITIONAL RESOURCES

https://petapixel.com/2014/05/12/diy-tutorial-convert-room-camera-obscura/

ASSESSMENT

Upload an image of your camera obscura.

Fill out some assessment questions.

  • How does time of day affect the image?

  • How did the room you projected into effect the image?

  • Is this something you could use in your art practice? If so how?

  • What were some challenges in trying to do this from home?

SUPPORT DEMO by JACK POWERS AND AVERY NORDIN


MATERIALS

·       Duct Tape

·       Electrical Tape

·       Scissors

·       A window

·       A separate piece of paper or board to put holes in (obscura lens)

·       A drill (not needed but can be used to create clean holes)

·       White sheet or something to project image onto

-A few of the following to be used to black out the window:

·       Black Construction paper

·       Cardboard or black Garbage Bags

·       Anything that will help block out light completely


LEARNING ACTIVITIES AND TIMING

1.     Collect all the materials that you need prior to starting

2.     Find a room with a window you would like to black out.  Think about the time of day when you do this. How might it affect the image?

3.     Start to black out the window, but leave a spot in the middle for the obscura lens. The lens will just be another piece of paper or foam board that you’ll cut holes into for the light to come into the room.

4.     Once window is blacked out makes sure there are no light leaks. The darker the room the easier it will be to see the image.

5.     Cut the obscura lens. Decide how large you want the obscura hole. The smaller the hole the sharper the image, but the harder it will be to see. The larger the hole the brighter the image will be, but will have less detail. A 10 – 15 mm ( .5-.75”) hole in diameter is recommended to start, but experiment to see what other results you can get. If you even want to you could try to cut a whole for a camera lens to fit into. You can also have multiple holes and just cover the ones you don't want to use.

6.     Once everything is blacked out and the holes have been cut, you can now tape the Obscura lens to the window (shown in video). 

7.     Turn off the lights and see the image being projected into your room. Wait 10-15 mins for your eyes to adjust to the darkness before trying to adjust the obscura hole.

8.     If you can’t see an image, try setting up a projection screen (white boards or curtains in my case.) in front of the obscura lens hole.

9.     If you still cannot see an image, try making a larger hole or seeing if your room still has some light leaking in.

10.  Once you have an image being projected in, take a photo of it! You might need to do a long exposure. 

TEACHER REFLECTION

What problems do you anticipated with this lesson?

Is it accessible to all at home?

Will the materials be available at home?

Will students be interested?

Tape may not stick to various surfaces.

Too much light leak

Too little light outside - need a bright day

How does this project fit into overall curriculum planning for the subject areas and the arts?

            Shows how a camera works in a Photography class

How will your students’ work be shared with the community?

            If the students can document the work they can share in online folders in classes or on social media

How will you receive feedback on your teaching methodology and quality of student work?

            Assessment and evaluation form

The Tin Foil Figure: Creating an Animation from Materials at home

The Tin Foil Figure: Creating an Animation from Materials at home

The Tin Foil Figure: Creating an Animation from Materials Found at Home -

Grade Level or Age of Participant: 4th Graders

School, Teacher and Classroom: DaVonte Robertson at Spero Academy

MCAD Teaching Artist:  Shaelynn Waseka

Number of Students: 10

VISUAL ARTS CONTENT OR STANDARDS

5.4.2.3.2

5. Visual Arts

Grade 4

2. Create

3. Create Original Artistic Work

2. Demonstrate awareness of environmental implications of art materials, tools, studio space, and equipment.

OVERVIEW OF PROJECT

This lesson focuses on using objects from home to create an animated form. The lesson helps students step back from reality and let them explore their creativity. They begin with tinfoil that is bunched up to create character or human form. The form can be can be easily manipulated to adjust to various scenerios or for stop motion animation. Documenting the character, either through photography or animation, they will share what they have created.

“BIG IDEAS”/ ESSENTIAL QUESTION(S)

What shapes create a human form?

How do our bodies move?

How do we balance?

STUDENT OUTCOME OBJECTIVES

Students will:

1.     Apply balance and proportions to the figure in a sculpture

2.     Create a human form from tinfoil

3.     Use the form to replicate movement

4.     Document the form in human poses

PRIOR KNOWLEDGE

Following directions on a screen

Safety with Tinfoil (serrated edge on box)

Optional (how to operate a phone, how to download and use an app)


EXAMPLES OF ARTWORK

I will be creating a step by step video of me doing the project. I will include an artist as a quick snippet of information.  


ADDITIONAL RESOURCES

Identify books or weblinks used to prepare the lesson plan and/or student learning materials.

Alan Becker (Animator vs. Animation (original)) Interesting video about stick figures

Gerard Regot Stop Motion Animation Techniques

L.S. Lowry, MatchStick Man Famous for painting stylized figures that were described as Match Stick men

Alberto Giacometti Sculpture famous for disproportioned bodies 


ASSESSMENT

Hopefully I will get feedback from this art lesson. But, theoretically students will be successful with this lesson if they can create a character where they can pose it in different forms. Another bonus would be getting the character to stand alone in a pose. This will show that they understand proportions and balance enough to keep the character standing.


MATERIALS

Part One

Phone, Pad or Computer access ( for video demo and directions)

Tinfoil

Pencil, Pen, Marker etc.

Piece of Paper

Scissors

Part Two

Cell phone

Scissors

TinFoil Man

Coffee Cup


LEARNING ACTIVITIES AND TIMING

Part 1 Making the TinFoil Figure

1. Open video

2. Watch video through and through to understand concept (Around 9-minute video). Feel free to stop the video as you work on the project.

3. Make a list of materials needed and bring them to a work area. (Tin foil, tablet, phone, smart device with camera, scissors, marker)

4. Take a sheet of tinfoil and add lines and labels like shown in the video

5. Label all parts of the tinfoil where head, legs, and arms are supposed to go.

6. Take scissors and cut where the lines are on the form in the video

7. Scrunch up the foil sections to create character; add additional tinfoil as needed for strength or detail

8. You may develop the form for additional foil characters. use it to create different sizes of foil characters

At this point, you may take pictures of your figure(s) in various settings with a camera or cell phone or you may create an animation with your figure. Do so so follow the directions in the video.

Part Two: Animating the Figure

1.     Collect Materials

2.     Create a coffee cup tripod (Cut two notches out of top of a coffee cup)

3.     Watch Tutorial

4.     Experiment with app

5.     Start taking pictures; slightly move the figure for each shot in the app

6. Play back the animation!

7. TA DA!


TEACHING ARTIST REFLECTION

What problems are anticipated with this lesson?

Lack of materials

Potentially could be too easy for some students and too hard for others.

Questions arise and students cannot ask anyone what to do. Parents or sibs may need to assist

Character falls apart


How does this project fit into overall curriculum planning for the subject areas?

This project helps the students understand balance and movement. Helps them understand another art form (Stop-Motion)

How will your students’ work be shared with the community?

Work can be shared with parents, classroom teachers or on social media with student releases

How will you receive feedback on your teaching methodology and quality of student work?

Photos back from the students of the completed projects it will help me understand if my method worked

It Just Takes Heart - Marc Chagall and the Bezhold Effect

It Just Takes Heart - Marc Chagall and the Bezhold Effect

Click here to access the Teaching Pptx created by Sydney Hollingshead

Click here to access the Teaching Pptx created by Sydney Hollingshead

Marc Chagall and the Bezhold Effect 

Teaching Artist: Sydney Hollingshead 

Grade Level: Elementary: 3rd Grade 

VISUAL ARTS CONTENT / STANDARDS 

  • Creating: Generate and conceptualize artistic ideas and work.

  • Organize and develop artistic ideas and work.

  • Synthesize and relate knowledge and personal experiences to make art.

  • Relate artistic ideas and works with societal, cultural, and historical context to deepen understanding.

OVERVIEW OF PROJECT 

Students will discover a new form of art making while also trying to mimic the works of the late artist, Marc Chagall (1887-1985). Students create their own artworks investigating the color used by Chagall in his work on heart shaped paper. In addition, students will attach the hearts to another sheet of paper to write about what they love to further mimic Chagall’s love for his work.

ESSENTIAL QUESTION(S) 

  • How does color choice effect the feeling of a piece of artwork? 

  • Why does a heart mean love?

  • Why do colors appear bright?

STUDENT OUTCOME OBJECTIVES

 Students will: 

   1. Apply color choice from a limited palette to create a design

   2. Adapt to a new technique of steps of artmaking. 

3. Use a variety of tools and materials to create a piece of art that is meaningful to them.


PRIOR KNOWLEDGE Before participating in this project, it is important for students to have a growth mindset. They need to understand that perfection isn’t everything. 

   EXAMPLES OF ARTWORK 

ADDITIONAL RESOURCES 

ASSESSMENT

The questions below are addressed in the Google Form for the lesson:

  • What can a heart mean besides love?

  • Can certain colors evoke a specific mood?

MATERIALS 

1. ) 3 pieces of  Printer Paper  (8 ½ x 11 inch) 

    2.) Scissors

    3.) Washable Markers 

    4.) Black Marker or Sharpie

    5.) Erasers 

    6.) Pencils

    7.) Glue stick

    8.) Ruler (optional)

LEARNING ACTIVITIES AND TIMING 

1.) Introduction to Marc Chagall: View Marc Chagall’s presentation that shows his past stained glass. 

  • Review vocabulary words discussed in the classroom and how it could tie into the activity (collage, composition/ space, contour, line, color, shape, geometric shape)

  • Introduce the project that the students will be working on and how it is similar into the presentation. 

  •  Present Own Example: An example drawn will show students the type of angle they should go when creating their hearts.

2.) Fold the Paper: After the presentation, students should take their computer sheet of paper and fold it the wider way or “hamburger style.” 

  • Make sure to line up the each side of the paper in a straight line to make sure that both sides are the same. 

3.) Draw a Half Heart: After folding their piece of paper, students should draw one half of their heart with a pencil on their folded paper. 

  • This may seem confusing to some students, so be sure to provide a reference image of a heart for students to look at when trying to draw.

4.) Cut Out the Heart: Cut out the half heart by guiding the scissors on the pencil line. 

  • Some students may be familiar with this part of the activity if they have made their own snowflakes in the past.

5.) Unfold the Heart : Once the students finished cutting out the hearts, have them unfold the paper and look at their hearts.

6.) Draw the Stained Glass: Have the students lightly draw the straight lines that are a part of Chagall’s stained glass work onto their paper hearts.

  • If available to them, students can also draw the straight lines on their papers with a ruler.

   7.) Inking: With a black marker, carefully go over the pencil lines. 

  • Before starting this step, be sure to lay another sheet of paper down on the table first just in case if the ink bleeds through the paper heart.

   8.) Erase the Pencil Lines: Erase the pencil lines that are still showing on the paper.

   9.) Coloring: Color the spaces that are left by the black marker with colored markers.

  • Have the students think about color choice while coloring.

  10.) Write a Message: On the back, write a message on the back about something or someone that you    love or appreciate.

11.) Glue the Paper: Glue the written message on the back of the heart with a glue stick.

12.) Take a picture of the heart and message with a cell phone. Put your heart in your window to share with your neighbors.

 TEACHING ARTIST REFLECTION 

 What problems do you anticipate with this lesson? 

  •  Students might feel frustrated when trying to cut out their hearts.

  •  Students may not grasp the importance of sticking to basic shapes with their designs 

and create complex ones instead. 

How does this project fit into overall curriculum planning for the subject areas and the arts? 

  •  Allows students to experiment and incorporate different types of art materials 

into one project. 

  • Shows students that there are multiple ways to make art and to express the meaning behind it.

How will your students’ work be shared with the community? 

  • Students will be able to give their hearts to others or their families to express what they love or as an act of it and be asked to upload them to their teachers art folder. In addition they may put them in the windows of their home.

 How will you receive feedback on your teaching methodology and quality of student work? 

  • Ask if they have learned anything. What did they like and dislike about working with different materials.

  • Through conversation with lead teacher after the project is complete

  • Through a self and video reflection

  • Through assessment by my instructor of the video of the lesson

Comic of our Fears  hosted by Mia

Comic of our Fears hosted by Mia

Comic of our Fears

Grade Level or Age of Participant: First grade and above

School, Teacher and Classroom: Minneapolis Institute of Art, Angela Olsen

MCAD Teaching Artist: Anavi Mullick

OVERVIEW OF PROJECT

This simple drawing project addresses fears and how to approach them with humor. Participants think about their own fears, choose one that is most alive for them, and then pick an animal which they feel best represents their fears. Then keeping in mind the fear and the animal they will draw the animal in a silly situation. For example; the fear of loved ones falling ill, embodied as a porcupine, and then imagining the porcupine juggling balls, and drawing this.

The lesson was designed focusing on the challenges that we are all facing as we live through a pandemic. Participants will be able to share their work through online social media platforms, as well as with members of their families.

A step-by-step document is featured on the Minneapolis Institute of Art (Mia) Website. Link Here.

“BIG IDEAS”/ ESSENTIAL QUESTION(S)

What are we afraid of? How can we learn to visualize something? How can art be reflective and expressive? How to draw from imagination? How can art be accessible to all?


STUDENT OUTCOME OBJECTIVES

Participants will:

1. Explore their own fears with guidance through a process to visualize a fear.

2. Draw from imagination.

3. Experience art as a form of expression.

4. Reflect on the power of the creative process.

PRIOR KNOWLEDGE

Ability to read/follow step-by-step instructions, or have a partner to help guide the participant.

LESSON PREPARATION TIMELINE

-       Brainstorming lesson

-       Step-by-Step planning

-       Reflect on outcomes and next steps

This lesson was conceived by Anavi Mullick from the MCAD Teaching Artist Practicum course and reviewed and workshopped by the Education Department of the Minneapolis Institute of Art prior to being included in their web lessons during the Covid 19 Pandemic


EXAMPLES OF ARTWORK

Samples chosen from the Collection at the Minneapolis Institute of Art.

-       Graham Sutherland, Bird and Mouse, 1968, 24.75 x 19.5 in.

https://collections.artsmia.org/art/54851/bird-and-mouse-graham-sutherland

-       Getsuju, Frog and Mouse, late 18th - early 19th century, 65 × 35 in.

https://collections.artsmia.org/art/117177/frog-and-mouse-getsuju

-       Gerhard Marcks, Cats, 1921, 15 x 20 in.

https://collections.artsmia.org/art/72892/cats-gerhard-marcks

-       Unknown artist, Seated Dog, 386-535.

https://collections.artsmia.org/art/872/seated-dog-china

-       John Randolph Carter, Grinning Dog with Raggedy Ann Doll, Clouds with Ears in Sky, 1979, 13.5 x 17 in.

https://collections.artsmia.org/art/8873/grinning-dog-with-raggedy-ann-doll-clouds-with-ears-in-sky-john-randolph-carter

-       Dudley Huppler, The Bug of Marianne Moore, 1945, 11 x 9 in.

https://collections.artsmia.org/art/128355/the-bug-of-marianne-moore-dudley-huppler

-       Unknown artist, Finial with Animal, late 12th-11th century BCE, 7 x 6 x 2 in.

https://collections.artsmia.org/art/1155/finial-with-animal-china

-       Clement Hurd, Animals, second half 20th century, 10.5 x 27 in.

https://collections.artsmia.org/art/117681/animals-clement-hurd


ADDITIONAL RESOURCES

-       Henri Rousseau’s (Artist) paintings of animals. (https://www.google.com/search?q=henri+rousseau+animal+paintings&hl=en&sxsrf=ALeKk00R9An6fyTyrO9S3pOqd82ipG4TPQ:1586804902830&source=lnms&tbm=isch&sa=X&ved=2ahUKEwjJ7r30jOboAhWRuJ4KHck5CUUQ_AUoAXoECBMQAw&biw=1172&bih=539)


SUPPORT MATERIALS

ASSESSMENT 

-How did you feel at the start of the lesson when you were thinking about what you were afraid of? How did you feel after the lesson?


MATERIALS

1.     A drawing tool

a.     Any one of the following; pencil. Pen, marker, crayon, color-pencil, paint and brush, chalk.

b.     Optional – if you think you would like to color your drawing after, you are welcome to. (crayons, paint, color pencil)

2.     A writing tool - a pencil or pen

3.     Paper/drawing surface - (2)

a.     Anything you have around you. (blank white paper, one sided paper, ruled sheets, an old paper bag, cut open a cereal box and use the inner surface, colored paper, newspaper, your driveway or sidewalk if you are using chalk)

4.     A comfy spot to sit, with a flat surface in reach. Not limited to, but a few options are; a dining table, or on the floor, or with a drawing board/a clipboard, or against a wall.


LEARNING ACTIVITIES AND PROJECT OVERVIEW

PROVIDE AN OVERVIEW OF THE PROJECT, PROCESS AND PURPOSE. See description above.

PREPARE. Gather drawing tool and decide on a drawing surface. Have everything at hand prior to starting. Then get comfortable.

Step 1. Brainstorming. Take a few seconds to observe your body, your breath, your heartbeat. You can close your eyes if you would like. 

Think about where you are, how you have been feeling, what you are afraid of.

 Step 2. Making a list and choosing. If your eyes were closed, you can open them. Pick up your writing tool, and your chosen drawing surface. Make a list of the fears that came to mind.

 When you are done with your list, take a moment to look at your list and identify which fear feels the most alive to you? Choose one that stands out to you.

Is it big and overwhelming? Is it small but sharp? Can you imagine this fear as an animal? What animal represents this fear?

Step 3. Imagining. Once you have chosen an animal that represents your fear, think of the animal doing something silly. Is it juggling balls? Eating fourteen bananas at the same time? Jumping on a trampoline? Be as silly as you can!

Step 4.  Draw it! Draw the animal doing this silly thing! Color it if you would like to. Do not worry about the animal or the activity looking ‘correct’. Just draw and enjoy! No judgement.

Step 5. Think about it….How do you feel now? Is your fear as great? Do you feel differently?

Step 5. Upload image, hashtag and respond. Tag @artsmia if you choose to post it, or #InspiredbyMia #MiaFromHome #MuseumFromHome. We’d love to hear what animal you chose, why you chose it and how you feel now.

Do as many as you like!

TEACHING ARTIST REFLECTION

-       Some participants will need assistance depending on their age in participating.

-       Participants might feel intimidated to think about the fears or drawing.

-       Challenging to consider consider sharing their artwork online

 Assessment from staff, general assessment through social media.

Making an Accordion Journal from Simple Materials with 2 Video Demos

Making an Accordion Journal from Simple Materials with 2 Video Demos

Hand torn Accordion Journal

Teaching Artist: Tanvi Kulkarni

 Age or Grade Level: 6-12 grade  

 Overview of Project

Students make an accordion book with cover and band. The lesson provides simple instruction for creating the book with minimal materials and without scissors.. Students will use the journals for daily reflections. Two short informational videos are available in the lesson as demonstration.


“Big Ideas”/ Essential Question(s)

  • How to be creative by using available material?

  • How to express ourselves through bookmaking?


Student Outcome Objectives

Students will:

  1. Create an accordion fold journal, cover and band to hold it together

  2. Use materials that are available and easy to access in a creative and intentional way

  3. Use the journal to connect their work to current events through writing and visual content


Prior Knowledge

None

Examples of Artwork

 Next to Nothing by Jody Williams https://mcad.edu/faculty/jody-williams

 Spatial Geometries by Karen Wirth http://karenwirth.com/books/books_spatial_geometries.htm


Additional resources

https://www.readbrightly.com/diy-accordion-book/

https://bookriot.com/2017/05/30/how-to-make-a-paper-bag-book-cover/


Assessment

How was the bookmaking process?

Did you learn something new?

What engaged you? What did you enjoy?

Materials

List of ALL material needed with specified amounts, sizes and/or quantities needed.

glue stick

paper , such as printer paper/newspaper/magazine/ discarded artwork

ruler

pencil

Learning Activities and Timing

30 mins: To make 3 types of accordion books.

20 mins: creative own content in the book.

10 mins: Create the cover for the journal.  

Step by Step Process

Video 1 - How to Make and Accordion Fold Book with few Supplies by Tanvi Kulkarni

Introduction and overview of the project

o   Gather materials: A4 size paper, glue, tape, and ruler

o   Cut a piece of paper in half lengthwise make two long rectangles.

o   Fold the rectangle in half widthwise.

o   Fold the top flap in half again by aligning the edge with the middle fold.

o   Flip the paper and do the same on the other side.

o   Do the same thing with another long rectangle

o   To attach the 2 Ws, flip one W to M shaped paper

o   Put glue on the page of W and glue the page of M on it, So it will look like WV.

o   Another way to attach the 2 Ws—>align the edges of W together, and put a tape on them

o   To make a pop out, cut two slits on the fold and push in the opposite direction of the paper

o   Angle the tear to create shapes.

Video 2 - How to Make a Cover and Band for an Accordion Fold Journal by Tanvi Kulkarni

Video 2

o   Material: A4 size paper, pencil, ruler, glue and accordion book

o   Take a piece of paper.

o   Cut the paper to the size of the book.

o   Fold top and bottom edges to the size.

o   Slide the page of the book on the cover.

o   Wrap it around the book.

o   To make a band, take a long strip of paper.

o   Wrap it over the book to size it.

o   Mark the length and glue both ends.

o   Slide the band on the cover.

 Teacher provides writing, drawing and artmaking prompts

Teaching Artist Reflection:

It might be hard to make a book without using Exacto knife and scissors because it is not easy to get sharp edges without cutting tools. I feel there is a thin line between DIY and art. Do not be concerned about the torn edge. It becomes part of the form.

STUDENT WORK GALLERY


Caffenol at Home Black and White Film Developer

Caffenol at Home Black and White Film Developer

Caffenol at Home Developer

Teaching Team Members:  Jack Powers

Age or Grade Level: 11th or 12th Grade

VISUAL ARTS CONTENT / STANDARDS

Media Arts 2.9.2.2.1

High School

1.Create

2.Generate and develop original artistic ideas.    

1. Apply aesthetic criteria in developing, proposing, and refining artistic

ideas, plans, prototypes, and production processes for media artworks,

considering original inspirations, audience and constraints.

OVERVIEW OF PROJECT

Students will be able to make this own developer at home. Most of the materials are available at your local grocery store (if you go out remember to practice social distancing!)  

“BIG IDEAS”/ ESSENTIALQUESTION(S)

How does accident play into art making?

How do materials, technique and accessibility effect the artists ability to work

STUDENT OUTCOME OBJECTIVES

Students will:

1. Make their own developer

2. Develop a roll of film

3. Judge the accessibility of the process 

PRIOR KNOWLEDGE

Basics of film development

EXAMPLES OF ARTWORK

https://www.flickr.com/groups/33051635@N00/pool/


ADDITIONAL RESOURCES

https://www.fieldmag.com/articles/how-to-develop-film-with-coffee-caffenol-guide

https://www.caffenol.org


ASSESSMENT

Upload an image of the developed roll.

Fill out some assessment questions.

 Did the demo represent the process?

Was this accessible to do at home?

How did the process change the outcome?

What were some challenges trying to do this from home?


MATERIALS

1 roll of undeveloped film

Vitamin C power or tablets (pulverized)

Instant coffee

Washing Soda  -  find it in laundry detergent aisle at the grocery store or in big-box stores, in hardware or home improvement stores or online

( addendum: WARNING: make sure to keep washing soda out of the reach of children and pets. You should wear gloves when cleaning with washing soda because it can cause skin irritation. It can be harmful to the eyes, cause irritation to the lungs if inhaled, and may cause abdominal pain or vomiting if large doses are swallowed.”

Washing soda can be made out of baking soda in the oven – have ventilation or open windows and take care in heating it up. https://sciencenotes.org/turn-baking-soda-washing-soda/

Fixer  https://www.ilfordphoto.com/rapid-fixer-product

Liquid dish soap

Glass or pyrex 16 ounce cup

Tsp (teaspoons – not Tbls tablespoon)

Vinyl, plastic or rubber gloves

Film processing tank or any light tight container or photo trays

Clothes pins and a hanger

Paper clips

Mixing containers


LEARNING ACTIVITIES AND TIMING

1.     Make the Washing Soda if needed and cool if it cannot be purchased.

2.     Collect all materials needed for the process from above list in one place where you will work by running water.

3.     Put on protective vinyl or rubber gloves.

4.     In one container mix 12 oz of tap water (room temp), ¾ tsps vitamin C powder (1000mg), 5 tsps instant coffee crystals (cannot be decaf), 3.5 tsps washing soda.

5.     Stir until all powder and crystals dissolve.

6.     Pour into sealed developing tank and agitate slowly for one minute, then agitate 2 time per minute for the following 11 minutes. Pour out Caffenol mix.

7.     Place tank under running water for 1 minute to stop developing process. Have the water as close to room temp as possible. It should not feel hot or cold to your touch.

8.     In another container, mix 2 oz of fixer with 6 oz of water. Pour this mix into tank and agitate slowly 2 times per minute for seven minutes. Save fix and bring to local darkroom (west photo) for disposal.

9.     In another container, mix water with a few drops of dish soap. Add to tank for a minute and agitate for the first 30 seconds. Let it rest for the last 30 seconds. Pour out and open tank.

10.  Pull out your film and hang to dry. You're all done.

11.  Scan film with scanner if possible if not, use your cell phone and take a picture of the negatives against a white screen on your laptop. Also you can scan the film with a DSLR if you have acess to one.  https://www.youtube.com/watch?v=xO-md8tiA6U

12.  Share images with Lauren. 

13.  Take the assessment to reflect on process and provide you and Laruen with Feedback.


TEACHER REFLECTION

What problems do you anticipated with this lesson?

Not everyone might be able to do the project.

Not everyone will have all the materials

Not everyone will want to do the project.

Not everyone will be able to see the results without a scanner or digital camera.

How does this project fit into overall curriculum planning for the subject areas and the arts?

            Is an alternative option to develop a roll yourself, rather than pay to have it done.

How will your students’ work be shared with the community?

            If they can scan the film they can share it however they’d like.

How will you receive feedback on your teaching methodology and quality of student work?

            Have the students will out an evaluation of the instructions and demo.


Experimenting with Yupo Paper for Middle Schoolers

Experimenting with Yupo Paper for Middle Schoolers

Experimenting with Yupo Paper

School/Teacher/Classroom or Arts Organization/Mentor: Elissa Cedarleaf-Dahl at Justice Page School

Grade Level or Age of Participants: 6-7th grade

MCAD Teaching Artist:  Lin Ajdukiewicz

Number of Students: 35-40

Visual Arts Content or Standards

6.1.2.5.1- Demonstrate the characteristics of the tools, materials and techniques of various two-and-three dimensional media for intentional effects in original artworks.

Overview of Project

Students will use Yupo paper to experiment with abstract watercolor techniques. They will observe the differences between synthetic and non-synthetic paper and use those observations to loosen up their techniques on non-synthetic paper. Without much prior knowledge on how to use watercolor, students may feel timid to let go with the medium and using a paper that allows no control over the medium will loosen the students techniques while they work on abstract pieces.  Can you share why this is important?

“Big Ideas”/ Essential QUESTION(s)

  • How can we engage with unexpected results in a positive way and see them as productive and positive?

Student Outcome Objectives

Students will:

  1. Experiment with synthetic paper to create abstract watercolor figures.

  2. Use the experimental and unpredictable techniques that they learned from the synthetic paper to work more loosely and freely on a final watercolor paper design.

Prior Knowledge

Students must know basic watercolor techniques such as, wet on wet, dry on wet, wet on dry and dry brushing techniques.

Examples of Artwork:

Additional Resources

https://paintingdemos.com/painting-with-watercolors-on-yupo-paper-a-few-techniques/

Assessment

The assessment for this project could be a formative assessment where students raise their hand and tell the class one thing that they have learned after using the new type of paper or a portfolio assessment. For the portfolio assessment, students lay out all of their work from the day on their desk and students can speak at their tables about what they made.

It is important for students to see each other’s work since the medium is unpredictable. Seeing others allows the students to figure out what else they can also do with their paper. With the setup of the classroom being in tables, it allows for students to have close access to each other's work.

Materials

  • Yupo Paper (4, 20”x29’’ sheets cut into 5” by 4” rectangles)

  • Watercolors

  • Watercolor Brushes; Flat, sharp, round

  • Water cups

  • Paper to blot brushes

Learning Activities and Timing

  1. I will begin in the front of the class by explaining what Yupo paper is and its qualities. It is key that students understand the difference between synthetic paper and non-synthetic paper. Yupo can be used over and over again, specifically with watercolor, the pigment can be washed off and it will only minorly stain the paper.

  2. The demo video will start and I walk around with my example that I had made in the demo video. Students can feel the paper and see the watercolor techniques that I used.

  3. The video will loop throughout the whole class, with no sound, so that if students need inspiration for techniques they can look up and view the demo video.

  4. Students will retrieve materials and begin to experiment. SInce this lesson is tagged along to another lesson about abstract watercolor creatures, students will attempt to make these creatures on the Yupo paper.

  5. When done with experiments, students will be instructed to move to their watercolor paper final where they will use the skills that they learned from the Yupo paper.